
Search Results for: kidpix

5 Ways to Personalize Wallpaper on 3 Digital Devices
Personalizing a digital device with unique wallpaper is a great way to encourage students to take responsibility for their iPad, Chromebook, laptop, PC, or another digital device. Choose the one best-suited to your digital devices.
- Method One: Use your digital device’s organic method of changing wallpaper. Most devices have 1) a wallpaper collection that’s available to users, and 2) a method of using images from user Pictures folder (or camera roll). Here’s how you access this option in Windows, Chromebooks, and iPads:
Here are examples in a PCs, Chromebooks, and iPads:
[gallery ids="52448,52445,52449"]- Method Two: Create your own wallpaper using school drawing program (such as KidPix, Paint, TuxPaint, Photoshop, or another). Save it to your digital portfolio. Use this personalized drawing under Method One or Four (as available).
Go Paperless for Earth Day
 Earth Day is April 22nd. Someone in your school, maybe the parent group, will raise the question of WHY NOT a paperless classroom? Everyone will nod their heads, agree this is a revolutionary idea, and move on when Earth Day passes.
Really, though: There are benefits to adopting web-based alternatives to paper:
- it’s easy to collaborate when everything’s online
- nothing gets soda dripped on it or eaten by the dog
- students can easily collaborate without requiring parent time and gas fumes
- teachers can answer questions in a timely manner
- teachers can provide feedback on projects that students respond to and resubmit
- student work is easy to copy, backup, and share as needed
To kickstart your paperless digital classroom requires a modicum of preparation. Take a few weekends this summer to set up a class blog and class website and get comfortable with the digital side of your school. This may include:
- Google Apps for Education and/or Google Classroom–this serves as a basic digital portfolio for students, a collaborative tool with classmates, the teacher’s inbox and her tool for returning graded and analyzed student work.
- an LMS like Edmodo, Otus, or MyBigCampus–these often include an interactive gradebook, parent inclusion devices, a student discussion forum, polls, a way to collect and share resources, a class calendar, and access across a variety of digital devices.
- digital portfolios for students–this can be accomplished with whatever LMS you use, Google Apps, Google Classroom, or even Dropbox
Three pieces that you especially want to look for:

A Conversation about Keyboarding, Methods, Pedagogy, and More

Dr. Bill Morgan and I have engaged in several months of spirited conversation about keyboarding, pre-keyboarding, and how it can best serve students. Bill is the brilliant creator of the PreKeys Pond and giant keyboards for classrooms. His experience teaching keyboarding often informs me in my art as I adapt to the ever-changing needs of the students in my classes. I’ve hosted Bill before on Ask a Tech Teacher (see this article on Preparing Young Students for Home Row Keyboarding: An Unplugged Approach). Today, I’m going to share random thoughts from a collection of our emails. Bill’s thoughts are in italics and mine in red and parentheses:
I have questions for the creators of Ratatype.com. They seem to be British since they use the term centimeters to refer to how close the keyboard and screen ought to be to the student. Of course, most of the world outside of the USA refers to centimeters instead of inches! I also want to thank Ratatype for clocking me at 97 wpm on the pretest. (🙂)
When typing, imagine the location of the symbol on the keyboard.
(I like that too. I need to incorporate more visual learning into my keyboard instruction).

3 Lesson Plans to Teach Architecture in First Grade
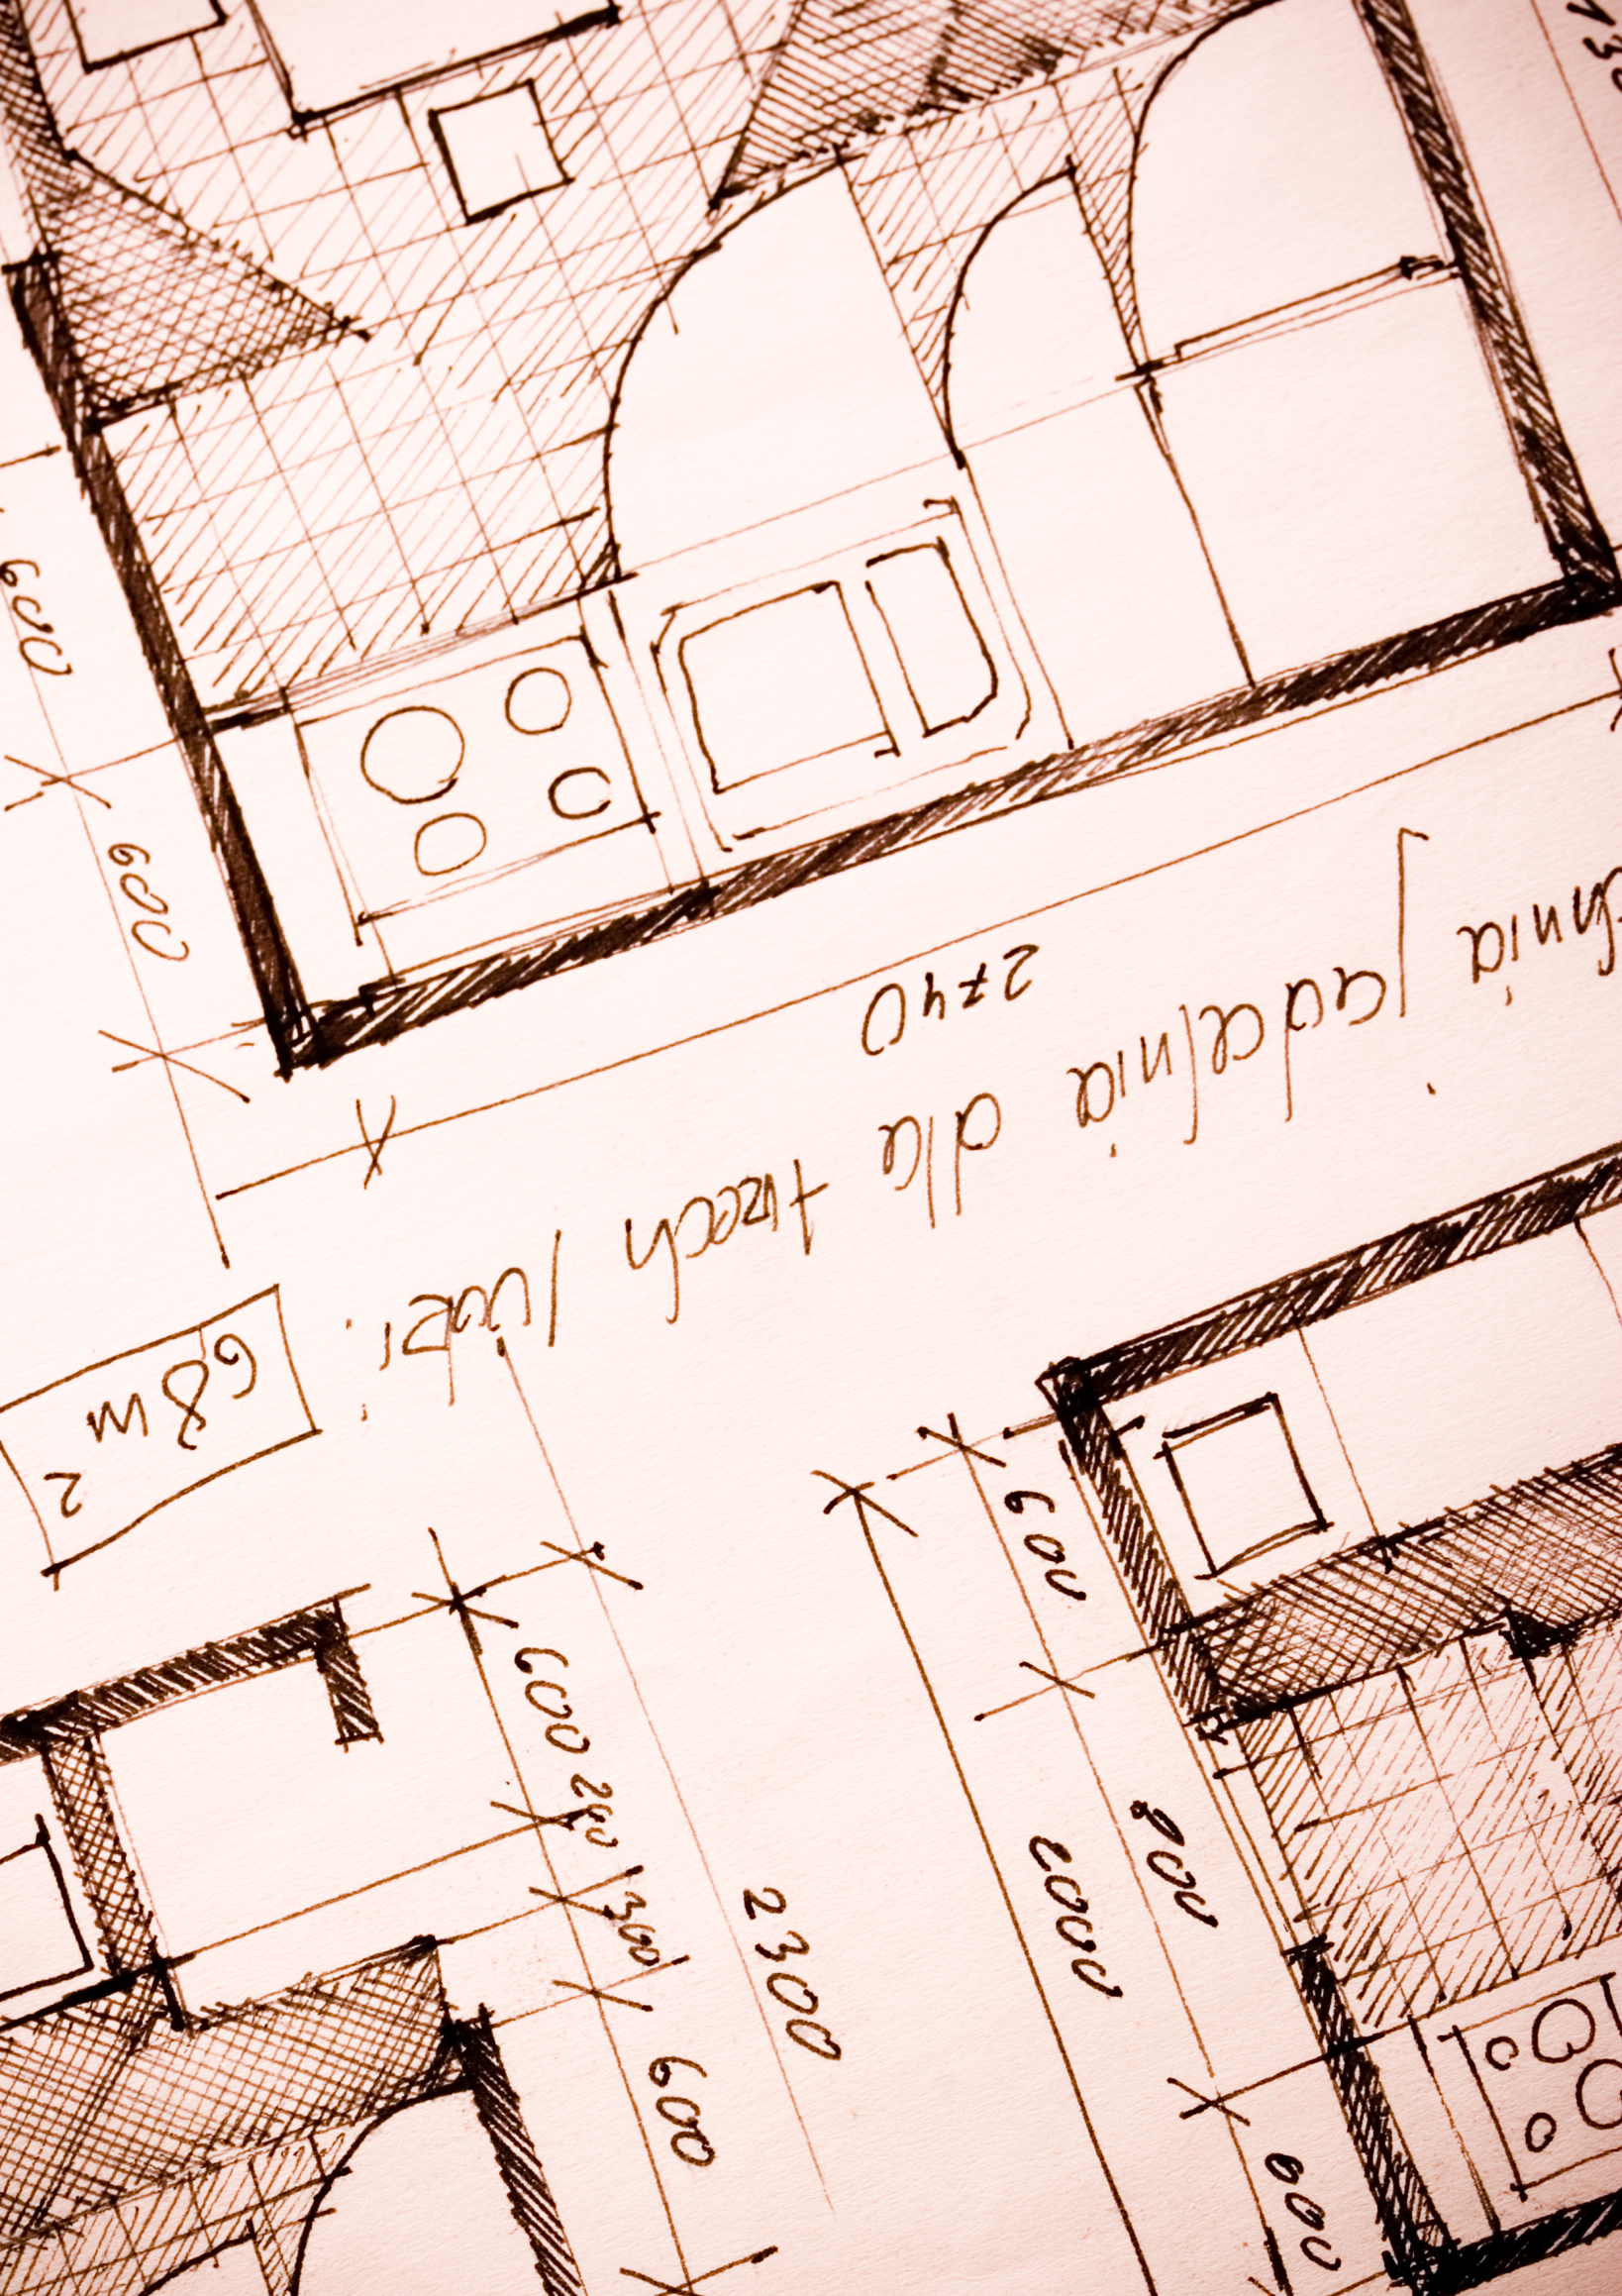 Here’s a great lesson plan with three activities well-suited to the discussion of architecture and design in 1st grade:
Review
Students complete three projects in two weeks to aid understanding of architecture, design, and three-dimensional thinking. They’ll experiment with spatially laying out a three-dimensional structure on a two-dimensional paper. When completed, they’ll discuss with neighbors while practicing good listening skills learned in class.
Start with a discussion of design. This includes size, shape, texture, proportion, scale, mass and color. We will apply these to rooms, buildings, and neighborhoods. Encourage students to think and analyze critically as they engage in learning.
In figures below, ask students which are two- or three-dimensions? How do they know?
[gallery ids="50170,50171,50172,50173,50164"]Design the Classroom
Visit Classroom Architect and demo how to design the classroom with drag-and-drop pieces (see figures below). Take suggestions from class on layout. Students must think about where tables and storage are relative to other items. This is an active learning lesson that encourages visual thinking. Develop a sample based on class input and show how to make corrections if necessary.

How to go Paperless in Your Classroom
Every Earth Day, someone in your school, maybe the parent group, raises the question of WHY NOT a paperless classroom? Everyone nods their heads, agrees this is a revolutionary idea, and moves on as Earth Day passes.
Really, though: Why not? There are benefits to adopting web-based alternatives to paper:
- it’s easy to collaborate when everything’s online
- nothing gets soda dripped on it or eaten by the dog
- students can collaborate without requiring parent time and gas fumes
- teachers can answer questions in a timely manner
- teachers can provide feedback on projects that students respond to and resubmit
- student work is simple to copy, back up, and share as needed
To kickstart your paperless digital classroom requires a modicum of preparation. Take a few weekends this summer to set up a class blog and class website and get comfortable with the digital side of your school. This may include:
- Google Apps for Education and/or Google Classroom–this serves as a basic digital portfolio for students, a collaborative tool with classmates, the teacher’s inbox, and her tool for returning graded and analyzed student work.
- an LMS like Edmodo, Otus, or MyBigCampus–these often include an interactive gradebook, parent inclusion devices, a student discussion forum, polls, a way to collect and share resources, a class calendar, and access across a variety of digital devices.
- digital portfolios for students–this can be accomplished with the LMS you use, Google Apps, Google Classroom, or even Dropbox
Four school-based pieces you’ll need:

Faceoff: What Digital Device Should My School Buy?
 In the not so distant past, two types of computers battled for supremacy in the classroom: Macs or PCs. Both were desktops and both did the same things, but in hugely different ways.
Today, whether it’s a Mac or a PC, a desktop is only one of the digital devices available in the education toolkit. First laptops eased their way into schools, pricey but popular for their portability and collaborative qualities. Then came iPads with their focus on the visual, ease of use, and engagement of users. The most recent entrant into the education digital device market is Chromebooks–able to do ‘most’ of what ‘most’ students need–at a precipitously lower price.
That means educators now have four options (desktops, laptops, iPads, Chromebooks) as they select tools to unpack education. The challenge is to understand the differences between these options and select based on personal criteria. That includes classroom needs, infrastructure, maintenance, and–yes–money. What gives the most value for the least investment?

Chromebooks in the Classrooms–Friend or Foe?
 AATT contributor, Krista Albrecht, has a balanced evaluation of Chromebooks in the classroom I think you’ll find useful. Krista is a NY State certified Instructional Technology Specialist working in public education on Long Island, NY. She has over 15 years experience in the field ranging from classroom teacher to tech teacher, to Professional Developer, to 1:1 integration specialist.
Chromebooks in the Classrooms… Friend or Foe?
Chromebooks…those little computers that everyone is talking about. Everywhere you look in education people are talking about Chromebooks, Google Apps for Education, Chrome Apps, etc. So what’s the big deal with these things? Are they really useful in the classroom to help your students achieve greater understanding? In my opinion, yes, but like any other piece of technology they do have their own list of pros and cons. So here’s one Instructional Technology Specialist’s (this girl, right here) attempt at laying out what I see to be the pros and cons of Chromebooks in the classroom. Hopefully, after reading this article, you will have a better idea of how these devices fit in your educational setting.
What is this Chromebook you speak of?

5 Favorite Classroom Apps
 Apps are out of control. When you think you have just the right one for your classroom, a better/faster/snazzier version pops up. Often for free. It’s not like a decade ago when every teachers’ favorite tech tools were MS Office, KidPix, Reader Rabbit, and the internet. Apps changed all that. Suddenly, the list exploded to include names like Voki, Tellagami, Wordle, ScreenChomp, Evernote and scores more that are weekly pushed aside by a new generation.
So before I unfold my favorites, here are guidelines to what I expected, culled from top education sites like Edutopia, Google Education, Educational Technology, and EdWeek:
- free or small fee
- support the ‘4 C’s’–creativity, critical thinking, communication, collaboration
- offer compelling content (although this is subjective; ‘compelling’ varies teacher-to-teacher and student-to-student)
- are not distracting or overwhelming in colors, music, or activity
- offer levels that become increasingly more difficult, providing differentiation for student needs
- stand the test of time
- positive parent reports
- few ads–and those that are there do not take up a significant portion of the screen
- intuitive to use with a short learning curve, encourage independence
- easily applied to a variety of educational environments
- doesn’t collect personal information other than user credentials or data required to operate the app
- rated ‘for everyone’ or ‘low maturity’
- no in-app purchases or billing
Based on these criteria, here are my top five:

Lesson Plans: Where Did I Come From?
Students find their country of origin on Google Earth and grab a screen shot of it. Save to their computer. Import it into a drawing program like KidPix and add the country flag and student name. Students learn about importing data from one program to another with this project.
[caption id="attachment_5431" align="aligncenter" width="564"] Use Google Earth in Second Grade[/caption]

What to do When Computers Are Down
 All tech teachers have experienced a day when the computers don’t work. You jiggle the mouse and nothing. You reboot and the screens remain dark. You know how to tap dance when the internet won’t connect (use software instead) or a particular program refuses to load (go to your Symbaloo page of alternatives).
Discuss digital citizenship
This is a topic that needs to be discussed every year, repetitively. When I teach digital citizenship, it always includes lots of back-and-forth conversation and surprised faces. Students have no idea that the right to use online resources includes responsibilities. In getting that point across, I end up answering endless questions, many that revolve around, ‘But no one knows who I am’, ‘But how can I be caught‘.
Use tech downtime to delve into this topic. Gather in a circle and talk about concepts like ‘digital footprint’, ‘plagiarism’, and ‘digital privacy’. Common Sense has a great poster (see image below) that covers these through a discussion on when to put photos online. You can print it out or display it on the Smartscreen. Take your time. Solicit lots of input from students–like their experiences with online cyberbullies and Instagram, and what happens with their online-enabled Wii platforms. It can be their personal experience or siblings.
A note: The poster says it’s for middle and high school, but I use it with students as young as third grade by scaffolding and backfilling the discussion:


