Category: Tech tips
169 Tech Tip #4 My Webpage Froze
![]() In these 169 tech-centric situations, you get an overview of pedagogy—the tech topics most important to your teaching—as well as practical strategies to address most classroom tech situations, how to scaffold these to learning, and where they provide the subtext to daily tech-infused education.
In these 169 tech-centric situations, you get an overview of pedagogy—the tech topics most important to your teaching—as well as practical strategies to address most classroom tech situations, how to scaffold these to learning, and where they provide the subtext to daily tech-infused education.
Today’s tip: My Webpage Froze
Category: Internet
Sub-category: Keyboarding
Q: My webpage is stuck. It won’t update and I can’t move around it to links or even scroll. What do I do?
A: Refresh the page with F5. If that doesn’t work, you might have to “force refresh” with Ctrl+F5. That will send the browser to re-check with the web server for the latest copy of the web page you are viewing. If you are using a Mac, push Apple + R or Cmd + R.
Sign up for a new tip each week or buy the entire 169 Real-world Ways to Put Tech into Your Classroom.
169 Tech Tip #71 How to Move Pics Around in Docs
![]() In these 169 tech-centric situations, you get an overview of pedagogy—the tech topics most important to your teaching—as well as practical strategies to address most classroom tech situations, how to scaffold these to learning, and where they provide the subtext to daily tech-infused education.
In these 169 tech-centric situations, you get an overview of pedagogy—the tech topics most important to your teaching—as well as practical strategies to address most classroom tech situations, how to scaffold these to learning, and where they provide the subtext to daily tech-infused education.
Today’s tip: How to Move Pics Around in Docs
Category: Images
Sub-category: MS Office, Google Apps
Q: I added an image to my Word document, but I can’t move it around the page. How do I fix that?
A: Word’s default for inserting a picture on a page is ‘inline’–it treats it as text. Like words on a document, it can’t be easily moved. Here’s how to fix that:
- Click on the picture; select ‘Picture Tools’ at the top center of the screen.
- Select ‘wrap text’ from the ribbon.
- Select ‘tight’ to have words wrap around it.
Now drag and drop it anywhere you’d like.
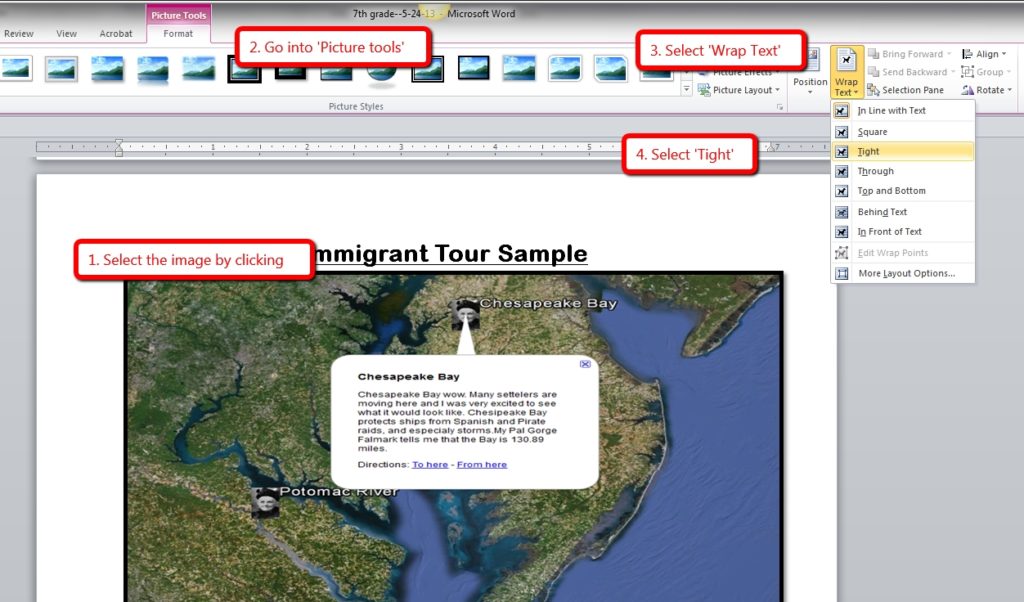
For detail, and how to do this in Google Apps, visit Tech Tip #12.
Sign up for a new tip each week or buy the entire 169 Real-world Ways to Put Tech into Your Classroom.
169 Tech Tip #49 The 15-second Slideshow
![]() In these 169 tech-centric situations, you get an overview of practical strategies to address most classroom tech situations, how to scaffold these to learning, and where they provide the subtext to daily tech-infused education.
In these 169 tech-centric situations, you get an overview of practical strategies to address most classroom tech situations, how to scaffold these to learning, and where they provide the subtext to daily tech-infused education.
Today’s tip: #49–The 15-second Slideshow
Category: Images
Sub-category: PCs, Macs, Chromebooks, iPads
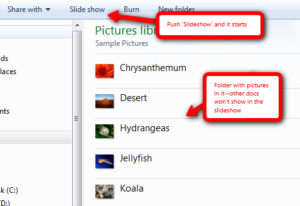
Q: What’s an easy way Kindergartners and first graders can share a slideshow of their work?
A: If you have PCs:
- Go to the Start button; select Computer in the right column.
- Select the folder with the pictures you want displayed as a slideshow.
- Select Slideshow from the toolbar; push play at the bottom.
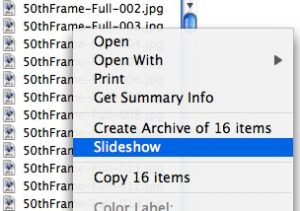
Here’s how you do it in Macs:
For Chromebooks:
- select Files
- select the folder that includes student images
- select the image
- click Openat the bottom of the screen
- hover over the bottom right toolbar and select the video icon for slideshow

What to do when you lose a digital document
 With classwork and homework now heavily digital, the days of “the dog ate my homework” are gone. It’s simple to track, isn’t it? It’s right on the student’s LMS account or in their digital portfolio, somewhere in the cloud.
Maybe. But the latest excuses are even more frightening — “Someone stole it from my digital file” or “The cloud ate it”. Every adult I know (myself included) has lost a critical, time-sucking digital file. It was saved wrong or got corrupted or simply vanished. The reason doesn’t matter. All that matters is that a week’s worth of work is now forever-gone.
Saving work correctly on a digital device isn’t as easy as it sounds. There’s a learning curve to knowing where to save, how to do that correctly, and then ultimately how to retrieve it. It can be especially complicated for students who use a different digital device at home than the one they use at school. Sure, it’s pretty easy if saved to a school-centric cloud account (like Google or One Drive) but that’s not always the case. If students use an online webtool, their work could be saved in that webtool’s server or as a link rather than a file.
Most kids learn how to properly save/retrieve digital files by suffering a painful experience. Before that happens, teach them this first place to look when save fails and they must search for it:
- Go to the digital device’s general Search field. This will find the file if it’s on that digital device or any drive connected to it.
- Search for the exact name or whatever part of the name is known. If you’ve taught students to always include their last name in a filename, they will now thank you!
- If they don’t know the file name but do know the file extension (maybe it was created in Google Docs or Excel), search for that using the general search term: *.[extension]. In this case, * is a general search term and replaces the file name. If they don’t even have that much information, look down this page under “When did you create the file?” for help.
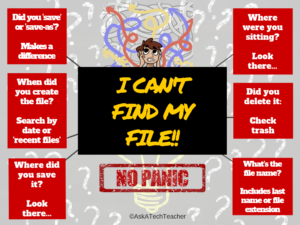
I start students saving their own files and understanding what that means as soon as they create work on a digital device they want to be able to find at a later date. I start very (very) simply and scaffold year to year. When they can’t find a project, here are six questions they can ask themselves:
A note before starting: Don’t answer these for students. Let them experience the thrill of critically thinking through how to solve this problem successfully.
Where did you save it?
Most programs have a default location where files are saved. This may be preset by the school (or parents) or it may be the system default. Where is that? If the student doesn’t know, this is a good time to have them ask that question.
169 Tech Tip #12 Wrap Text Around a Picture
![]() In these 169 tech-centric situations, you get an overview of pedagogy—the tech topics most important to your teaching—as well as practical strategies to address most classroom tech situations, how to scaffold these to learning, and where they provide the subtext to daily tech-infused education.
In these 169 tech-centric situations, you get an overview of pedagogy—the tech topics most important to your teaching—as well as practical strategies to address most classroom tech situations, how to scaffold these to learning, and where they provide the subtext to daily tech-infused education.
Today’s tip: #12–Wrap Text around a Picture
Category: Images
Sub-category: MS Office, Google Apps
Q: I want my text to wrap around the picture I inserted, but it goes under/above it. There’s a big white space I can’t type in. What do I do?
A: I get this from students a lot. Here’s what you do in MS Word:
- select the image
- select the ‘Pictures’ tab at the top of the screen
- select ‘wrap text’ from the ribbon
- select ‘tight’ from drop down menu
Text now flows around the picture

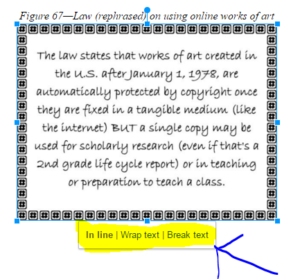
In Google Apps, click the image and select ‘wrap text’ from the three options:
Sign up for a new tip each week or buy the entire 169 Real-world Ways to Put Tech into Your Classroom.
169 Tech Tip #7 Transparent Backgrounds
![]() In these 169 tech-centric situations, you get an overview of pedagogy—the tech topics most important to your teaching—as well as practical strategies to address most classroom tech situations, how to scaffold these to learning, and where they provide the subtext to daily tech-infused education.
In these 169 tech-centric situations, you get an overview of pedagogy—the tech topics most important to your teaching—as well as practical strategies to address most classroom tech situations, how to scaffold these to learning, and where they provide the subtext to daily tech-infused education.
Today’s tip: #7–Transparent Backgrounds
Category: Images
Sub-category: Keyboarding
Q: When I insert a picture, the background isn’t transparent, so it covers everything behind it. How do I make it see-through?
A: Two ways to fix that problem:
- Select the picture; use the picture toolbar pen.
- If that doesn’t work, select the picture and then press Ctrl +T.
These don’t work in all cases. It depends upon the image file you’re using. I hope it covers your case.
Sign up for a new tip each week or buy the entire 169 Real-world Ways to Put Tech into Your Classroom.
Solve 50% of Tech Problems with 16 Simple Solutions
 The Number One reason–according to students–why their computer doesn’t work is… It’s broken. As a teacher, I hear this daily, often followed by the solution, I need a different computer. My students innately think computer problems are something they can’t solve. I asked them what happened in class when I wasn’t there to fix the problem, or at home. I usually got a shrug and one of these responses:
- My classroom teacher can’t fix them.
- My mom/dad can’t fix them.
- The school tech people couldn’t get there fast enough.
Which got me thinking about how these problems that bring learning to a screeching halt really aren’t that complicated They don’t require a Ph.D in engineering or years of experience in IT. So why not teach kids how to troubleshoot their own problems?
I started with a list. Every time a student had a tech problem, I wrote it down and then ticked it off each time it happened. It didn’t take long to determine that there are about sixteen problems that happen often and repetitively. Once students learned how to solve these, they’d be able to fix half of the problems that bring their education to a screeching halt. I spent the school year teaching the solutions authentically as they arose starting in Kindergarten. By the end of 2nd grade, students felt empowered, By the end of 5th grade, they rarely asked for help.
Here’s my list but yours may be different. Include those that arise granularly in your school’s educational endeavor. For example, if you use Macs, right-click issues won’t be as big a deal.
10 Top Tips and Click-throughs in 2018
 Because AATT is a resource blog, we share lots of tips our group comes across in their daily teaching as well as materials shared by others we think you’d like. Some you agree with; others, not so much. Here’s a run-down on what you thought were the most valuable in 2018:
Top 10 Tech Tips
As a working technology teacher, I get hundreds of questions from parents about their home computers, how to do stuff, how to solve problems which I share with you. Here are the Top Ten tech tips from 2018. Between these ten, they had over 174,000 visitors during the year.
- 10 Tech Tools for Your Math Class
- How to Teach Digital Citizenship in 1st Grade
- 169 Tech Tip #146: 18 Ideas for Warm-ups, Exit Tickets
- How to Teach Mouse Skills to Pre-Keyboarders
- Is Orton-Gillingham Right For Your Students?
- Use the SAMR Model to Spearhead Technology in Your Classroom
- 5 Ways Teachers Can Stay on Top of Technology
- Image Copyright Do’s and Don’ts
- What to do When Computers Are Down
- 9 Mistakes Teachers Make Using Tech in the Classroom
End-of-year Maintenance: Image and Back-up Digital Devices

This week, I’m sharing three holiday activities that will get your computers, technology, and social media ready for the new year. Here’s what you’ll get:
Today: Image and Backup Your Digital Devices
Two critical maintenance tasks that lots of people skip are:
- image your computer
- back up your documents
Image your computer
Every computer must be reformatted eventually. Every time you download from a website or open an email attachment or update one of your online tools, you collect digital dust and grunge that affects the speed and efficiency of your computer. Performing the cleanup items suggested in 19 Ways to Speed Up Your Computer helps, but eventually not enough. The only way to return your computer to its original zippy youthful self is by reformatting.
End-of-Year Maintenance: 19 Steps To A Speedier Computer
This week, I’m sharing three holiday activities that will get your computers, technology, and social media ready for the new year. Here’s what you’ll get:
-
A note: The above links won’t work until the articles publish!
Today: 19 Steps to a Speedier Computer
There are two ‘speed’ problems that arise when using computers:
- the computer itself is slow, for lots of reasons
- you are slow–meaning: You have too much to do. We’ll deal with this later…
Here’s what you need to do: