Category: Keyboarding
4 Collaborative Projects Students Will Love
Collaboration is the new rigor in the classroom. Who hasn’t been mesmerized by children gathered at a table engaged in a high-level discussion, making shared decisions, and demonstrating deep, scaffolded learning? When students share organic ideas and peer review projects, they build authentic knowledge that everyone takes ownership in, but the saying is easier than the doing. You can’t just break students into groups and expect a collaborative workflow. It takes practice. The rudimentary teamwork availed by Google Docs and online tools like Subtext is a great start, but what’s better is projects that inspire, motivate, and teach students skills for speaking and listening.
Here are three activities I use in my classroom to achieve this goal:
 Three Then Me
Every activity in your classroom includes how-to questions. Before answering, have students ask three classmates before asking you. For example, if they can’t find the tech tool they want, check with three neighbors before putting their hand. Kids love helping each other and spotlighting their talent. Not only does ‘Three then me’ get the student’s question answered faster, it engenders a sense of cooperation and collaboration in the class, that students are resources to each other.
A note of caution: This works best with self-correcting facts, like how to do something, but if it’s a definition or the spelling of a word, students could get the wrong answer and not know it. As you’re training students in ‘three then me’, remind them to evaluate answers, critically think about them before implementing, and trust their own judgment. Does it sound right? Does it fit what else they know about the question? If it does, go for it!
Educational Activities
Share this:
- Click to share on Facebook (Opens in new window) Facebook
- Click to share on X (Opens in new window) X
- Click to share on LinkedIn (Opens in new window) LinkedIn
- Click to share on Pinterest (Opens in new window) Pinterest
- Click to share on Telegram (Opens in new window) Telegram
- Click to email a link to a friend (Opens in new window) Email
- More
Hour of Code–Program with Alt Codes
As a working technology teacher, I get hundreds of questions from parents about their home computers, how to do stuff, how to solve problems. Each Tuesday, I’ll share one of those with you. They’re always brief and always focused. Enjoy!
A hidden coding secret on every computer is the ‘Alt codes’. Those are the symbols you invoke by typing Alt+[a number] on most digital devices. The suggestions below are for PCs, but there are similar lists for Macs and Chromebooks.
Alt+0191 = ¿
Alt+0128 = €
Alt+0169 = ©
Tip: Press the ALT key. While it is pressed, put in the numbers from your NUMBER PAD. It doesn’t work using the numbers at the top of the keyboard). Make sure the NUM LOCK is ON.
Share this:
- Click to share on Facebook (Opens in new window) Facebook
- Click to share on X (Opens in new window) X
- Click to share on LinkedIn (Opens in new window) LinkedIn
- Click to share on Pinterest (Opens in new window) Pinterest
- Click to share on Telegram (Opens in new window) Telegram
- Click to email a link to a friend (Opens in new window) Email
- More
5 Best Typing Tutors for Everyone
 Keyboarding is always a concern with educators, and one of the most questions is–how do you teach it? Adam Fort, an education strategist at Ratatype, has five ideas:
Typing tutors are aids that enable users to increase their own typing speed, skills and touch typing techniques. There are different types of typing tutors including online typing tutors, typing tutor programs and typing tutor software. These can help you to improve typing as well as other aspects of life like salary increases, job satisfaction, improved posture and many other things which will come as a result of mastering the art of typing. Here is a list of 5 best typing tutors for everyone.
There are a number of free typing tutors on the web which are most useful when it comes to typing lessons, typing practice and typing tests. Most of these sites are free online sites which are useful to both learners and teachers. Among the most notable typing sites include TypingWeb and Ratatype.
TypingWeb Online Typing Tutor
TypingWeb is a renowned free typing tutor on the web that consists of a teacher’s portal which acts as a classroom aid for teaching the appropriate touch typing skills. It is a free typing platform although ads are enabled but can always be removed when the need arises and this does not cost a lot of money.
Share this:
- Click to share on Facebook (Opens in new window) Facebook
- Click to share on X (Opens in new window) X
- Click to share on LinkedIn (Opens in new window) LinkedIn
- Click to share on Pinterest (Opens in new window) Pinterest
- Click to share on Telegram (Opens in new window) Telegram
- Click to email a link to a friend (Opens in new window) Email
- More
Dear Otto: How do I Teach Keyboarding in My Limited Class Time?
 Here’s Melanie’s question about teaching keyboarding effectively:
My problem is that I only see each group of students (PK – 4th grade) once a week for 30min. I see 1st and 2nd grade two times a week. How do I successfully teach keyboarding AND my regular tech curriculum with next to no time to do both? I’ve thought about doing keyboarding for the first half of the year and then my curriculum the next half.. but I’m just not sure.
I often get a version of this question–how can students learn to keyboard when there’s so little time allotted to teaching it? Surprisingly, it’s not as difficult as it sounds when you use a scaffolded approach. Start with pre-keyboarding in Kindergarten and first grade, move to good keyboarding habits that encourage speed and accuracy, and then blend it all into grade-level inquiry.
Here’s my answer:
PK, K, 1 are all about pre-keyboarding skills. Students need to understand the purpose of a keyboard, the mouse, tools and toolbars, basic digital citizenship safety, rudimentary problem solving. That can be done within the timeframe you’ve indicated. In fact, I lay it out in the K-1 curriculum that I publish. It’s easier than it sounds: Know what grade-level inquiry you can support and weave the tech skills into those.
Share this:
- Click to share on Facebook (Opens in new window) Facebook
- Click to share on X (Opens in new window) X
- Click to share on LinkedIn (Opens in new window) LinkedIn
- Click to share on Pinterest (Opens in new window) Pinterest
- Click to share on Telegram (Opens in new window) Telegram
- Click to email a link to a friend (Opens in new window) Email
- More
Keyboarding Success Requires More than Drills
Drills have backstopped keyboarding since I was in high school. I still remember
rtyu
fghj
vbnm
Over and over I typed those until my fingers could find the keys with no help from my brain. It worked for thousands of us.
So why don’t drills work for the new generation of typists. There are a few reasons:
- Kids are learning keyboarding at a younger age. Where I started training in high school, now I teach pre-keyboarding to students as young as kindergarten. Drills simply aren’t the right approach for those younger brains.
- Drills must be repeated over and over ad nauseum to work. Few schools have time to commit to that rigor and even fewer kids will voluntarily take time at home. As a result, the repetitive part of drill is no longer exercised.
As a result, it didn’t surprise me when I got this letter from one of my readers:
I teach K-6 computers. I teach keyboarding in all grade levels, 3/4 specifically. However, I see this as a giant hurdle. When I teach keyboarding skills–home row, posture, finger placement and use of our online software–the kids get it! They really get it. I walk around the lab and they are using the software, the fingering is good. WPM are great, errors are down. But when I test them in Word processing, their fingering is terrible. Their errors go up and their fingering resorts back to hunt and peck. What gives? Every child, every grade level, every day of the year. Someone please tell me I am not the only one.
Share this:
- Click to share on Facebook (Opens in new window) Facebook
- Click to share on X (Opens in new window) X
- Click to share on LinkedIn (Opens in new window) LinkedIn
- Click to share on Pinterest (Opens in new window) Pinterest
- Click to share on Telegram (Opens in new window) Telegram
- Click to email a link to a friend (Opens in new window) Email
- More
6 Tech Best Practices for New Teachers
A study released last year by the National Council on Teacher Quality found that nearly half of the nation’s teacher training programs failed to insure that their candidates were STEM-capable. That means new teachers must learn how to teach science, technology, engineering and math on-the-job. Knowing that, there are six Best Practices teachers in the trenches suggest for integrating technology into classroom instruction:
 Digital Citizenship
Many schools now provide digital devices for students, often a Chromebook or an iPad. Both are great devices, but represent a sea change from the Macs and PCs that have traditionally been the device-of-choice in education. While I could spend this entire article on that topic, one seminal difference stands out: Where PCs and Macs could be used as a closed system via software, materials saved to the local drive, and native tools, Chromebooks and iPads access the internet for everything (with a few exceptions) be it learning, publishing, sharing, collaborating, or grading. There’s no longer an option to hide students from the online world, what is considered by many parents a dangerous place their children should avoid. In cyberspace, students are confronted often–if not daily–with questions regarding cyberbullying, digital privacy, digital footprints, plagiarism, and more.
The question is: Who’s teaching students how to thrive in this brave new world? Before you move on to the next paragraph, think about that in your circumstance. Can you point to the person responsible for turning your students into good digital citizens? When third grade students use the internet to research a topic, do they know how to do that safely and legally?
When asked, most educators shrug and point at someone else. But it turns out too often, no one is tasked with providing that knowledge.
Share this:
- Click to share on Facebook (Opens in new window) Facebook
- Click to share on X (Opens in new window) X
- Click to share on LinkedIn (Opens in new window) LinkedIn
- Click to share on Pinterest (Opens in new window) Pinterest
- Click to share on Telegram (Opens in new window) Telegram
- Click to email a link to a friend (Opens in new window) Email
- More
Review: Flipwrite iPad Keyboard
 I’ve read several nonscientific studies that concluded students type equally well whether they use iPads or traditional keyboards (click here; scroll to ‘Keyboarding: iPad vs. Traditional’). These results are counter-intuitive to what common sense says is true: that the flat, non-tactile nature of the iPad onscreen keyboards make them less accurate and slower than standard keyboards. Until there is sufficient evidence to contradict this perception, schools continue to kit their iPads out with detachable keyboards. This they believe–and is probably true–makes them more versatile and responsive to student and teacher educational needs.
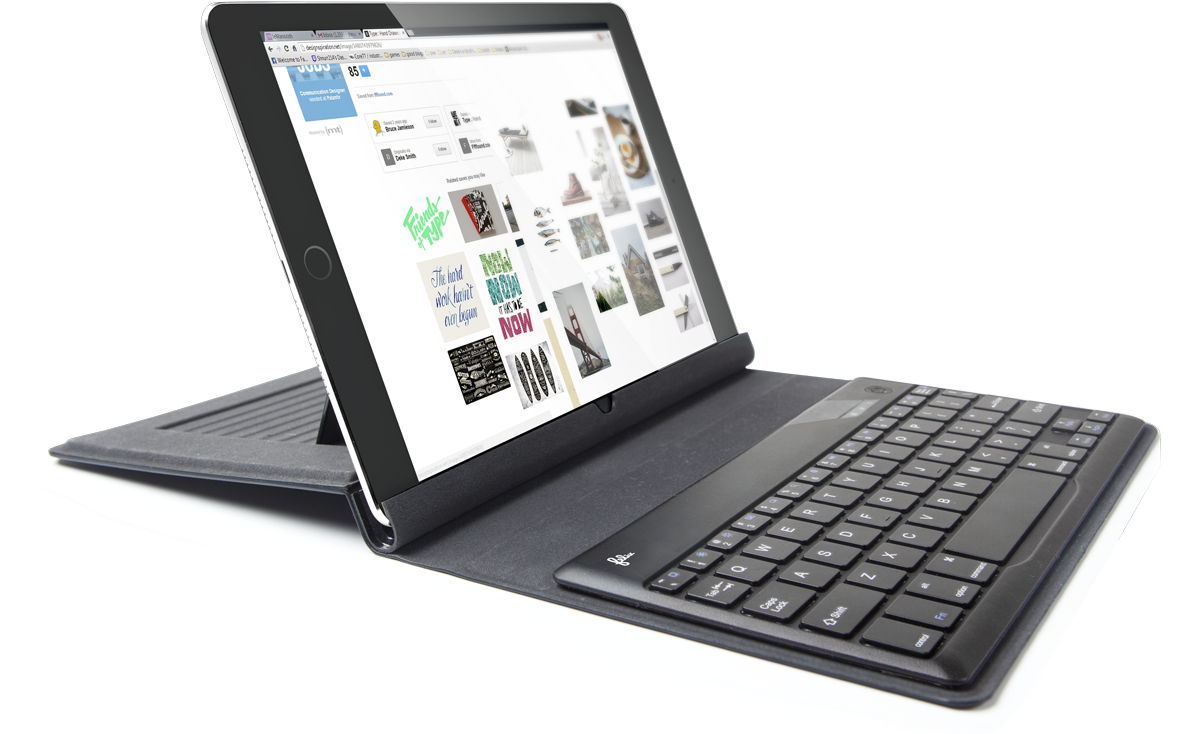
I’ve spent a lot of time reviewing these add-on keyboards and was thrilled when Felix offered me one of their versatile Bluetooth-enabled FlipWrite keyboards to test out for my classes.
Right up front, I liked what I received. It’s light weight and includes an iPad stand that enables me to place my iPad horizontally or vertically at a variety of adjustable angles, responsive to either viewing or typing. If I’m not using the keyboard, it can fold under the iPad out of the way, allowing me to use the iPad as a tablet. When I’m not using the iPad, I can store it in the Flipwrite folio case, which is barely larger than the device itself and only about twice as thick (less than an inch). The charge is supposed to last two+ months, a claim I haven’t yet tested, longer by far than any of my other digital devices.
Share this:
- Click to share on Facebook (Opens in new window) Facebook
- Click to share on X (Opens in new window) X
- Click to share on LinkedIn (Opens in new window) LinkedIn
- Click to share on Pinterest (Opens in new window) Pinterest
- Click to share on Telegram (Opens in new window) Telegram
- Click to email a link to a friend (Opens in new window) Email
- More
Computer Shortkeys That Streamline Your Day
 After twelve years of teaching K-8, I know as sure as I know August comes earlier every year that kids will try harder if its fun. The challenge for us as teachers: How do we make a the geeky side of technology ‘fun’?
The answer is keyboard shortcuts–aka shortkeys. According to Wikipedia, keyboard shortkeys are:
a series of one or several keys that invoke a software or operating system operation when triggered by the user.
Shortkeys are one of the teacher tools that scaffold differentiation. Students learn in different ways. Some excel with toolbars, ribbons, drop-down menus, or mouse clicks. Others find the mishmash of tiny pictures and icons confusing and prefer the ease and speed of the keyboard. Give students the option to complete a task in the manner best suited for their learning style. Once they know shortkeys, these will be an option available when they can’t find the program tool, or when it’s nested so deeply in menus, they can’t drill down far enough to find it. Shortkeys provide an alternative method of accomplishing simple tasks, like exit a program (Alt+F4), print (Ctrl+P), or copy (Ctrl+C).
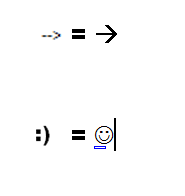
My students love them. I start in kindergarten with the easy ones–like Alt+F4–and build each year until they discover their own. Throw in a few quirky ones and you’ve won their hearts and minds. My two favorites are –> and :):
- To create the first: Type – – >; many programs automatically switch it to an arrow
- To create the second: Type : followed by ); many programs automatically switch it to a smiley face
Share this:
- Click to share on Facebook (Opens in new window) Facebook
- Click to share on X (Opens in new window) X
- Click to share on LinkedIn (Opens in new window) LinkedIn
- Click to share on Pinterest (Opens in new window) Pinterest
- Click to share on Telegram (Opens in new window) Telegram
- Click to email a link to a friend (Opens in new window) Email
- More
Tech Tip #105: Create Shortkeys for Windows Tools
As a working technology teacher, I get hundreds of questions from parents about their home computers, how to do stuff, how to solve problems. Each Tuesday, I’ll share one of those with you. They’re always brief and always focused. Enjoy!
Q: I love the Windows snipping tool, but it takes too long to get to. Is there a shortkey for it?
A: Oddly, there isn’t, which is why I didn’t use it for a long time. I want a screen capture that’s instantaneous. Jing is even too slow for me (though I tolerate it because of all its cool annotations.
Then I discovered how to create a shortkey for Snipping Tool:
- Go to Start–accessories
- Right click on ‘snipping tool’
- Select ‘properties’
- Click in ‘shortcut’
- Push the key combination you want to use to invoke the snipping tool. In my case, I used Ctrl+Alt+S
- Save
Now all I have to do is remember the shortkey!
BTW, this works for any tool.
Share this:
- Click to share on Facebook (Opens in new window) Facebook
- Click to share on X (Opens in new window) X
- Click to share on LinkedIn (Opens in new window) LinkedIn
- Click to share on Pinterest (Opens in new window) Pinterest
- Click to share on Telegram (Opens in new window) Telegram
- Click to email a link to a friend (Opens in new window) Email
- More
#55: Keyboarding in the Classroom
Mix a variety of keyboarding tools so students get the most out of keyboarding time in the classroom. I include software (TTL4), online keyboarding websites (Dancemat typing) and fun tests (TypingTest.com). The goal is to get students to age-appropriate national standards for typing speed with practice three times per week, fifteen minutes each time. Click the image below to enlarge:
Share this:
- Click to share on Facebook (Opens in new window) Facebook
- Click to share on X (Opens in new window) X
- Click to share on LinkedIn (Opens in new window) LinkedIn
- Click to share on Pinterest (Opens in new window) Pinterest
- Click to share on Telegram (Opens in new window) Telegram
- Click to email a link to a friend (Opens in new window) Email
- More


