Category: Classroom management

15 Good Replacements for ScreenChomp
 For years, TechSmith’s ScreenChomp app has been my go-to resource for whiteboard drawings, screencasts, and for an uncluttered online art platform for students using iPads. ScreenChomp did a masterful job of making everything needed for each of these activities intuitive even for young users. For older students, ScreenChomp made it easy to provide personalized feedback by writing or recording comments directly onto their digital work and then sharing it back to them.
There are more uses, but none of them matter right now because ScreenChomp has been retired. According to TechSmith, it no longer fits their larger business goals. I’m not here to judge those; what matters for teachers is that we must now fill the hole left by the loss of ScreenChomp. Like Kerpoof, thousands of educators are scrambling to replace a fundamental tool that was to be an integral part of their 2016-17 lesson plans.
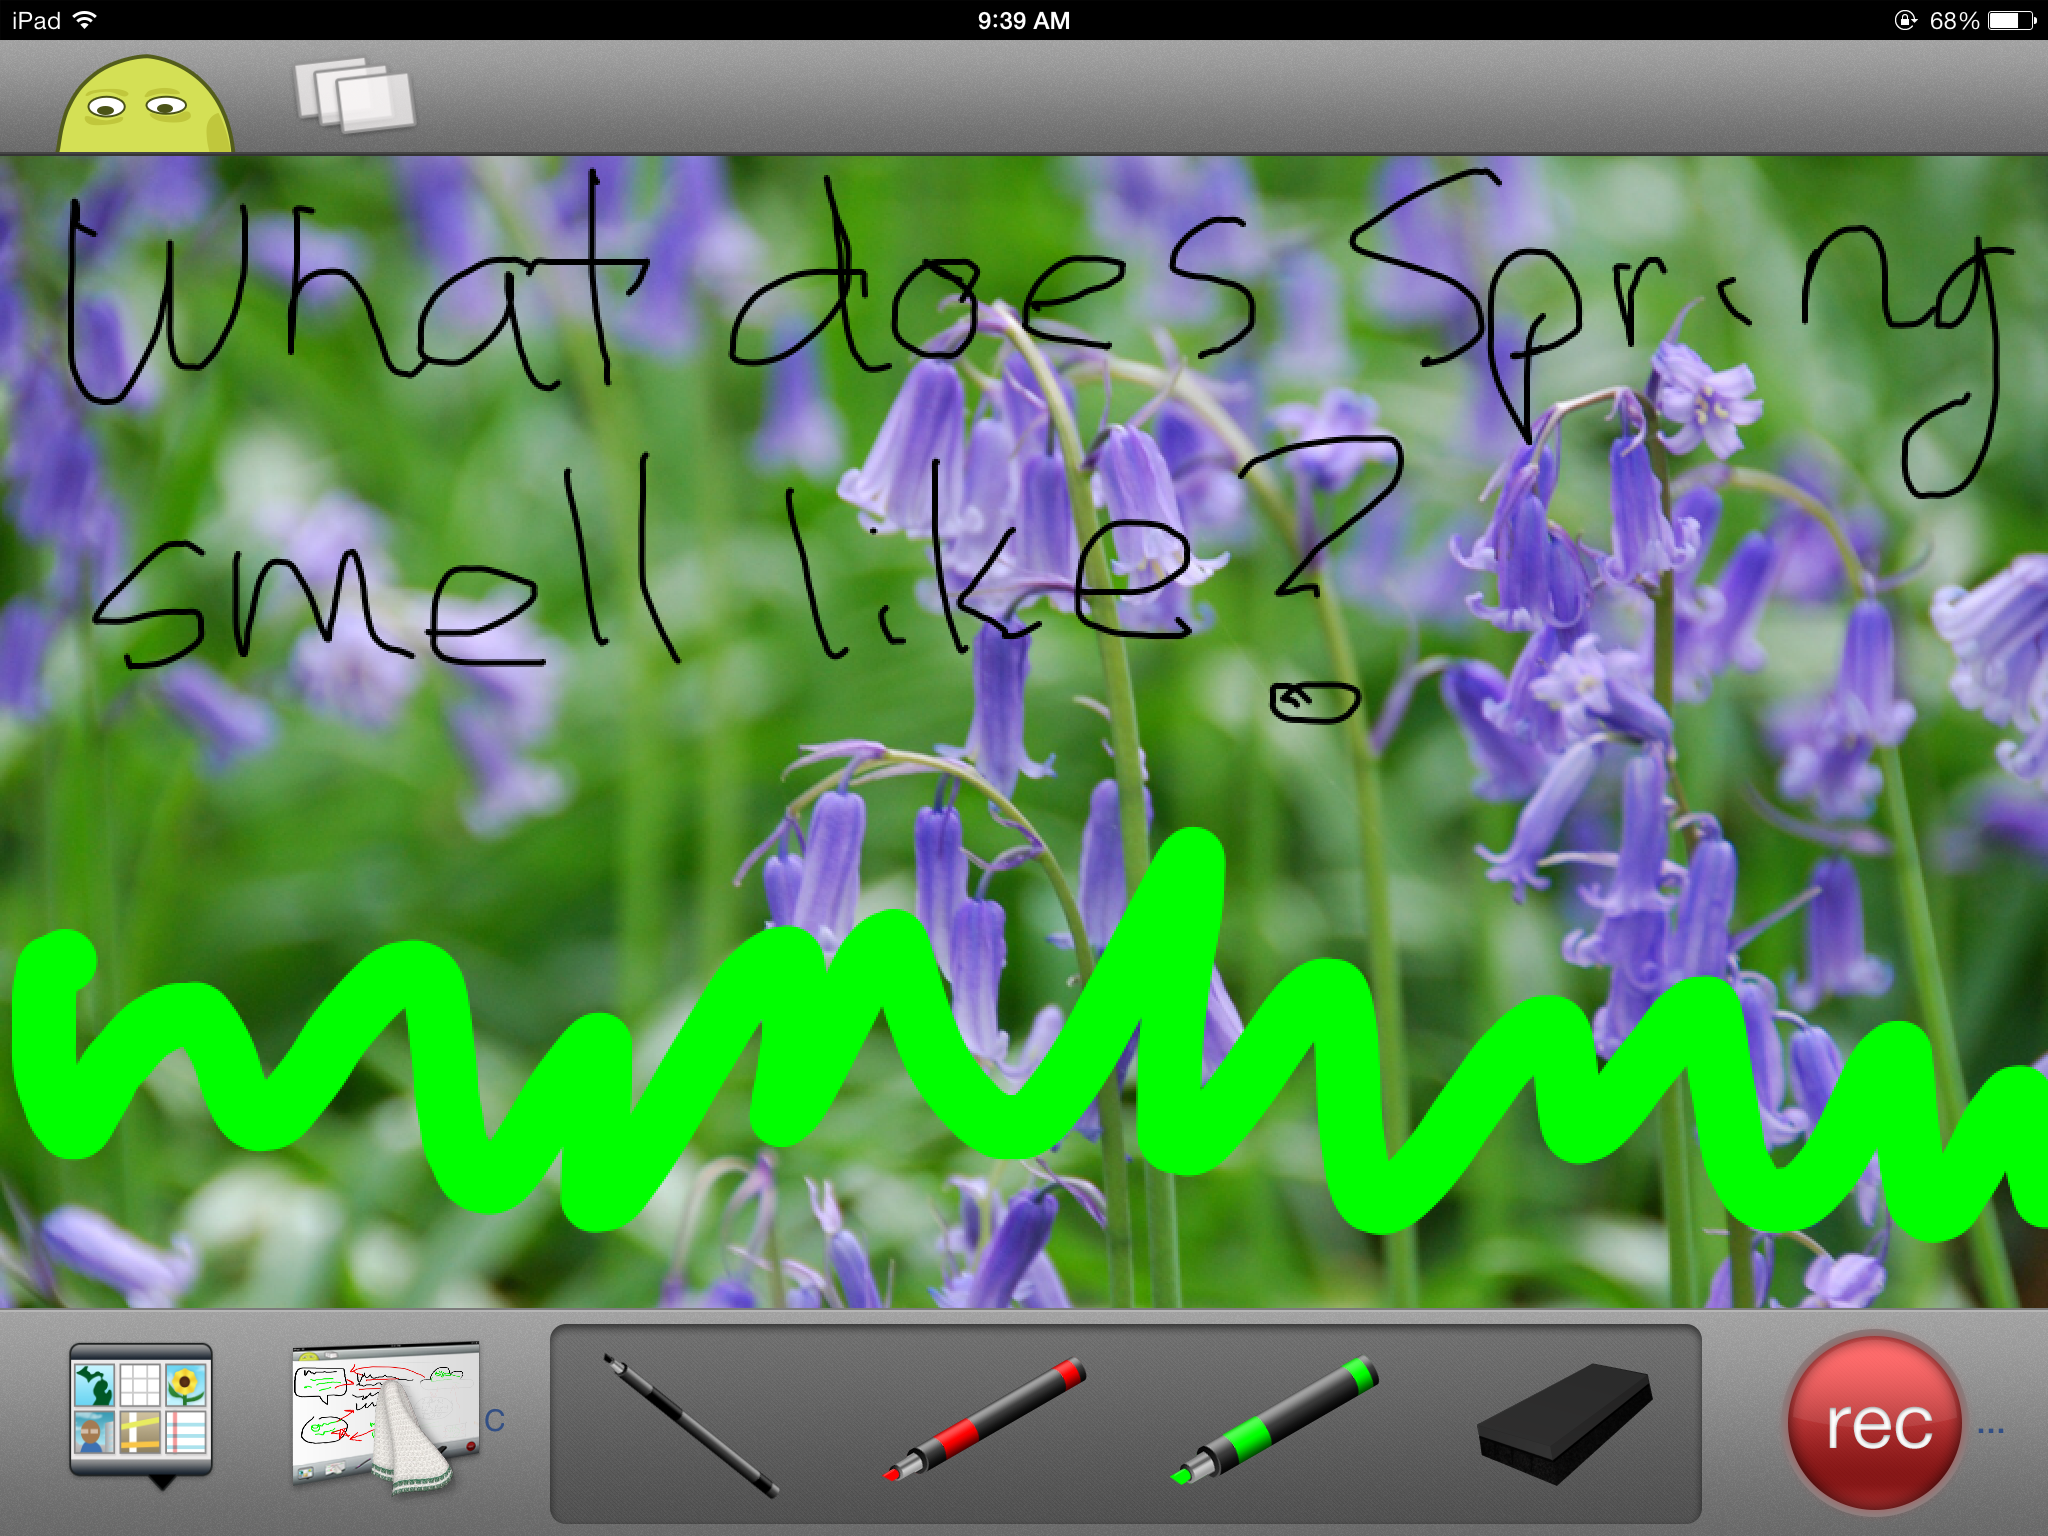
Let me help you with that. Here are options for the most common four activities (art, picture annotation, screencast, and whiteboard) you probably used ScreenChomp for. Since it was an iPad app, I’ve limited the replacement options to that platform:
Art
Create a drawing by fingerpainting, adding stamps, and inserting text. You can even connect with a friend to draw together over the Internet. Price: Free
What is Kiddom? Why is it right for you? And free resources to inform your teaching
The popularity of standards-based grading and instruction is growing. Why? It’s because the one-size-fits-all concept of a single grade representing the fullness of the students’ work is flawed. Today, teachers want to call out student strengths and weaknesses, accomplishments and areas of improvement, as aligned with the standards that their school mission is built on. That requires a detailed picture of what students have learned.
The problem is: This is time-consuming. Teachers must itemize tasks and work, attach them to relevant standards, monitor each student’s progress toward the goal of achieving the standards, and remediate when they need help. For many teachers, this is overwhelming. The ideal would be to have all assignments, assessment, and submittals for each student curated in one spot that automatically updates as the year progresses–and provides actionable reports.
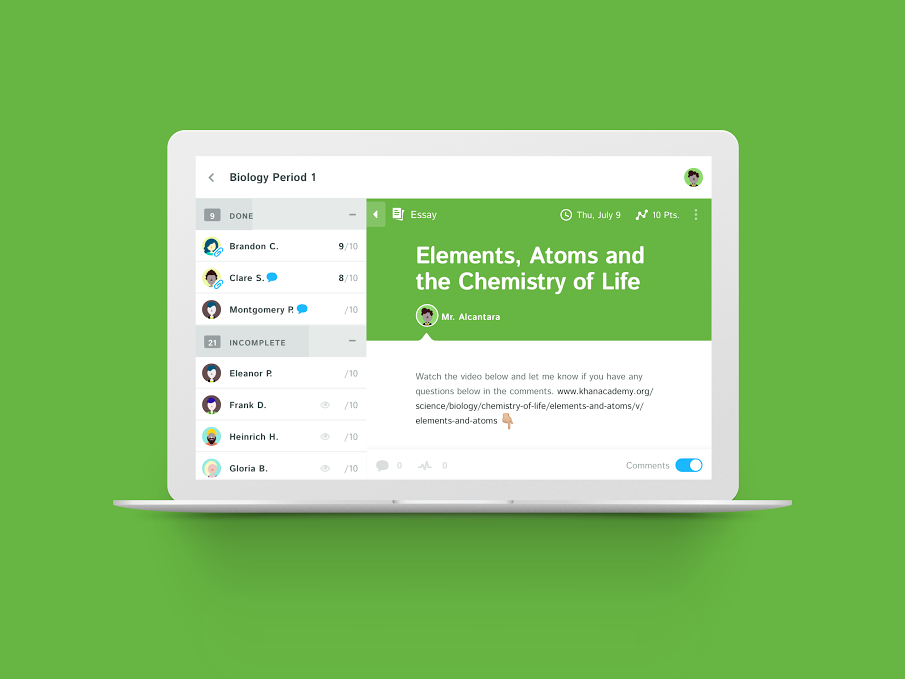
Happily, there is such a program. It’s called Kiddom.
Kiddom is a free standards-based platform designed to help teachers curate individual learning experiences. Its pages are visual and easy-to-understand, enabling teachers to quickly determine how students are doing and where remediation is needed–all without spending a lot of time analyzing data. Many of the details are linked, allowing you to dig deeper on any subject from a variety of pages rather than one specific spot.
Here are details you’ll like:
169 Tech Tips–8 Tips for Chromebooks
![]() In these 169 tech-centric situations, you get an overview of pedagogy—the tech topics most important to your teaching—as well as practical strategies to address most classroom tech situations, how to scaffold these to learning, and where they provide the subtext to daily tech-infused education.
In these 169 tech-centric situations, you get an overview of pedagogy—the tech topics most important to your teaching—as well as practical strategies to address most classroom tech situations, how to scaffold these to learning, and where they provide the subtext to daily tech-infused education.
Today’s tip: #94–8 Tips for Chromebooks in Class
- Be clear what the Chromebook can and can’t do. Then you won’t expect the impossible.
- It is sturdy–reinforced hinges, water-proof keyboard (waterproof everything), able to survive a drop from desk-height–but still teach students to handle it with care.
- Chromebooks are platform agnostic. It doesn’t matter if students create documents in Macs or PC. Once they load it to their cloud storage, they can view it and/or share it.
- Taking screenshots is easy. Review this early and often with students.
- Get students used to the most fundamental Chromebook shortkeys. They’re much faster.Here’s a big list of ones they’ll find useful.
- The Chromebook operating system (Chrome OS) is Linux-based. I won’t bore you with what that means. Just be clear that you’re not working with an OS X or Windows operating system. That will inform a lot of the stuff you do along the way.
- Chromebooks will operate more efficiently on the Chrome browser than IE or Firefox.
- Who you buy your Chromebook from will affect how much Cloud storage each user gets.

10 Ways to Use Twitter in Class
 For anyone who missed the April announcement, Twitter switched its app category from ‘social media’ (where it consistently ranked in the top ten with Facebook, Instagram, Messenger, WhatsApp, and Pinterest) to ‘news’ (now ranked #1, ahead of apps like CNN, Fox News, and Reddit). It makes sense; tweets and twitter streams have been part of hard-core news reports for years as an effective way for leaders and politicians to reach their constituents and pollsters to gauge what interests people. A good example is this series of tweets explaining the Brexit vote.
As an educator, I am thrilled. Twitter’s gossipy reputation among administrators and most parents negates its dynamic applications in the classroom. With the not-so-recent addition of audio and video files (easily embedded from sites like Instagram and Periscope), educators can easily use it as a student-friendly approach to everything from assessment to sharing notes.
Before unpacking Twitter in your classroom, here are a few guidelines:
- Clear its use with your administration. Be prepared to educate them on why what seems to be social media is actually educational.
- Inform parents that their children will be using Twitter to collaborate, share information, study for tests, and other uses specific to your program. Again, as with your administration, be prepared to explain the benefits of a Twitter-powered class.
- Twitter doesn’t have a lower age limit, but does reference ‘thirteen’ as a suggested minimum age. You decide what fits your group. You may also decide that setting the Twitter stream as private (called ‘protected Tweets’) is a good educational decision.
- Demonstrate how to use Twitter and what the symbols mean (tie this into a class discussion on math symbols).
- Establish rules for Twitter use. Remind students it is for educational uses only; chatting and socializing must be done through other means. Then enforce it by suspending privileges, warning abusers, or whatever works best in your classroom climate.
- Check out the Twitter streams of other educators before starting. Here’s one for a first-grade class to get you started. The visual of how they use it to enhance education is powerful.
Here are my ten favorite uses of Twitter in my classroom:
169 Tech Tip #146: 18 Ideas for Warm-ups, Exit Tickets
![]() In these 169 tech-centric situations, you get an overview of pedagogy—the tech topics most important to your teaching—as well as practical strategies to address most classroom tech situations, how to scaffold these to learning, and where they provide the subtext to daily tech-infused education.
In these 169 tech-centric situations, you get an overview of pedagogy—the tech topics most important to your teaching—as well as practical strategies to address most classroom tech situations, how to scaffold these to learning, and where they provide the subtext to daily tech-infused education.
Today’s tip: #146–18 Ideas for Warm-ups, Exit Tickets
Category: ASSESSMENTS
Sub-category: Classroom Management, Writing, Differentiation
Here are eighteen ideas for class warm-up and exit tickets:

How to Blend DoK into Lesson Plans without a Comprehensive Rewrite
 I recently got a question from a reader asking how the lessons in my K-8 curriculum supported Dr. Norman Webb’s Depth of Knowledge philosophy — an integral concept to her school’s mission. It got me thinking about lesson plans in general — how far we’ve come from lecture-test-move on. Now, exemplary teachers focus on blending learning into the student’s life knowledge base with the goal of building happy, productive adults. There are several concepts that address this reform in teaching (such as Art Costa’s Habits of Mind, Bloom’s Taxonomy, the Hess Cognitive Rigor Matrix, or the tech-oriented SAMR Model). Depth of Knowledge (DoK) is arguably the most thorough with its four concise levels, each supported by a collection of words that contribute to delivering content at that level. Like the SAMR Model, involvement grows with each level from a basic recall of knowledge to the ability to use that information in new circumstances.
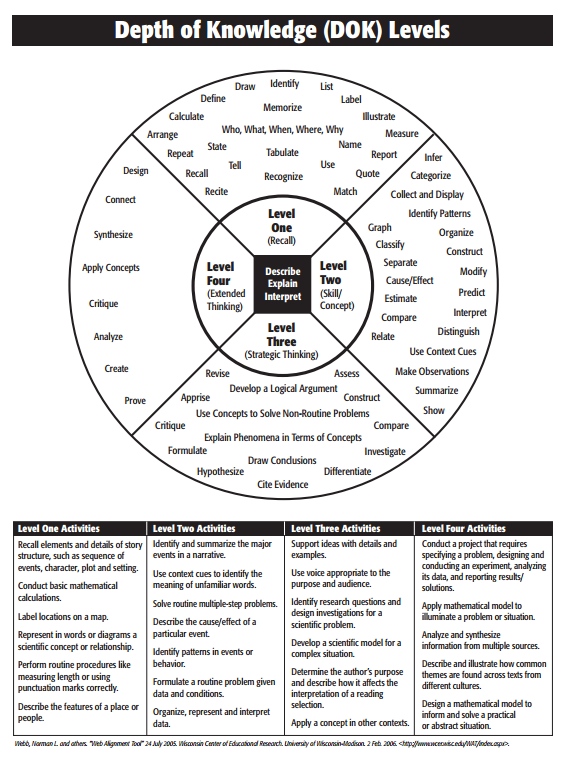
Here are general details about Webb’s DoK:
- With Webb’s DoK chart, not only can you figure out how to teach a subject more deeply and expect students to demonstrate complex understanding, but teachers can evaluate where students are in the four-step process starting at the rote application of knowledge to its synthesization from various sources that is then transferred to other uses.
- Level One: Identify details in the text, specific facts that result in a ‘right’ answer. Tasks that require Level One thinking include words like memorize, state, and recognize.
- Level Two: Show a relationship between an idea in the text and other events. ‘How’ and ‘why’ are good questions to bump an activity into Level Two. Tasks that require Level Two thinking include words like compare, infer, and interpret.
- Level Three: Analyze and draw conclusions about the text. Support conclusions with details. Use a voice that is appropriate to the purpose, task, and audience. Tasks that require Level Three thinking include words like hypothesize, differentiate, and investigate.
- Level Four: Extend conclusions and analysis (which might be the result of Level three) to new situations. Use other sources to analyze and draw conclusions. Tasks that require Level Four thinking include words like connect, analyze, and prove.
- As Dr. Karin Hess says, DoK is not about difficulty, it’s about complexity. Level One may be difficult for some students, but it isn’t complex. They may memorize a calculus formula (which I’ll stipulate is beyond difficult), but it doesn’t represent rigorous thinking. That happens in Level Four’s application to the real world.
- For DoK’s Level One and Two, there are usually right answers. That’s not true in Levels Three and Four.There, it’s about higher-order thinking.
- DoK is not a taxonomy (like Bloom’s). Rather, it itemizes ways students interact with knowledge.
- To work at a Level Three or Four requires foundation. Show students how to accomplish Level One and Two goals first.
With that in mind, here are seven steps to transform your current lesson plan into one aligned with DoK guidelines:

Learning and Playing and Why Both Matter for Teachers
 Play as the vehicle of education is not a revolutionary idea. Pedagogy has long recommended ‘play’ as a superior teacher for youngers–
Play is the great synthesizing, integrating, and developing force in childhood and adolescence. –PsycINFO Database Record 2012 APA,
The play of children is not recreation; it means earnest work. Play is the purest intellectual production of the human being, in this stage … for the whole man is visible in them, in his finest capacities, in his innermost being.~ Friedrich Froebel
In general, research shows strong links between creative play and language, physical, cognitive, and social development. Play is a healthy, essential part of childhood. —Department of Education, Newfoundland Labrador
Young children learn the most important things not by being told but by constructing knowledge for themselves in interaction with the physical world and with other children – and the way they do this is by playing.” –Jones, E., & Reynolds, G. “The play’s the thing: Teachers’ roles in children’s play”..
Ask a Tech Teacher contributor, Nick Garvin, founder of StackUp, has these thoughts on why both learning and playing matter for teachers:

Need an LMS next year? Here are three to consider
An LMS — Learning Management System — is a digital tool that tracks a wide variety of student-teacher interactions such as homework, grading, sharing of resources, parent communication, assessments, and more. It allows teachers to create, distribute and track class materials anywhere, on any device. That means it’s accessible from school or home, with any platform (including Macs, PCs, Chromebooks, and tablets). The term ‘LMS’ is often conflated with ‘SMS’ (student management system) and ‘CMS’ (course management system) because their purposes and tools are so similar. In this article, we’ll treat all as LMSs.
Teachers like LMSs because they keep all class content in one secure place, easily managed and viewed in the time constraints of most teacher’s busy days. Critical to a successful LMS is that it’s easy to learn, intuitive to use, dependable, contributes to the learning experience (rather than just another digital tool that must be juggled before learning happens), and it saves time.
Here are three of the most popular LMSs among educators I know:

33 Digital Exit Tickets That Fit Most Subjects
 Exit tickets (or exit slips) are a time-proven method of checking understanding in the classroom. Often, this means students write down (with pen and paper) a two-three sentence take-away summary of the day’s lesson and turn it in prior to exiting the class. It’s easily understand, requires little preparation, and is done in minutes.
Robert Marzano, classroom researcher and education author, shares four uses for exit slips. Students:
- rate their current understanding of new learning
- analyze and reflect on their efforts around the learning
….and teachers:
- gain feedback on an instructional strategy
- gain feedback about the materials and teaching
Technology provides a great opportunity to update this popular activity so it can be collaborative, shared, and published for the benefit of all. A few weeks ago, I published a Google Spreadsheet as a collaborative way for all of us to share our Exit Ticket suggestions. Here are 28 ideas from readers. I love the variety:
Padlet: A Versatile Classroom Tool
 One of the most popular, free tools used by thousands of schools is a virtual bulletin board called Padlet. It starts as a blank canvas (called a ‘wall’) to which users can add text, video, images, weblinks, and more. It can be accessed via a direct link that is posted or emailed, or an embed in any digital platform that accepts these HTML codes (such as a blog, website, or wiki). It can be managed from the website, a mobile device, or with a Chrome app or extension. Walls can also be emailed, printed, social shared, or saved as an image or PDF file. Individual accounts are free; education accounts are charged per teacher.
Here’s how it works:
- set up an account so that you can save and share your walls
- quickly and easily create your first wall with a customized background, title, and layout. Backgrounds include lined paper, blueprint, a chalkboard, and more.
- once the set-up is completed share the link or embed with students
- to participate, all students do is tap the screen and add their comment
Pros
If you have a Google account, you can use your Google account to sign on. No need to create a new account.
All walls are by default semi-private — accessed only through the direct link or the embed, but privacy options range from ‘private’ to ‘public’. You choose your level of transparency.
An unusual ‘save’ option is to export as a PDF. This creates a completed document that is platform-neutral.
Amazingly, the walls are ad-free whether you’re on the website or the embed. I don’t know how they manage this, but I’m thrilled — and hope it lasts!