Category: Freebies/Discounts

#34: How to Teach Dolch Words with Graphic Art Tools

Before you start this project, you might want to visit How to KidPix I and How to KidPix II.
There are a lot of graphic art options for youngers. We choose KidPix because it is user friendly, easily understood, and doesn’t clutter up the screen with anything other than what new graphic artists need.

#72: How to Check Your Math in a Spreadsheet

Over the next few months, we’ll provide a series of lessons on spreadsheet basics you can use in your K-8 classroom. Here are some of the topics we’ll cover:
- #74: Mastering Excel (for Beginners)
- #71: Beginning Graphs in MS Excel
- #70: Create a Timecard in Excel for Grade Two and Up
- #73: How to Graph in Excel
- #12: Create Simple Shapes in Excel
- #75: Tessellations in Excel
- #72: How to Check Your Math in Excel
- How to Use Excel to Teach Math Arrays
- #62: Email from Word (Or PowerPoint or Excel)
- #79: Excel Turns Data Into Information
Today:


–from 55 Technology Projects for the Digital Classroom
–image credit Deposit Photos

Here’s the sign-up link if the image above doesn’t work:
https://forms.aweber.com/form/07/1910174607.htm
Copyright ©2024 worddreams.wordpress.com – All rights reserved.
“The content presented in this blog is the result of my creative imagination and not intended for use, reproduction, or incorporation into any artificial intelligence training or machine learning systems without prior written consent from the author.”
Jacqui Murray has been teaching K-18 technology for 30 years. She is the editor/author of over a hundred tech ed resources including a K-12 technology curriculum, K-8 keyboard curriculum, K-8 Digital Citizenship curriculum. She is an adjunct professor in tech ed, Master Teacher, webmaster for four blogs, CSTA presentation reviewer, freelance journalist on tech ed topics, contributor to NEA Today, and author of the tech thrillers, To Hunt a Sub and Twenty-four Days. You can find her resources at Structured Learning.

Subscriber Special: January free-lesson-plan

January 8th-11th
the 53-page PDF, “25 Digital Tools for the Classroom”
for free!
“25 Digital Tools for the Classroom” is a thorough discussion on which are the most useful tools in a K-8 classroom. This includes popular digital tools such as blogs, backchannel devices, vocabulary decoding tools, avatars, digital portfolios, digital notetaking, as well as others you may not have thought of. Here’s what you do:
- Sign up for our newsletter, Weekly Websites, Tech Tips, and Tech Ed News. If you already subscribe, qualify by purchasing one of our resources on the Structured Learning website. Any product, any price qualifies.
- Email us the welcome message or receipt you receive (we’re at askatechteacher at gmail dot com). Make the subject line read, “Please send free ’25 Digital Tools for the Classroom'”.
- We’ll send you the collection.
- If the newsletter doesn’t work for you, there’s an ‘unsubscribe’ at the bottom of each email.

#16: A Holiday Memory in Word or KidPix

Use this not only to create a gift for parents, but to practice writing skills, grammar, MS Word’s spell check. I have student compose the memory one week and we format it the next. For beginning writers, use KidPix and its text tools. 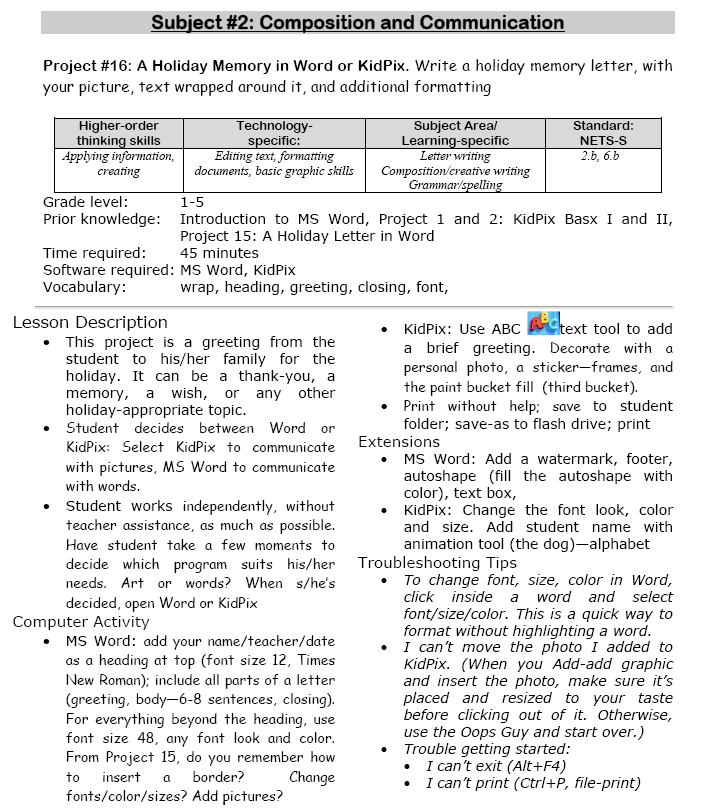
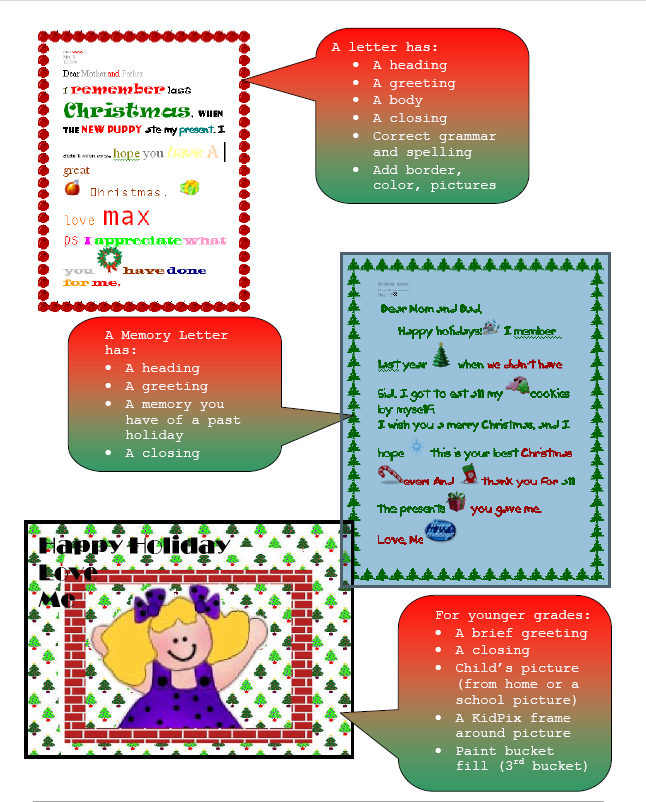 –from 55 Technology Projects for the Digital Classroom (more…)

Three Projects to Kick Off the Holidays
Three holiday projects to prepare kids to celebrate:
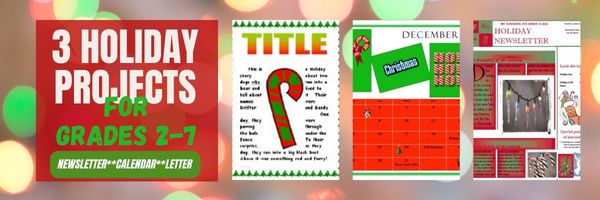
A Holiday Calendar
Kids love making this calendar. They get to talk about their upcoming vacations and hear what their friends are doing. It’s simple enough for third grade with advanced tools that satisfy a fifth graders growing intellect.
Click to enlarge lesson plan (more…)



#6: Photoshop for Fifth Graders–Auto-fixes
Before starting on Photoshop lessons for fifth grade and up, teach preparatory basics covered in this lesson plan here (reprinted in part below). If you have a newer version of Photoshop, adapt these instructions to yours.
Here are the basic skills fifth graders can learn in Photoshop if you’ve prepared them with basic computer skills. I’ve provided links but they aren’t live until publication:
- Photoshop artwork–already live
- Photoshop actions–already live
- Photoshop basics
- Photoshop filter and rendering tools
- Photoshop starters–auto-correct with the auto-correction tools–those quick fixes that make a photo look cleaner (coming up)
- Photoshop crop tool–with the lasso and the magic wand
- Photoshop clone tool– within a picture and to another picture
- Photoshop–change the background (put yourself in front of the Eiffel Tower or on top of Hoover Dam)
- Photoshop tools–add custom shapes
- Photoshop–start with Word (a little dated but still useful)

Get started
Open Photoshop. Notice the tool bars at the top. These will change depending upon the tool you choose from the left side. These are the crux of Photoshop. We cover about ten of them in fifth grade. The right-hand tools are used independent of the left-hand tools. They are more project oriented.
-
- Click the File Browser tool (top right-ish). It shows you the folders on your computer. From here, you can select the picture you’d like to edit (or use File-open)
- Select a picture and notice how it displays all data—file name, size, date created, author, copyright and more
- Click on several tools on the left side and see how the top menu bar changes, offering different choices. Go to Help. Have students view several of the ‘How To’ wizards available. Make sure they try ‘How to paint and draw’, ‘How to print photos’, ‘How to save for other applications’. Then have them select the ‘Help’ files. This takes them to the Adobe CS website and exposes a vast database of questions and answers. Encourage them to explore, engage their critical thinking and active learning skills. Remind them this is where they can find answers independent of teacher assistance.
- Open a picture of the student’s choice. Show class how to zoom in and out (right-side toolbar). Explain pixels.
Show students how they can take the paint brush and color just one pixel if they are close enough. This is
how experts remove ‘red eye’ in photos. - Introduce the History toolbar (right side) as an undo feature (like Ctrl+Z in Word). Have students open a new blank canvas and draw on it. Now use the history tool to toggle between the canvas before and after drawing on it by clicking between the original picture and the last action taken (at the bottom of the History list).
- Have students click through several tools on the left tool bar and show them how the top toolbar changes,
depending upon the tool selected. - Watch the layers tools. You can only paint on the highlighted layer. Notice that the top layer covers all others
- Show students how to save. The default is as a Photoshop file with a .psd extension. This won’t open in other programs, so show students how to change the file type format to a .jpg, .bmp, .tif or other for use in Word, Publisher, emails or a website.

Once students are comfortable with the Photoshop format, try these easy-to-do auto-fixes.
Auto-fixes is one of the easiest Photoshop skills. Depending upon your version of Photoshop, this may be found in different spots on the menu lists. If you’re familiar with your program, you’ll find it right away:

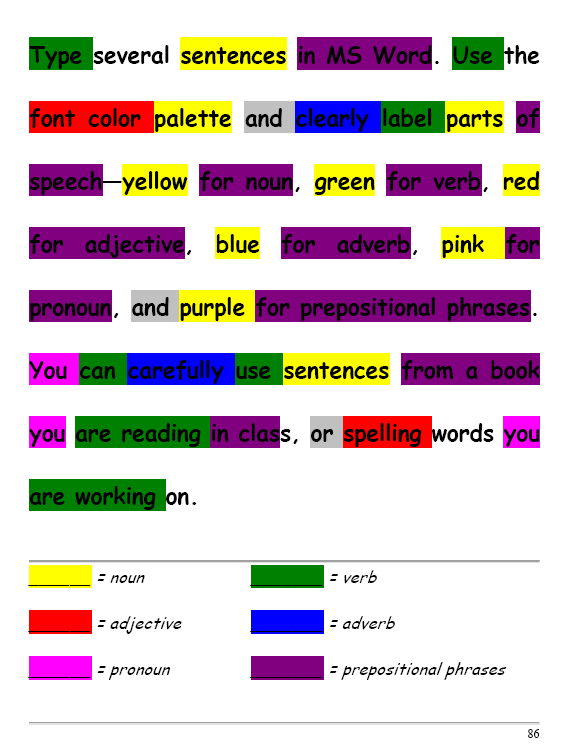
Lesson Plan #32: Color my Grammar
In this lesson plan, students type several sentences in a word processing program like MS Word. Use the font color palette to label parts of speech, i.e., blue for subject, red for verb. Use sentences from a book they’re reading in class, spelling words they’re working on, or a teacher hand-out. This makes grammar fun.


#32: How to Use Art to Teach Grammar

Here’s a great lesson that uses every child’s innate love of color to learn grammar. All you need is MS Word or Google Docs), a quick introduction to the toolbars and tools, and about 25 minutes to complete. If you’re the tech lab teacher, this gives you a chance to reinforce the grammar lesson the classroom is teaching and teach tech skills students need (click to enlarge):
[caption id="attachment_1026" align="aligncenter" width="450"] From Structured Learning’s Tech Lab Toolkit Volume I[/caption]

#71: Beginning Graphs in MS Excel
Excel makes graphs simple and easy for beginners. Even my parent helpers are amazed at how much students can do with a simple F11 shortkey and a right click. This lesson plan works just as well with Google Sheets though you may have to adapt a few of the instructions.
Over the next few months, we’ll provide a series of lessons on spreadsheet basics you can use in your K-8 classroom. Here are some of the topics we’ll cover:
- #74: Mastering Excel (for Beginners)
- #71: Beginning Graphs in MS Excel
- #70: Create a Timecard in Excel for Grade Two and Up
- #73: How to Graph in Excel
- #12: Create Simple Shapes in Excel
- #75: Tessellations in Excel
- #72: How to Check Your Math in Excel
- How to Use Excel to Teach Math Arrays
- #62: Email from Word (Or PowerPoint or Excel)
- #79: Excel Turns Data Into Information
If the lesson plans are blurry, click on them for a full size alternative. (more…)