Tag: chromebooks
Tech Tip #86: Image Your Computer Often
 In these 169 tech-centric situations, you get an overview of pedagogy—the tech topics most important to your teaching—as well as practical strategies to address most classroom tech situations, how to scaffold these to learning, and where they provide the subtext to daily tech-infused education.
Today’s tip: Image Your Computer Often
Category: Maintenance, PCs, Chromebooks, Macs
Q: I hate reformatting. I lose the personalizations I added and the extra programs. Is there any way to make that process easier?
 A: Yes. Create an image–a picture of your hard drive including system files, drivers, software and program updates, software and downloaded programs, docs, files, and extras—and save it in a secure backup area. When you reformat, copy the image back to the computer. Mine is on a terabyte external drive. Even if my two internal drives explode, I’m good.
Here’s how to do this if you have a PC:
- Click the start button. Go to Control Panel. Select ‘Backup and Restore’
- On the left sidebar, select the option ‘create a system image’. Follow directions.
Mac owners: Use a cloud-based third-party service (like Carbonite).
Chromebook folks: Because no data or programs are stored to the device, rather than re-image, try a power wash to reset everything to factory settings. You’ll lose shortkeys and programs installed to the shelf, but that’s it. If that doesn’t work, there are more involved steps (still not too difficult, though) to re-image using third-party utilities.
Alternatively, you can use a cloud-based service like Carbonite. Be forewarned: If you have a lot of data, it takes a while. You can work on your computer while it’s backing up; it’ll just be slower.
Sign up for a new tip each week or buy the entire 169 Real-world Ways to Put Tech into Your Classroom.
What’s your favorite tech tip in your classroom? Share it in the comments below.
Share this:
- Click to share on Facebook (Opens in new window) Facebook
- Click to share on X (Opens in new window) X
- Click to share on LinkedIn (Opens in new window) LinkedIn
- Click to share on Pinterest (Opens in new window) Pinterest
- Click to share on Telegram (Opens in new window) Telegram
- Click to email a link to a friend (Opens in new window) Email
- More
Tech Tip #85: Backup Your Computer Often
 In these 169 tech-centric situations, you get an overview of pedagogy—the tech topics most important to your teaching—as well as practical strategies to address most classroom tech situations, how to scaffold these to learning, and where they provide the subtext to daily tech-infused education.
Today’s tip: Backup Your Computer Often
Category: Maintenance, Security, PCs, Macs, Chromebooks
Q: I’ve had some virus problems and it reminds me that I need to backup my computer. What’s the easiest way?
 A: For PC/Windows folks: Use Windows Backup. Here’s what you do:
- Click the start button.
- Go to Control Panel
- Select ‘Backup and Restore’
- Select ‘Backup Now’
From there, select a drive with sufficient space and start. Be forewarned: If you have a lot of data, it takes a while. You can work on your computer while it’s backing up; it’ll just be slower.
Mac: Use the Time Machine tool.
Chromebook: No need. Everything is saved to the cloud. Now if you want to backup your cloud, use a service like Backupify.
Sign up for a new tip each week or buy the entire 169 Real-world Ways to Put Tech into Your Classroom.
What’s your favorite tech tip in your classroom? Share it in the comments below.
Share this:
- Click to share on Facebook (Opens in new window) Facebook
- Click to share on X (Opens in new window) X
- Click to share on LinkedIn (Opens in new window) LinkedIn
- Click to share on Pinterest (Opens in new window) Pinterest
- Click to share on Telegram (Opens in new window) Telegram
- Click to email a link to a friend (Opens in new window) Email
- More
169 Tech Tip #128–Top 10 Chromebook Shortkeys
 In these 169 tech-centric situations, you get an overview of pedagogy—the tech topics most important to your teaching—as well as practical strategies to address most classroom tech situations, how to scaffold these to learning, and where they provide the subtext to daily tech-infused education.
Today’s tip #128–Top Ten Chromebook Shortkeys
Category: CHROMEBOOKS
Sub-category: Keyboarding
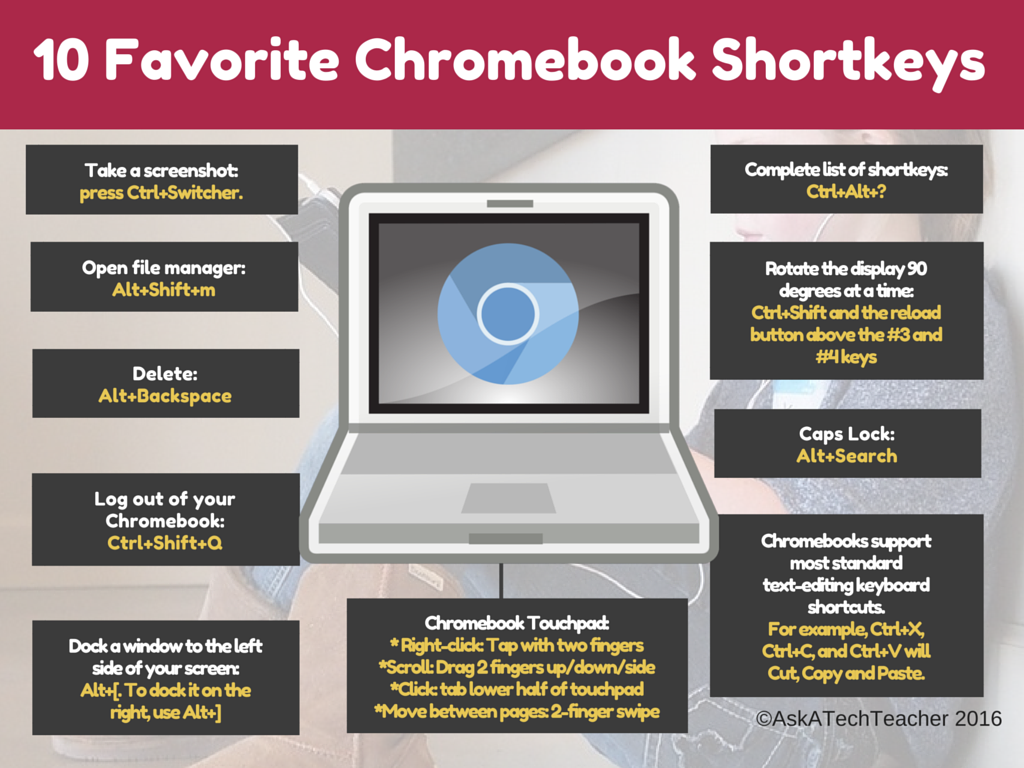
Here’s a poster with ten Chromebook shortkeys popular in classrooms:
Share this:
- Click to share on Facebook (Opens in new window) Facebook
- Click to share on X (Opens in new window) X
- Click to share on LinkedIn (Opens in new window) LinkedIn
- Click to share on Pinterest (Opens in new window) Pinterest
- Click to share on Telegram (Opens in new window) Telegram
- Click to email a link to a friend (Opens in new window) Email
- More
169 Tech Tips–Two Great Chromebook Shortkeys
 In these 169 tech-centric situations, you get an overview of pedagogy—the tech topics most important to your teaching—as well as practical strategies to address most classroom tech situations, how to scaffold these to learning, and where they provide the subtext to daily tech-infused education.
Today’s tip: #121–Chromebook Caps Lock and #122–Chromebook Delete Key
Category: CHROMEBOOKS
Sub-category: Keyboarding
Share this:
- Click to share on Facebook (Opens in new window) Facebook
- Click to share on X (Opens in new window) X
- Click to share on LinkedIn (Opens in new window) LinkedIn
- Click to share on Pinterest (Opens in new window) Pinterest
- Click to share on Telegram (Opens in new window) Telegram
- Click to email a link to a friend (Opens in new window) Email
- More
169 Tech Tips–8 Tips for Chromebooks
 In these 169 tech-centric situations, you get an overview of pedagogy—the tech topics most important to your teaching—as well as practical strategies to address most classroom tech situations, how to scaffold these to learning, and where they provide the subtext to daily tech-infused education.
Today’s tip: #94–8 Tips for Chromebooks in Class
- Be clear what the Chromebook can and can’t do. Then you won’t expect the impossible.
- It is sturdy–reinforced hinges, water-proof keyboard (waterproof everything), able to survive a drop from desk-height–but still teach students to handle it with care.
- Chromebooks are platform agnostic. It doesn’t matter if students create documents in Macs or PC. Once they load it to their cloud storage, they can view it and/or share it.
- Taking screenshots is easy. Review this early and often with students.
- Get students used to the most fundamental Chromebook shortkeys. They’re much faster.Here’s a big list of ones they’ll find useful.
- The Chromebook operating system (Chrome OS) is Linux-based. I won’t bore you with what that means. Just be clear that you’re not working with an OS X or Windows operating system. That will inform a lot of the stuff you do along the way.
- Chromebooks will operate more efficiently on the Chrome browser than IE or Firefox.
- Who you buy your Chromebook from will affect how much Cloud storage each user gets.
Share this:
- Click to share on Facebook (Opens in new window) Facebook
- Click to share on X (Opens in new window) X
- Click to share on LinkedIn (Opens in new window) LinkedIn
- Click to share on Pinterest (Opens in new window) Pinterest
- Click to share on Telegram (Opens in new window) Telegram
- Click to email a link to a friend (Opens in new window) Email
- More
Tech Tip #122: Chromebook Delete Key
As a working technology teacher, I get hundreds of questions from parents about their home computers, how to do stuff, how to solve problems. Each Tuesday, I’ll share one of those with you. They’re always brief and always focused. Enjoy!
Q: Not only does my Chromebook not have Caps Lock (which I’ve now fixed), but there’s no ‘delete’ key.
Use the shortkey, Alt+Backspace.
Jacqui Murray has been teaching K-18 technology for 30 years. She is the editor/author of over a hundred tech ed resources including a K-12 technology curriculum, K-8 keyboard curriculum, K-8 Digital Citizenship curriculum. She is an adjunct professor in tech ed, Master Teacher, webmaster for four blogs, an Amazon Vine Voice, CSTA presentation reviewer, freelance journalist on tech ed topics, contributor to NEA Today, and author of the tech thrillers, To Hunt a Sub and Twenty-four Days. You can find her resources at Structured Learning.
Share this:
- Click to share on Facebook (Opens in new window) Facebook
- Click to share on X (Opens in new window) X
- Click to share on LinkedIn (Opens in new window) LinkedIn
- Click to share on Pinterest (Opens in new window) Pinterest
- Click to share on Telegram (Opens in new window) Telegram
- Click to email a link to a friend (Opens in new window) Email
- More
Tech Tip #121: Chromebooks Caps Lock
As a working technology teacher, I get hundreds of questions from parents about their home computers, how to do stuff, how to solve problems. Each Tuesday, I’ll share one of those with you. They’re always brief and always focused. Enjoy!
Q: Where’s the caps lock on Chromebooks? There’s a ‘search’ button where that key is on my normal keyboard.
On Chromebooks, caps lock is a shortkey: Alt+Search. Search is the magnifying glass located where the the caps lock is on other keyboards. To turn it off, tap Shift.
If you’re like me and never plan to use that Search key, you can remap the Search key by visiting the Settings > Device > Keyboard settings.
Share this:
- Click to share on Facebook (Opens in new window) Facebook
- Click to share on X (Opens in new window) X
- Click to share on LinkedIn (Opens in new window) LinkedIn
- Click to share on Pinterest (Opens in new window) Pinterest
- Click to share on Telegram (Opens in new window) Telegram
- Click to email a link to a friend (Opens in new window) Email
- More
Tech Tip #116: How to Take Screenshots
As a working technology teacher, I get hundreds of questions from parents about their home computers, how to do stuff, how to solve problems. Each week, I’ll share one of those with you. They’re always brief and always focused. Enjoy!
Q: I need to take a screenshot with my Chromebook.
Here’s the shortkey: Hold down the Ctrl key and press the Window Switcher key. The screenshot is placed on the clipboard and in the download folder. If you have trouble finding the Download file, click Alt+Shift+M to open the File Manager. Download will be one of the options on the left sidebar.
In case you use a different digital device, here are the screenshot shortkeys for other platforms:
Share this:
- Click to share on Facebook (Opens in new window) Facebook
- Click to share on X (Opens in new window) X
- Click to share on LinkedIn (Opens in new window) LinkedIn
- Click to share on Pinterest (Opens in new window) Pinterest
- Click to share on Telegram (Opens in new window) Telegram
- Click to email a link to a friend (Opens in new window) Email
- More
Faceoff: What Digital Device Should My School Buy?
 In the not so distant past, two types of computers battled for supremacy in the classroom: Macs or PCs. Both were desktops and both did the same things, but in hugely different ways.
Today, whether it’s a Mac or a PC, a desktop is only one of the digital devices available in the education toolkit. First laptops eased their way into schools, pricey but popular for their portability and collaborative qualities. Then came iPads with their focus on the visual, ease of use, and engagement of users. The most recent entrant into the education digital device market is Chromebooks–able to do ‘most’ of what ‘most’ students need–at a precipitously lower price.
That means educators now have four options (desktops, laptops, iPads, Chromebooks) as they select tools to unpack education. The challenge is to understand the differences between these options and select based on personal criteria. That includes classroom needs, infrastructure, maintenance, and–yes–money. What gives the most value for the least investment?
Share this:
- Click to share on Facebook (Opens in new window) Facebook
- Click to share on X (Opens in new window) X
- Click to share on LinkedIn (Opens in new window) LinkedIn
- Click to share on Pinterest (Opens in new window) Pinterest
- Click to share on Telegram (Opens in new window) Telegram
- Click to email a link to a friend (Opens in new window) Email
- More
Computer Shortkeys That Streamline Your Day
 After twelve years of teaching K-8, I know as sure as I know August comes earlier every year that kids will try harder if its fun. The challenge for us as teachers: How do we make a the geeky side of technology ‘fun’?
The answer is keyboard shortcuts–aka shortkeys. According to Wikipedia, keyboard shortkeys are:
a series of one or several keys that invoke a software or operating system operation when triggered by the user.
Shortkeys are one of the teacher tools that scaffold differentiation. Students learn in different ways. Some excel with toolbars, ribbons, drop-down menus, or mouse clicks. Others find the mishmash of tiny pictures and icons confusing and prefer the ease and speed of the keyboard. Give students the option to complete a task in the manner best suited for their learning style. Once they know shortkeys, these will be an option available when they can’t find the program tool, or when it’s nested so deeply in menus, they can’t drill down far enough to find it. Shortkeys provide an alternative method of accomplishing simple tasks, like exit a program (Alt+F4), print (Ctrl+P), or copy (Ctrl+C).
My students love them. I start in kindergarten with the easy ones–like Alt+F4–and build each year until they discover their own. Throw in a few quirky ones and you’ve won their hearts and minds. My two favorites are –> and :):
- To create the first: Type – – >; many programs automatically switch it to an arrow
- To create the second: Type : followed by ); many programs automatically switch it to a smiley face
Share this:
- Click to share on Facebook (Opens in new window) Facebook
- Click to share on X (Opens in new window) X
- Click to share on LinkedIn (Opens in new window) LinkedIn
- Click to share on Pinterest (Opens in new window) Pinterest
- Click to share on Telegram (Opens in new window) Telegram
- Click to email a link to a friend (Opens in new window) Email
- More

