Tag: 169 tech tips

Tech Tip #85: Backup Your Computer Often
 In these 169 tech-centric situations, you get an overview of pedagogy—the tech topics most important to your teaching—as well as practical strategies to address most classroom tech situations, how to scaffold these to learning, and where they provide the subtext to daily tech-infused education.
Today’s tip: Backup Your Computer Often
Category: Maintenance, Security, PCs, Macs, Chromebooks
Q: I’ve had some virus problems and it reminds me that I need to backup my computer. What’s the easiest way?
 A: For PC/Windows folks: Use Windows Backup. Here’s what you do:
- Click the start button.
- Go to Control Panel
- Select ‘Backup and Restore’
- Select ‘Backup Now’
From there, select a drive with sufficient space and start. Be forewarned: If you have a lot of data, it takes a while. You can work on your computer while it’s backing up; it’ll just be slower.
Mac: Use the Time Machine tool.
Chromebook: No need. Everything is saved to the cloud. Now if you want to backup your cloud, use a service like Backupify.
Sign up for a new tip each week or buy the entire 169 Real-world Ways to Put Tech into Your Classroom.
What’s your favorite tech tip in your classroom? Share it in the comments below.
Tech Tip #43: Backup Your Work Often
In these 169 tech-centric situations, you get an overview of pedagogy—the tech topics most important to your teaching—as well as practical strategies to address most classroom tech situations, how to scaffold these to learning, and where they provide the subtext to daily tech-infused education.
Today’s tip: Backup Your Work Often

Category: Maintenance, Security, Email
Q: How often should I backup my project? How about my whole hard drive?
A: I teach students to save early save often (Tech Tip #15), when working on a project. You decide what you can tolerate losing: ten minutes or ten hours. After all, if the computer loses your work, you’re the one who has to start over.
Me, I save each project I’m working on constantly and then save-as to a backup location when I’ve completed the document. A lot of people skip the backup process. Don’t!
More options for backing up:
- Email it to yourself. Then, save it to an email file called ‘backups’.
- For files too large to email, save it as an attachment to a message that’s stored in ‘Drafts’.
- Use an automated service like Carbonite that works in the background, daily. These may charge a fee (Carbonite is about $60 a year), but takes the guesswork out of whether you’ve saved a file as a backup.
- Rely on the program you’re using to back your files up. This is a good option for many internet-based programs (like Canva) and Google Apps, but sketchy for others.
As for the entire computer, once a week is good.
Sign up for a new tip each week or buy the entire 169 Real-world Ways to Put Tech into Your Classroom.
What’s your favorite tech tip in your classroom? Share it in the comments below.
Tech Tip #133: 10 Favorite Mac Shortkeys
In these 169 tech-centric situations, you get an overview of pedagogy—the tech topics most important to your teaching—as well as practical strategies to address most classroom tech situations, how to scaffold these to learning, and where they provide the subtext to daily tech-infused education.
Today’s tip: 10 Favorite Mac Shortkeys
Category: Macs, Keyboarding
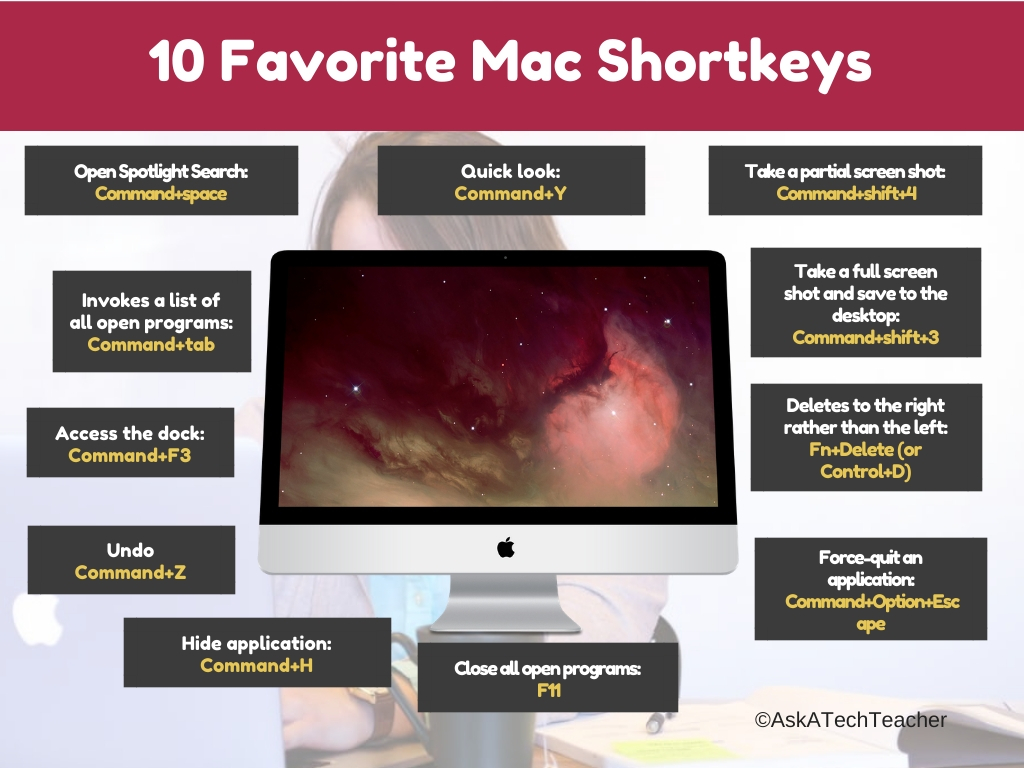
Here’s a poster with ten of the most popular Mac shortkeys among students:
Sign up for a new tip each week or buy the entire 169 Real-world Ways to Put Tech into Your Classroom.
What’s your favorite tech tip in your classroom? Share it in the comments below.
Jacqui Murray has been teaching K-18 technology for 30 years. She is the editor/author of over a hundred tech ed resources including a K-12 technology curriculum, K-8 keyboard curriculum, K-8 Digital Citizenship curriculum. She is an adjunct professor in tech ed, Master Teacher, webmaster for four blogs, an Amazon Vine Voice, CSTA presentation reviewer, freelance journalist on tech ed topics, contributor to NEA Today, and author of the tech thrillers, To Hunt a Sub and Twenty-four Days. You can find her resources at Structured Learning.

Tech Tip #66–How to Add Accents
In these 169 tech-centric situations, you get an overview of pedagogy—the tech topics most important to your teaching—as well as practical strategies to address most classroom tech situations, how to scaffold these to learning, and where they provide the subtext to daily tech-infused education.
Today’s tip: How to add accents
Category: Languages, Keyboarding, Writing
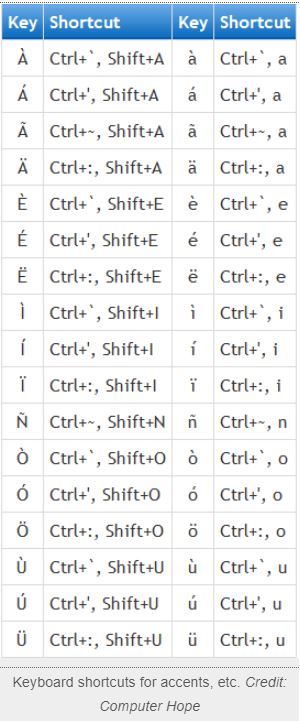
Q: I teach Spanish and need a quick way to add accents to words. Can you help?
A: You can go through the symbols library, but there’s an easier way. Use Ctrl + another key to add the accent. Here is a table.
More tech tips:
Create Shortkeys for Windows Tools
Jacqui Murray has been teaching K-18 technology for 30 years. She is the editor/author of over a hundred tech ed resources including a K-12 technology curriculum, K-8 keyboard curriculum, K-8 Digital Citizenship curriculum. She is an adjunct professor in tech ed, Master Teacher, webmaster for four blogs, an Amazon Vine Voice, CSTA presentation reviewer, freelance journalist on tech ed topics, contributor to NEA Today, and author of the tech thrillers, To Hunt a Sub and Twenty-four Days. You can find her resources at Structured Learning.
Tech Tip #105: Create Shortkeys for Windows Tools
In these 169 tech-centric situations, you get an overview of pedagogy—the tech topics most important to your teaching—as well as practical strategies to address most classroom tech situations, how to scaffold these to learning, and where they provide the subtext to daily tech-infused education.
Today’s tip: Create Shortkeys for Windows Tools
Category: Keyboarding
Q: I love the Windows snipping tool, but it takes too long to activate. Is there a shortkey?
A: Oddly, there isn’t, which is why I didn’t use it for a long time. I want a screen capture that’s instantaneous. I discovered how to create a shortkey for Snipping Tool—or any Windows program:
- Right click on the program icon.
- Select ‘properties’.
- Select the ‘shortcut’ tab.
- In the ‘Shortcut key’ field, push the key combination you want to invoke this program. In my case, for the Snipping Tool, I used Ctrl+Alt+X.
- Click OK
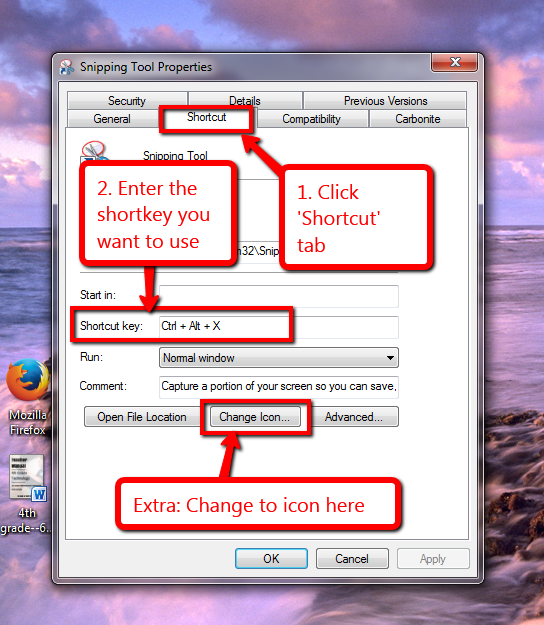
Here’s a video on how to create the shortkey. Now all I have to do is remember the shortkey!
Sign up for a new tip each week or buy the entire 169 Real-world Ways to Put Tech into Your Classroom.
–Comments are closed but feel free to contact me via Twitter (@askatechteacher).
Tech Tip #31: 10 Best Keyboarding Hints
In these 169 tech-centric situations, you get an overview of pedagogy—the tech topics most important to your teaching—as well as practical strategies to address most classroom tech situations, how to scaffold these to learning, and where they provide the subtext to daily tech-infused education.
Today’s tip: 10 Best Keyboarding Hints
Category: Keyboarding
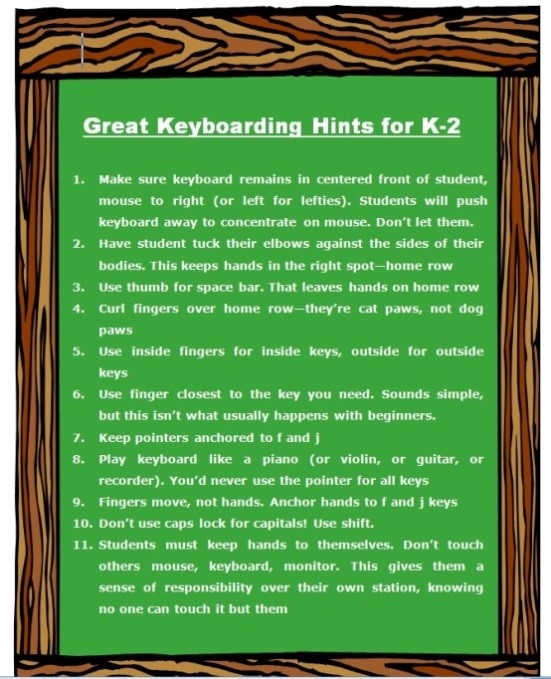
This poster has ten keyboarding hints that cover the most common mistakes students make that prevent them from excelling at keyboarding:
- Tuck your elbows against the sides of your body. This keeps your hands in the right spot—home row—at the right angle (parallel to the rows).
- Use your right thumb for the space bar. That leaves your hands ready, on home row.
- Curl fingers over home row—they’re cat paws, not dog paws.
- Use inside fingers for inside keys, outside fingers for outside keys. This is a great rule of thumb until students start touch typing.
- Use the finger closest to the key you need. Sounds simple, but this isn’t what usually happens with beginners.
- Keep your pointers anchored to f and j. Notice the tactile bump on those keys so you don’t have to look at the keyboard to find homerow.
- Play your keyboard like you do a piano (or violin, or guitar, or recorder). You’d never use your pointer for all keys. Don’t do it on a keyboard either.
- Fingers move, not your hands. Hands stay anchored to the f and j keys
- Add a barrier between the sides of the keyboards. I fashioned one from cover stock. That’ll remind students to stay on the correct side of the keyboard
- Don’t use caps lock for capitals! Use shift.
There’s an eleventh in the poster. Can you tell which one that is?
Buy the entire 169 Real-world Ways to Put Tech into Your Classroom.
Tech Tip #161: Ten Most Important Keyboard Keys
In these 169 tech-centric situations, you get an overview of pedagogy—the tech topics most important to your teaching—as well as practical strategies to address most classroom tech situations, how to scaffold these to learning, and where they provide the subtext to daily tech-infused education.
Today’s tip: 10 Most Important Keyboard Keys
Category: Keyboarding
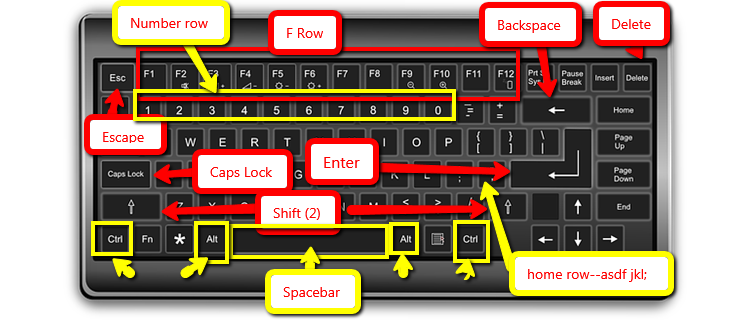
As you teach K-5 keyboarding, here are the ten most important keys you want them to learn—a few a year:
Buy the entire 169 Real-world Ways to Put Tech into Your Classroom.
–Comments are closed but feel free to contact me via Twitter (@askatechteacher).
Tech Tip #11: Four Stages of Keyboarding Growth
In these 169 tech-centric situations, you get an overview of pedagogy—the tech topics most important to your teaching—as well as practical strategies to address most classroom tech situations, how to scaffold these to learning, and where they provide the subtext to daily tech-infused education.
Today’s tip: 4 Stages of Keyboarding Growth
Category: Keyboarding
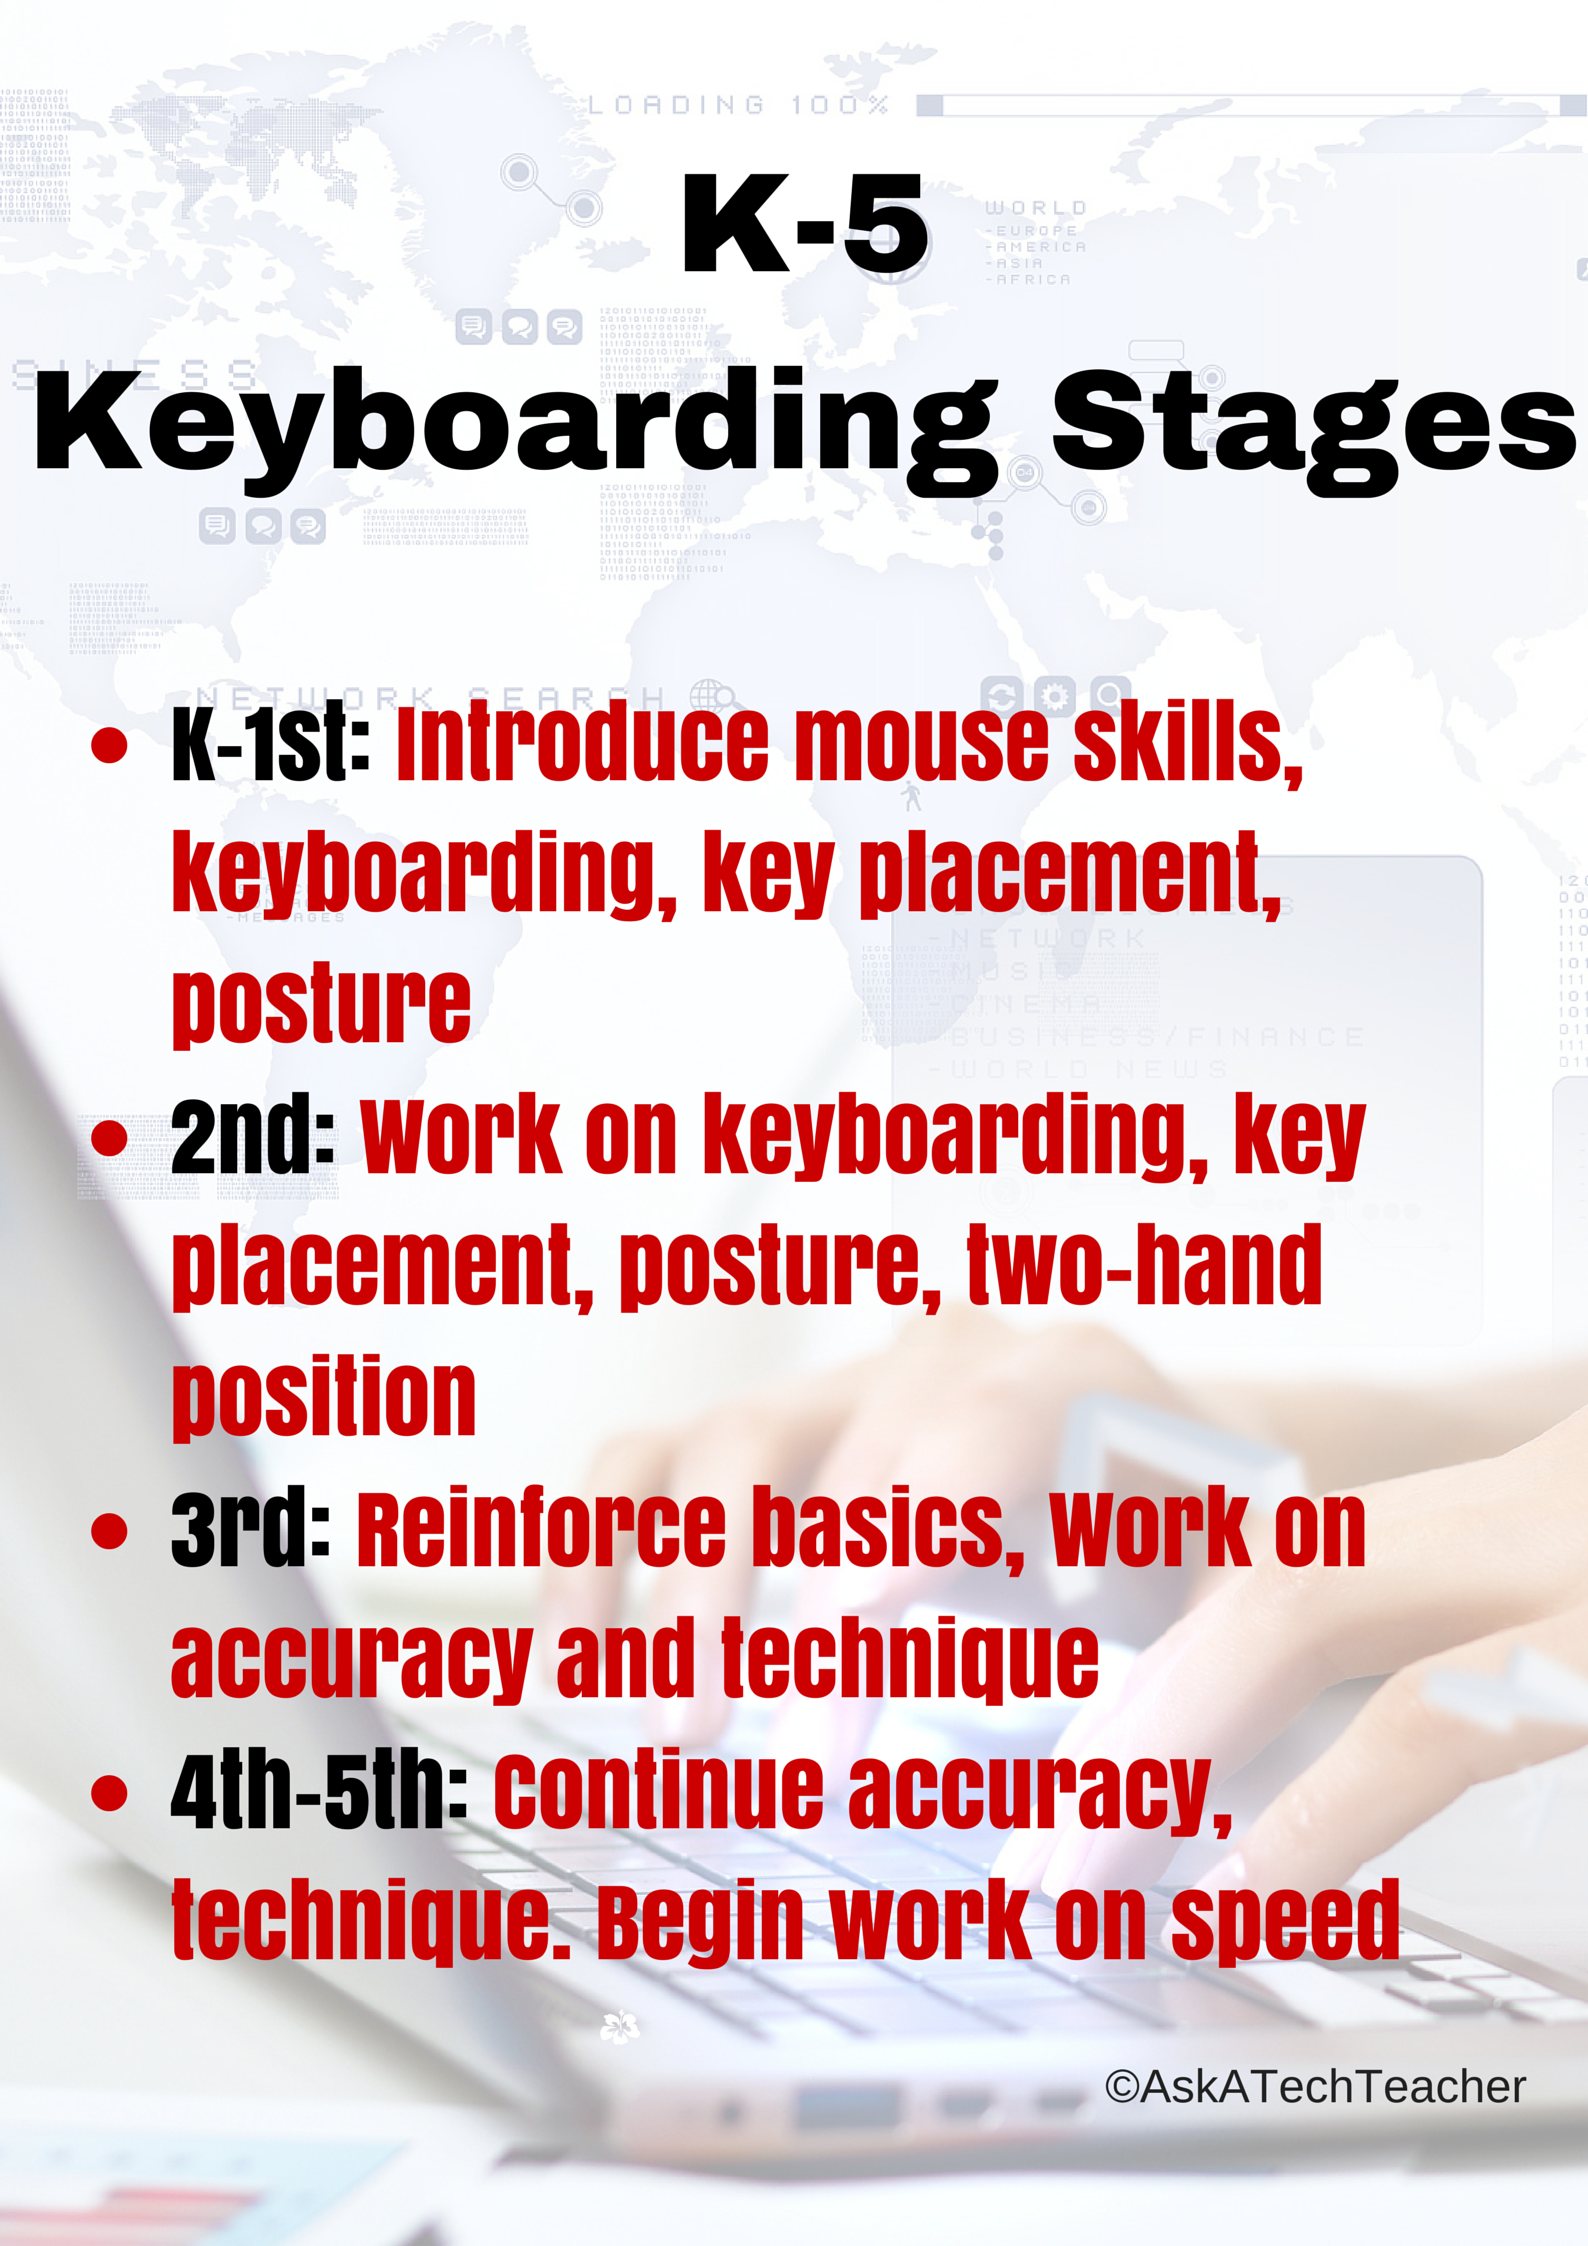
Here’s a poster with the four stages you will follow as you teach students keyboarding. It starts with pre-keyboarding in K-1st and ends with touch typing in 4th/5th grade:
Sign up for a new tip each week or buy the entire 169 Real-world Ways to Put Tech into Your Classroom.
#keyboarding
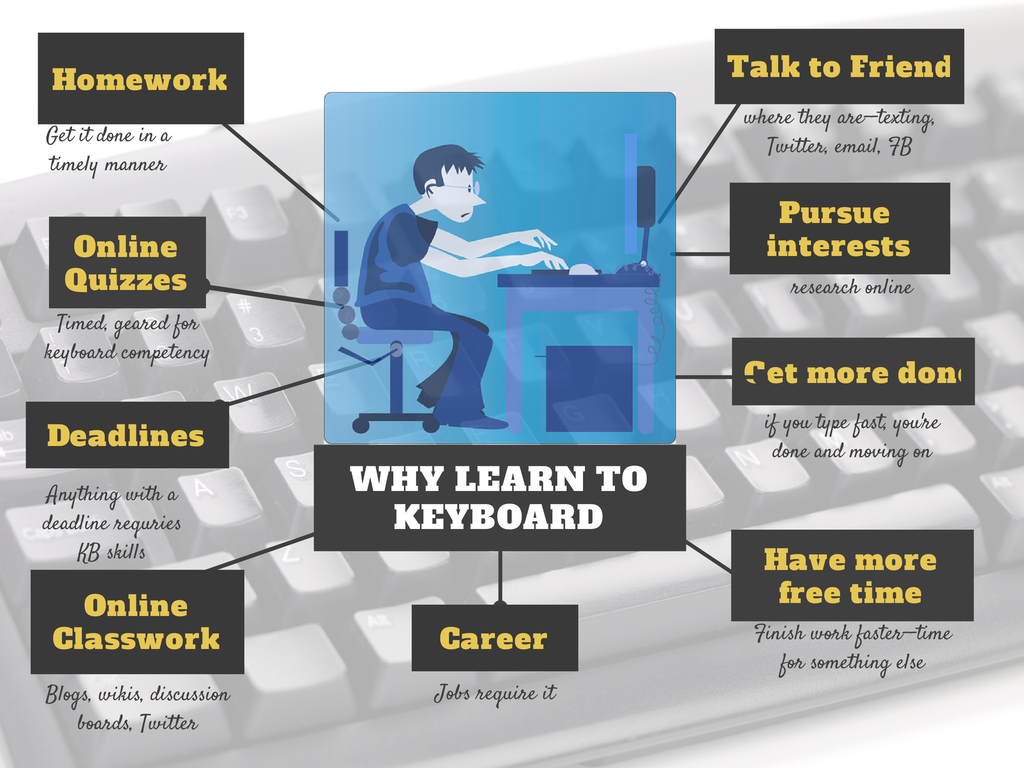
Tech Tip #158: Why Learn Keyboarding
In these 169 tech-centric situations, you get an overview of pedagogy—the tech topics most important to your teaching—as well as practical strategies to address most classroom tech situations, how to scaffold these to learning, and where they provide the subtext to daily tech-infused education.
Today’s tip: Why Learn Keyboarding?
Category: Keyboarding
Here’s a poster with the top nine reasons why students want to learn keyboarding:
Sign up for a new tip each week or buy the entire 169 Real-world Ways to Put Tech into Your Classroom.
Tech Tip #9–Quickly Hide Your Screen
In these 169 tech-centric situations, you get an overview of pedagogy—the tech topics most important to your teaching—as well as practical strategies to address most classroom tech situations, how to scaffold these to learning, and where they provide the subtext to daily tech-infused education.
Today’s tip:
Category: Keyboarding
Q: I’m updating grades at school. Students come in for help and I don’t want them to see what I’m doing. What’s the fastest way to hide the screen?
A: Press “Alt+Tab” on your keyboard (or Command-Tab on a Mac). It’ll hide the window on your screen by bringing up the one you last visited.
Use it as a verb as in, “I had to Alt+Tab when my student dropped by.”
Buy the entire 169 Real-world Ways to Put Tech into Your Classroom.