


Category: Keyboarding

50+ Websites on Keyboarding
Here are a wide variety of resources that teach keyboarding–from games to drills to everything in between:
- ABCYa–Keyboard challenge—grade level
- Alphabet rain game
- Alpha Quick–how quickly can a student type the alphabet?
- Barracuda game
- Big Brown Bear
- Bubbles game
- Digipuzzles–6 keyboarding practice games for youngers
- Edutyping–fee-based
- Free typing tutor

- GoodTyping.com
- KAZ–speed typing in 90 minutes
- Keyboard practice—quick start
- Keyboarding—more lessons
- NitroType
- TIPP 10
- Touch Typing Progressive Program
- Typaphone–make music while you type
- TypeDojo — word lists, 10-key, and more
- Typesy
- Typing Arena–lots of games to teach typing
- Typing Mentor
- Typing Pal
- Typing Tournament
- Typing.IO–typing code for practice
Graduated programs
For iPads
- Ghost Type
- Tap Fun Lite
- Tap Typing
- Typing Tournament–with teacher dashboard; includes games; fee
- Typetastic–also for computers
By row
Software
For Special Needs
Typing test
Lesson Plans
- 4 lesson plans–bundled
- Homeschool Keyboarding Kit
- K-5 Curriculum
- K-8 Curriculum
- Keyboarding and the Scientific Method
- Middle School Curriculum
Jacqui Murray has been teaching K-18 technology for 30 years. She is the editor/author of over a hundred tech ed resources including a K-12 technology curriculum, K-8 keyboard curriculum, K-8 Digital Citizenship curriculum. She is an adjunct professor in tech ed, Master Teacher, webmaster for four blogs, an Amazon Vine Voice, freelance journalist on tech ed topics, and author of the tech thrillers, To Hunt a Sub and Twenty-four Days. You can find her resources at Structured Learning.

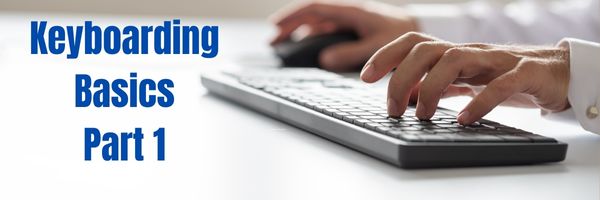
Keyboarding Basics Part 1
 Keyboarding is a topic that most parents want their children to learn and many schools don’t have time to teach. Of all topics on Ask a Tech Teacher, keyboarding is the most visited. If you’re looking for a curriculum for your K-8 classes, here are two popular ones we offer:
The Essential Guide–-a thorough K-8 curricula intended for schools that allot about 45 minutes a week to tech classes
The Ultimate Guide–a K-5 or MS comprehensive deep dive into keyboarding (optional student workbooks available)
We are taking the next two weeks–two articles–to answer the questions that should help you as a teacher or administrator decide what type of keyboarding program is best for your school.
Week 1 (this article)
- Why learn keyboarding?
- What is the best age to start teaching keyboarding?
- How important is teacher knowledge of teaching keyboarding?
Week 2 (click when available)
- What is the best way to teach keyboarding?
- What is the correct body position?
- What about keyboarding homework?
- Questions you may have
 Keyboarding Posters")
5 (free) Keyboarding Posters

Every month or so, we share themed posters you can re-share on your website (with attribution), post on your walls, or simply be inspired.
This month: Keyboarding

40 Websites to Teach Keyboarding
Here are a few of the popular resources teachers are using to teach keyboarding. For more keyboarding websites, software, typing tests, special needs, and more, click Ask a Tech Teacher’s Keyboarding Page:

Lesson Plans

Tech Ed Resources for your Class–K-8 Keyboard Curriculum
I get a lot of questions from readers about what tech ed resources I use in my classroom so I’m going to take a few days this summer to review them with you. Some are edited and/or written by members of the Ask a Tech Teacher crew. Others, by tech teachers who work with the same publisher I do. All of them, I’ve found well-suited to the task of scaling and differentiating tech skills for age groups, scaffolding learning year-to-year, taking into account the perspectives and norms of all stakeholders, with appropriate metrics to know learning is organic and granular.

Today: K-8 Keyboard Curriculum
Overview
K-8 Keyboard Curriculum (four options plus one)–teacher handbook, student workbooks, companion videos, and help for homeschoolers
2-Volume Ultimate Guide to Keyboarding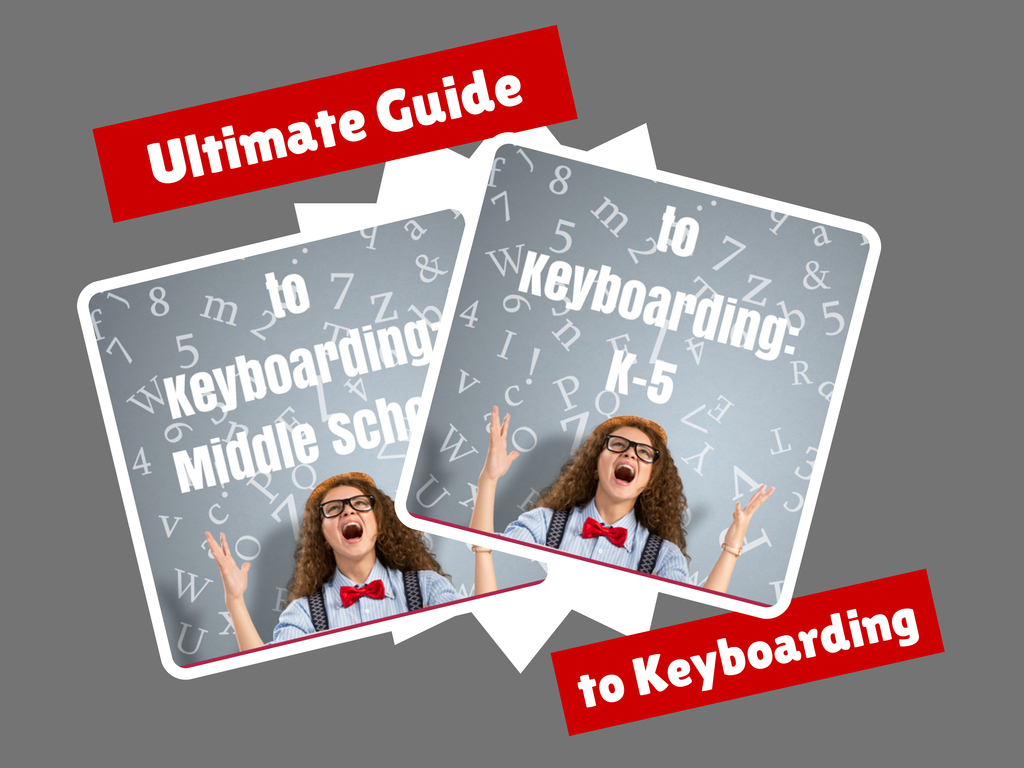
K-5 (237 pages) and Middle School (80 pages), 100 images, 7 assessments
K-5–print/digital; Middle School–digital delivery only
Aligned with Student workbooks and student videos (free with licensed set of student workbooks)
Student workbooks sold separately
__________________________________________________________________________
1-Volume Essential Guide to K-8 Keyboarding
120 pages, dozens of images, 6 assessments
Great value!
Delivered print or digital
Doesn’t include: Student workbooks

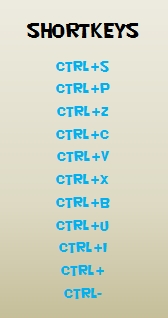
Tech Tip #129: Top Ten PC Shortkeys
![]() In these 169 tech-centric situations, you get an overview of pedagogy—the tech topics most important to your teaching—as well as practical strategies to address most classroom tech situations, how to scaffold these to learning, and where they provide the subtext to daily tech-infused education.
In these 169 tech-centric situations, you get an overview of pedagogy—the tech topics most important to your teaching—as well as practical strategies to address most classroom tech situations, how to scaffold these to learning, and where they provide the subtext to daily tech-infused education.
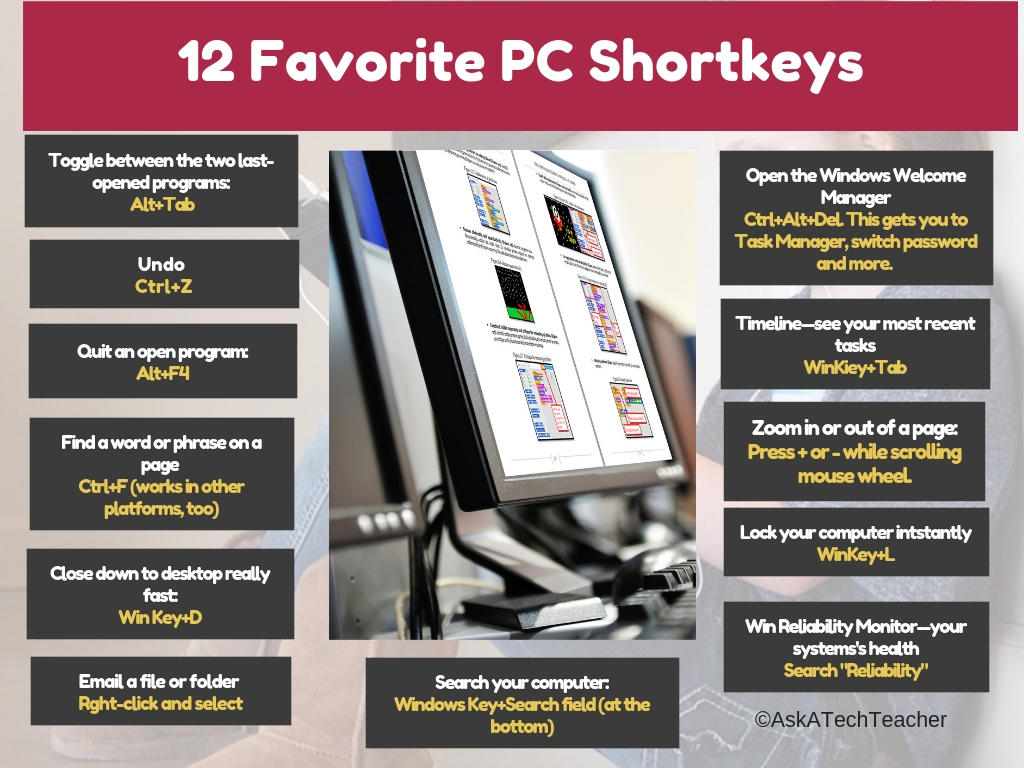
Today’s tip: Poster–Top 10 PC shortkeys
Category: PC, keyboarding
Here’s a poster with the ten most-popular PC shortkeys in my colleague’s classes:
Sign up for a new tip each week or buy the entire 169 Real-world Ways to Put Tech into Your Classroom.
What’s your favorite tech tip in your classroom? Share it in the comments below.
Jacqui Murray has been teaching K-18 technology for 30 years. She is the editor/author of over a hundred tech ed resources including a K-12 technology curriculum, K-8 keyboard curriculum, K-8 Digital Citizenship curriculum. She is an adjunct professor in tech ed, Master Teacher, webmaster for four blogs, an Amazon Vine Voice, CSTA presentation reviewer, freelance journalist on tech ed topics, contributor to NEA Today, and author of the tech thrillers, To Hunt a Sub and Twenty-four Days. You can find her resources at Structured Learning.
Tech Tip #16: What’s Today’s Date?
![]() In these 169 tech-centric situations, you get an overview of pedagogy—the tech topics most important to your teaching—as well as practical strategies to address most classroom tech situations, how to scaffold these to learning, and where they provide the subtext to daily tech-infused education.
In these 169 tech-centric situations, you get an overview of pedagogy—the tech topics most important to your teaching—as well as practical strategies to address most classroom tech situations, how to scaffold these to learning, and where they provide the subtext to daily tech-infused education.
Today’s tip: What’s Today’s Date?
Category: PC, MSO, Keyboarding
Q: I never remember the date. Is there a shortcut for people like me?
A: Push Shift+Alt+D. That puts the current date into any Word document (use Ctrl+; in Excel and Google Sheets).
Be aware: This inserted date will update every time you open the document. If you want the date to memorialize the document, skip the shortkey.
Other ways:
- Hover over the clock and it tells you the date.
- Start typing the date in a Word doc and Word finishes it for you.
Sign up for a new tip each week or buy the entire 169 Real-world Ways to Put Tech into Your Classroom.
What’s your favorite tech tip in your classroom? Share it in the comments below.
Jacqui Murray has been teaching K-18 technology for 30 years. She is the editor/author of over a hundred tech ed resources including a K-12 technology curriculum, K-8 keyboard curriculum, K-8 Digital Citizenship curriculum. She is an adjunct professor in tech ed, Master Teacher, webmaster for four blogs, an Amazon Vine Voice, CSTA presentation reviewer, freelance journalist on tech ed topics, and author of the tech thrillers, To Hunt a Sub and Twenty-four Days. You can find her resources at Structured Learning.
Tech Tip #159: Create a Macro
![]() In these 169 tech-centric situations, you get an overview of pedagogy—the tech topics most important to your teaching—as well as practical strategies to address most classroom tech situations, how to scaffold these to learning, and where they provide the subtext to daily tech-infused education.
In these 169 tech-centric situations, you get an overview of pedagogy—the tech topics most important to your teaching—as well as practical strategies to address most classroom tech situations, how to scaffold these to learning, and where they provide the subtext to daily tech-infused education.
Today’s tip: Create a Macro
Category: MSO, Problem-solving, Keyboarding
Here are basic steps for MS Word:
- Click View – Macros – Record Macros.
- Specify a name for the macro.
- Choose whether it should be a keyboard shortcut or a button.
- Once you click OK, your mouse becomes a cassette tape. Click all elements you would like to be part of your macro.
- Stop recording by clicking View – Stop Recording.
Here’s a video on how to create a macro in MS Word.
If you use Chromebooks, you can adjust what some keys do (such as the Search key can become the Caps Lock) through Settings. Additionally, there are several add-ons like iMacro that will help you create macros.
Google Apps call them ‘scripts’ and they’re popular. Alice Keeler has a starter-project you can find on her website.
Mac calls them ‘substitutions’. Use the System Preferences.
Sign up for a new tip each week or buy the entire 169 Real-world Ways to Put Tech into Your Classroom.
What’s your favorite tech tip in your classroom? Share it in the comments below.

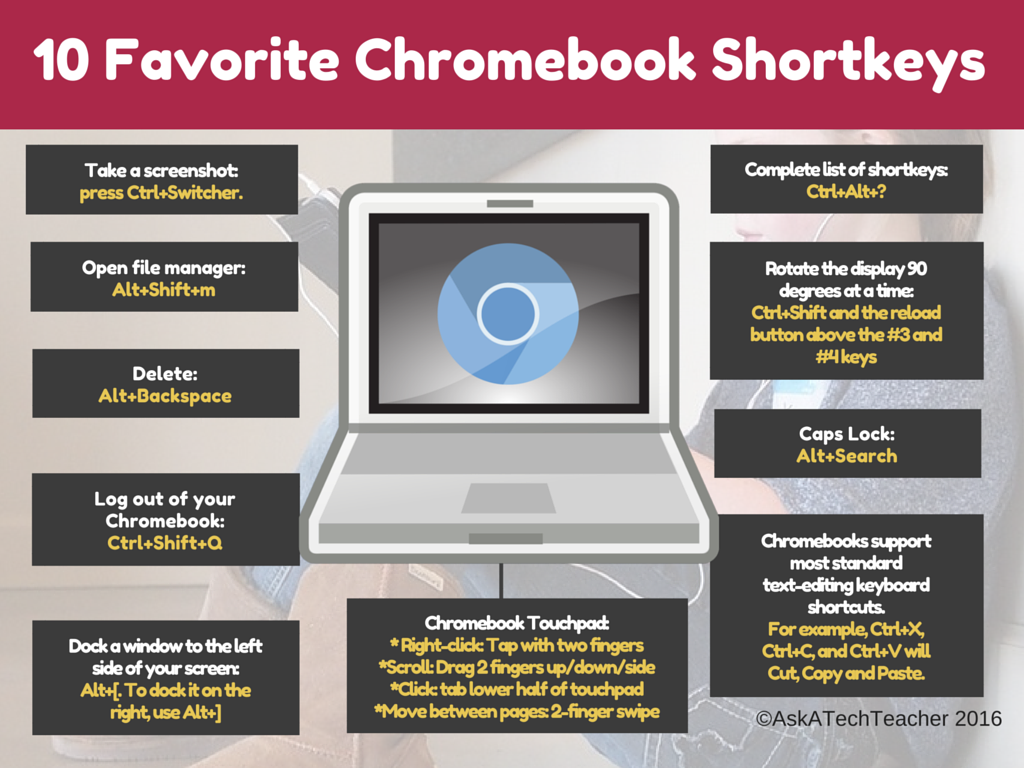
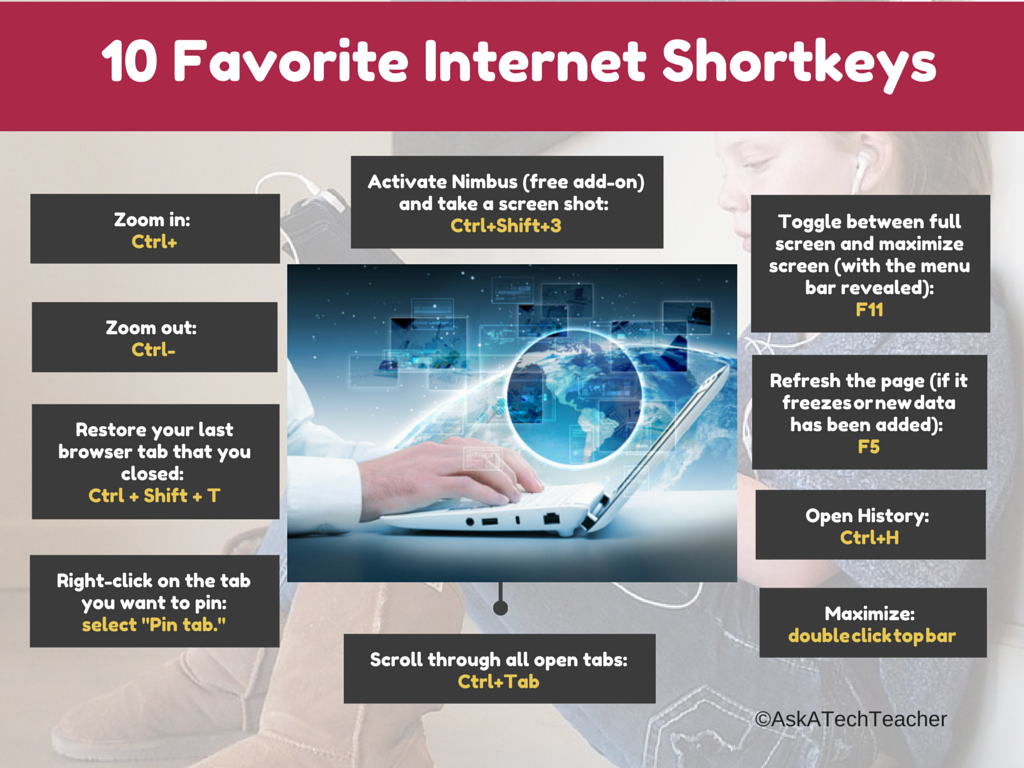
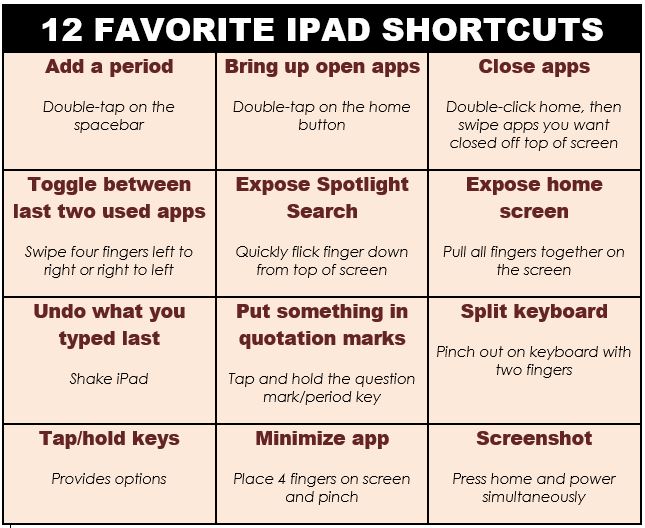
Long List of Shortkeys to Help Your Keyboarding
Here’s a great list of shortkey helps for keyboarding on the Internet, software, or anywhere else:

Tech Tip #72: Alt+??? Brings up which Command?
![]() In these 169 tech-centric situations, you get an overview of pedagogy—the tech topics most important to your teaching—as well as practical strategies to address most classroom tech situations, how to scaffold these to learning, and where they provide the subtext to daily tech-infused education.
In these 169 tech-centric situations, you get an overview of pedagogy—the tech topics most important to your teaching—as well as practical strategies to address most classroom tech situations, how to scaffold these to learning, and where they provide the subtext to daily tech-infused education.
Today’s tip: Alt+??? Brings up which Command?
Category: MS Office, Keyboarding
Q: I always forget the Alt keys for MS Word menu commands. Do you have a list?
A: I’ll do one better. In MS Office, push the Alt key and it tells you what number or letter is associated with which menu command.
To activate the shortcut, push Alt+ exposed letter or number. For example, for Redo, push Alt+3. That’s it.
Sign up for a new tip each week or buy the entire 169 Real-world Ways to Put Tech into Your Classroom.
What’s your favorite tech tip in your classroom? Share it in the comments below.


