Category: Google
169 Tech Tip #20: How to Add a Link to MS Word
 In these 169 tech-centric situations, you get an overview of pedagogy—the tech topics most important to your teaching—as well as practical strategies to address most classroom tech situations, how to scaffold these to learning, and where they provide the subtext to daily tech-infused education.
Today’s tip: #20–How to add a link to MS Word
Category: EDIT/FORMAT
Sub-category: MS Office, Google Apps, Keyboarding
Q: I want to link a resource in Word/Google Docs to a website. How do I do that?
A: Follow these easy steps:
- Go to the website you want to link to.
- Copy the address from the address bar (Ctrl+C or Edit>copy from the menus).
- Return to your doc (it’s waiting on the taskbar at the bottom of the screen or simply click Alt+Tab).
- Highlight the words you want to link to the website.
- Press Ctrl+K; press Ctrl+V; push enter.
- The words turns blue with a line under them, showing it’s a link.
- To use the link, Ctrl+click on the words.
There are sophisticated options that go along with adding links, but this is quick and easy.
Share this:
- Click to share on Facebook (Opens in new window) Facebook
- Click to share on X (Opens in new window) X
- Click to share on LinkedIn (Opens in new window) LinkedIn
- Click to share on Pinterest (Opens in new window) Pinterest
- Click to share on Telegram (Opens in new window) Telegram
- Click to email a link to a friend (Opens in new window) Email
- More
How to Use Google Apps
Here’s a collection of Ask a Tech Teacher articles addressing individual Google Apps:
This isn’t meant to be comprehensive. Yet. If your favorite Google App isn’t listed and you’d like me to review it, fill out the form below:
Share this:
- Click to share on Facebook (Opens in new window) Facebook
- Click to share on X (Opens in new window) X
- Click to share on LinkedIn (Opens in new window) LinkedIn
- Click to share on Pinterest (Opens in new window) Pinterest
- Click to share on Telegram (Opens in new window) Telegram
- Click to email a link to a friend (Opens in new window) Email
- More
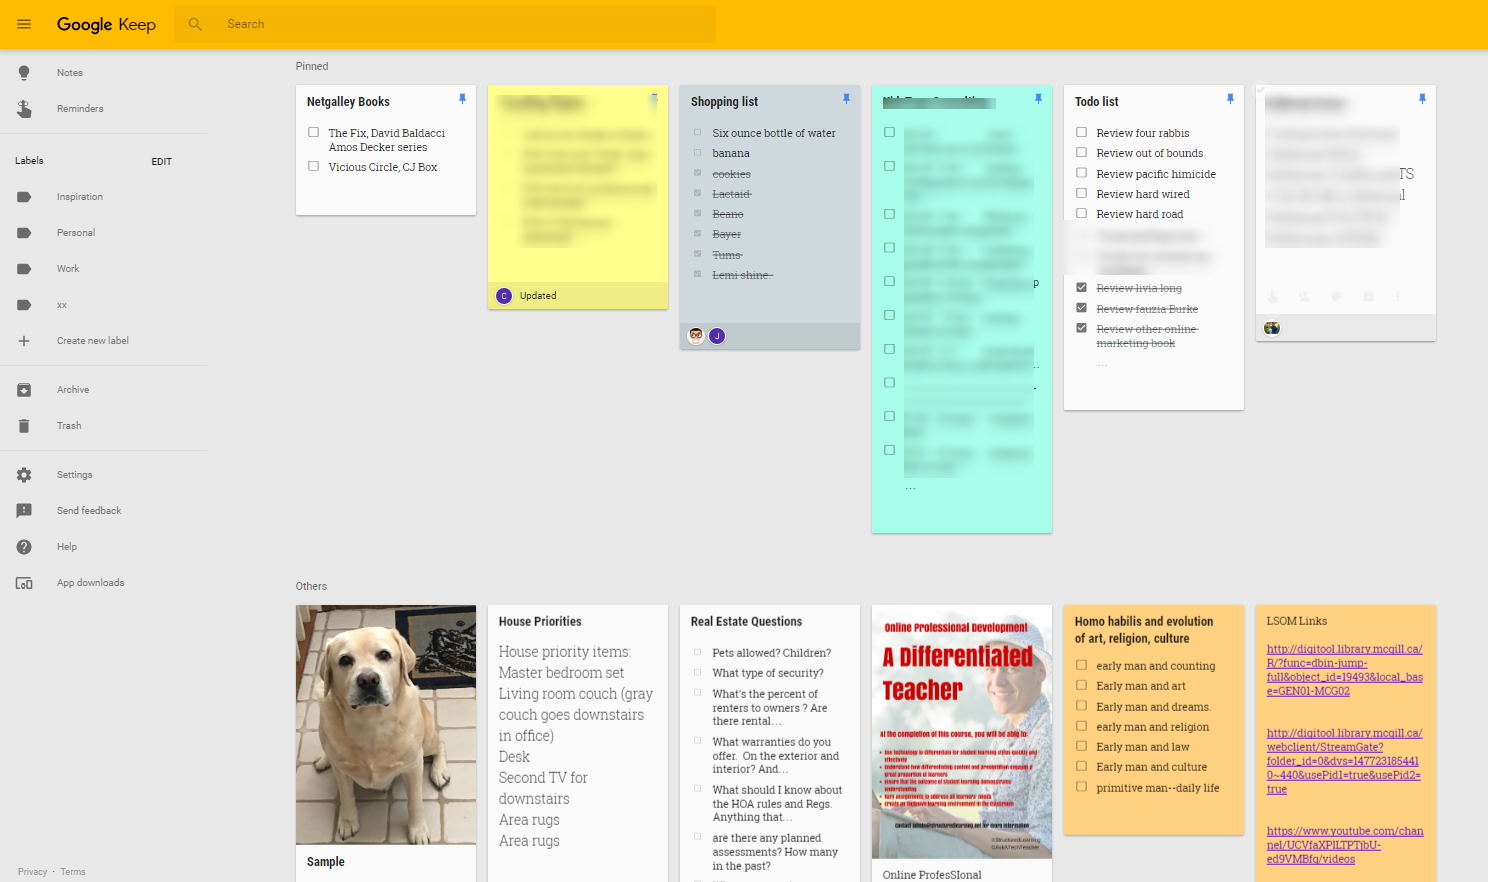
What is Google Keep and Why Use it in Your Classroom?
My daughter just bought her first house (though it went on hold several times as the Navy threatened/offered to move her). We wanted a simple way to share a ToDo list that would be available on phones, iPads, and computers, and would auto-update with our ideas. I looked at a variety of options, but found something wrong with each of them.
Until I found Google Keep. It is marketed as a note-taking app — which it is — but trades sophisticated note-taking tools (like formatting) for simplicity. It is similar to iPhone Notes, but with more options, more visual, syncs across all devices, and allows collaboration. You can add thoughts by typing or speaking (mobile devices only), as a narrative note or a bullet list, and include images from your collection, your camera roll, or by taking one with the native camera (mobile devices only). The title is auto-formatted to stand out from the rest of the note. You can organize notes by category or color, search for a particular note, pin the most important to the top, and re-arrange the collection by dragging-dropping. As in Google Reminders, you can set a location-based reminder to pull up your grocery list when you get to the store or a time-based reminder to make sure you never miss a parent conference.
It requires a Google account and — as with other Google Apps — the amount of space you get for saved notes depends upon your Google Drive size. It works on iOS, the web, Chrome (with an add-on), and Android.
Share this:
- Click to share on Facebook (Opens in new window) Facebook
- Click to share on X (Opens in new window) X
- Click to share on LinkedIn (Opens in new window) LinkedIn
- Click to share on Pinterest (Opens in new window) Pinterest
- Click to share on Telegram (Opens in new window) Telegram
- Click to email a link to a friend (Opens in new window) Email
- More
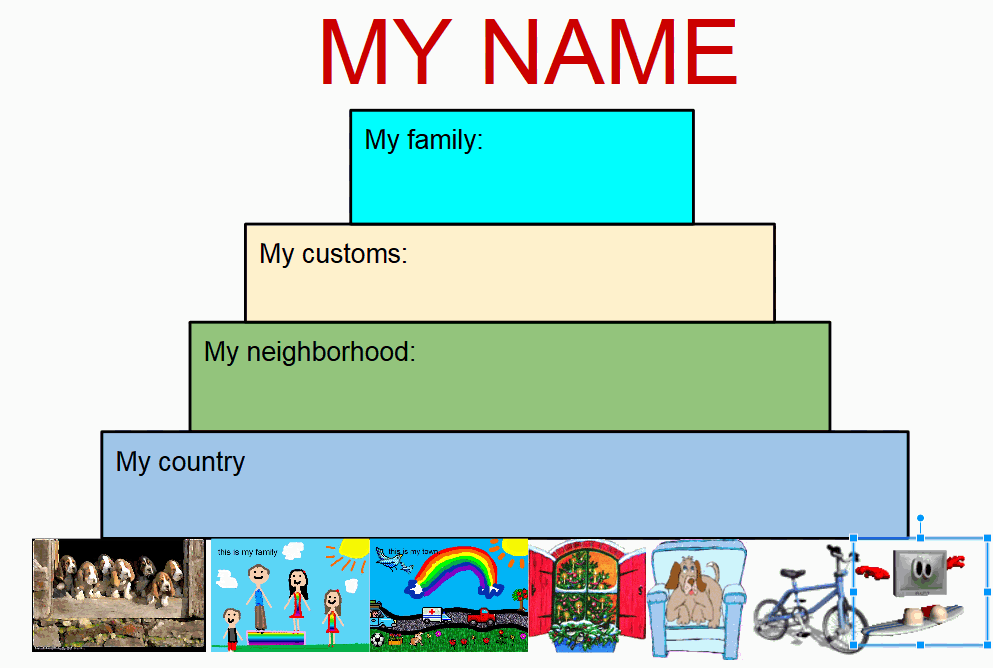
How to Use Google Drawings
 Google Drawings is a free, web-based drawing tool that allows users to collaborate and work together in real time to create flowcharts, organizational charts, website wireframes, mind maps, concept maps, drawings, and more. It is included in GAFE, Google Classroom, G Suite, and Google Drive (this may vary in managed domains, depending upon whether the administrator turns on access to this tool).
To use Google Drawing, here’s what you do:
- Open your Google Drive account; go to New and select Google Drawings.
- Insert shapes, lines, an image, or text with the editing tools.
- When finished, add this drawing to another Google Doc, slideshow, or spreadsheet, save it as a stand-alone file, and/or share it with others in a wide variety of methods.
There are a lot of drawing programs available — SumoPaint, KidPix, and TuxPaint to name a few. All wonderful in their own right. So why use Google Drawings instead of a tool you are already familiar with? Here are seven reasons:
- it’s collaborative
- projects are easily shared with teacher
- it can be used at home and school — and synced between the two locations
- it is minimalist — the project is easy to find in the student’s Google Drive (if they attend a Google school). No tracking it down and wondering, “What tool did I use to create this project?”
- changes or edits are easy to add — just open the project in Google Drive and edit
- project can be embedded into student digital portfolio or class gallery
- project can be downloaded as an image file, a vector graphic, or a PDF
Be aware: Each drawing program mentioned above may have some of these, but few have all. Except, of course, Google Drawings.
Here are eight projects that are perfect for Google Drawings:
Share this:
- Click to share on Facebook (Opens in new window) Facebook
- Click to share on X (Opens in new window) X
- Click to share on LinkedIn (Opens in new window) LinkedIn
- Click to share on Pinterest (Opens in new window) Pinterest
- Click to share on Telegram (Opens in new window) Telegram
- Click to email a link to a friend (Opens in new window) Email
- More
How Google Docs Improves Writing
 Google Docs is a free word processing program that does 99% of everything a student will ever need to do when writing. What isn’t included as part of the Google Docs program tool can be augmented with mostly free third-party add-ons, extensions, and apps. It operates in the cloud so there’re no download foibles, pesky maintenance, or expensive yearly upgrades. The end result is a learning tool that is powerful, robust, scalable, and because it’s free, is the equitable solution to so many concerns over education’s digital divide.
It’s no surprise that Google Docs and its sister programs — Google Spreadsheets, Google Slideshows, Google Draw, and Google Forms — have taken education by storm, usually in a package like Google Apps for Education (GAFE) or Google Classroom. While it does have a moderate learning curve (no worse than MS Word), once traveled, teachers quickly adopt it as their own and find many reasons why this has become their favorite tool. Here are the top eleven reasons from the educators I talk to:
Always up
I’ve never had the experience of logging into Google Drive (where Google Docs live) and having it not open. On the other hand, I have often experienced that heart-stopping occurrence with MS Word when it suddenly won’t work or a Word file has become corrupted for no reason I can tell. Using Google Docs has probably added years to my life just in the lowered stress levels.
Share this:
- Click to share on Facebook (Opens in new window) Facebook
- Click to share on X (Opens in new window) X
- Click to share on LinkedIn (Opens in new window) LinkedIn
- Click to share on Pinterest (Opens in new window) Pinterest
- Click to share on Telegram (Opens in new window) Telegram
- Click to email a link to a friend (Opens in new window) Email
- More
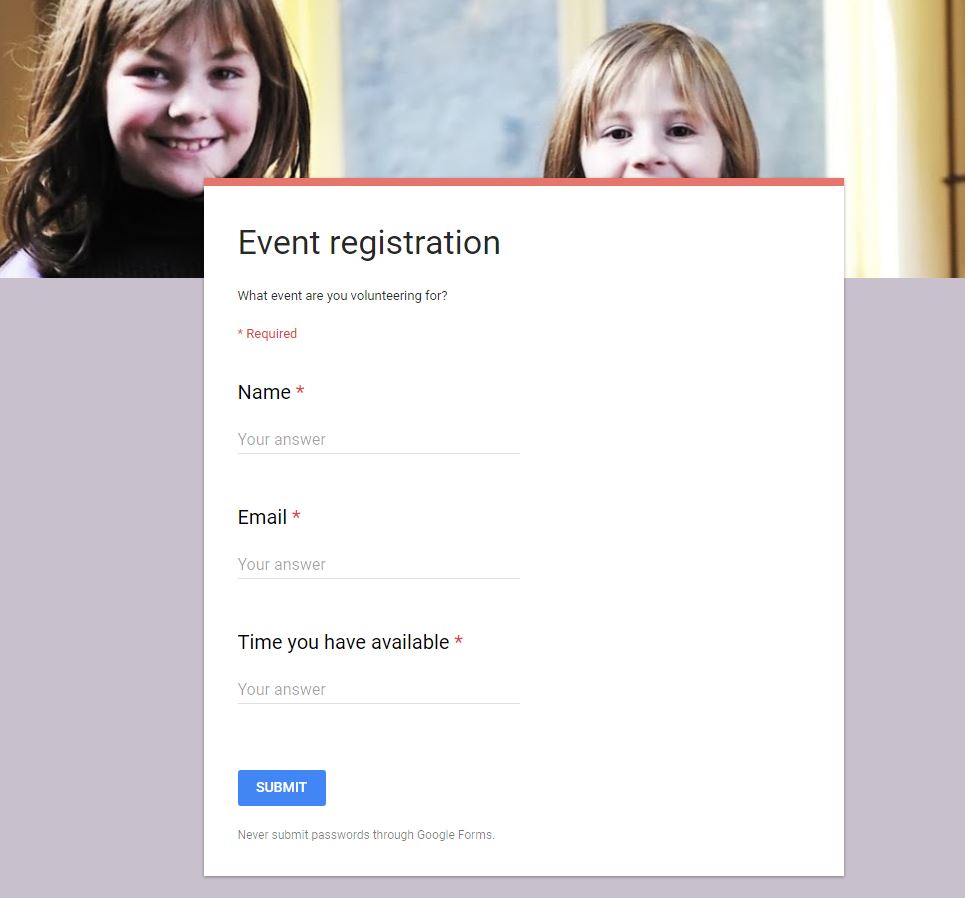
How to Use Google Forms in the Classroom
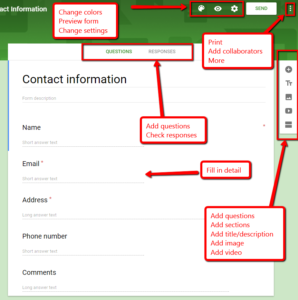 There are lots of free survey and polling sites (two popular options are PollDaddy and Survey Monkey), but often they limit the number of surveys you can create or how many questions you can include without ‘leveling up’ to a premium version. Among the teachers I know who are always looking for ways to save their limited pennies, Google Forms is a run-away favorite. It is intuitive, flexible, professional, can be adapted to school colors and images, and can be shared as a link or an embed. You can work alone or with colleagues and there are a wide variety of options that tweak the form to your needs.
Using available templates, a customized form can be completed in under five minutes. Responses are collected to a Google Spreadsheet that can be private or shared with participants and can be sorted and analyzed like any other spreadsheet.
Google Forms integrates well with Google Apps for Education, Google Classroom and many LMSs such as Blackboard.
How to use it
Google Forms is simple to use. Just follow these steps:
Share this:
- Click to share on Facebook (Opens in new window) Facebook
- Click to share on X (Opens in new window) X
- Click to share on LinkedIn (Opens in new window) LinkedIn
- Click to share on Pinterest (Opens in new window) Pinterest
- Click to share on Telegram (Opens in new window) Telegram
- Click to email a link to a friend (Opens in new window) Email
- More
9 Google Apps Tips You Don’t Want to Miss
 Here are the top 9 nine Google Apps tips according to Ask a Tech Teacher readers:
- Embed a File from Google Drive
- How to Embed Student Work into Digital Portfolios
- Book Review: Google Apps Meets Common Core
- Dear Otto: How do I teach Google Drive to K/1?
- Google Gravity
- Google Apps Support Bloom’s Taxonomy–Take a Look
Share this:
- Click to share on Facebook (Opens in new window) Facebook
- Click to share on X (Opens in new window) X
- Click to share on LinkedIn (Opens in new window) LinkedIn
- Click to share on Pinterest (Opens in new window) Pinterest
- Click to share on Telegram (Opens in new window) Telegram
- Click to email a link to a friend (Opens in new window) Email
- More
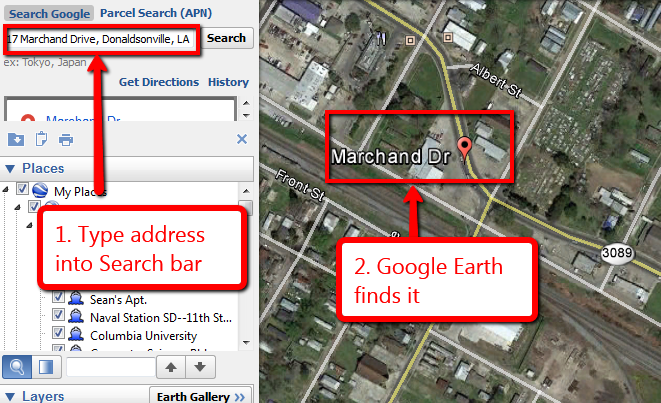
8 Google Earth Tips and Resources You Don’t Want to Miss
Here are eight of the top Google Earth tips and resources according to Ask a Tech Teacher readers:
- Monday Freebies #38: Introduction to Google Earth
- Google Earth: User-Friendly in the Classroom
- 5 Google Earth Lesson Plans
- Tech Tip #65: Google Street View
- Monday Freebies #39: Google Earth Board
- Monday Freebies #40: Wonders of Google Earth
- Lesson Plans: Where Did I Come From?
Share this:
- Click to share on Facebook (Opens in new window) Facebook
- Click to share on X (Opens in new window) X
- Click to share on LinkedIn (Opens in new window) LinkedIn
- Click to share on Pinterest (Opens in new window) Pinterest
- Click to share on Telegram (Opens in new window) Telegram
- Click to email a link to a friend (Opens in new window) Email
- More
Embed a File from Google Drive
As a working technology teacher, I get hundreds of questions from parents about their home computers, how to do stuff, how to solve problems. Each week, I’ll share one of those with you. They’re always brief and always focused. Enjoy!
Q: So many colleagues are embedding documents to their blogs and websites, but I don’t know how to do that. Can you help?
A: I love this part of Google Apps. When your Google document is complete–that includes Docs, Spreadsheets, Slides, and Drawings:
- Go to ‘Share’ in the upper right corner; select the option you prefer–allowing viewers to just view or edit
- Click File>Publish to the Web (on the menu bar)
- Select the link and copy-paste to your website (I’ve done this below) OR select Embed
- Copy the HTML code that starts with ‘<iframe…’
- Paste into blog, wiki, website like I did below:
Let’s try this out. Here’s a collaborative spreadsheet to share Exit Ticket ideas. Your name is optional. Strongly consider adding the linkback so we can add each other to our PLN–a great way to share ideas and knowledge. Access the spreadsheet and tell us your favorite warm-up activities and exit tickets:
Here’s the embedded document:
Share this:
- Click to share on Facebook (Opens in new window) Facebook
- Click to share on X (Opens in new window) X
- Click to share on LinkedIn (Opens in new window) LinkedIn
- Click to share on Pinterest (Opens in new window) Pinterest
- Click to share on Telegram (Opens in new window) Telegram
- Click to email a link to a friend (Opens in new window) Email
- More
Tech Tip #108: Got a Tech Problem? Google It!
 As a working technology teacher, I get hundreds of questions from parents about their home computers, how to do stuff, how to solve problems. Each Tuesday, I’ll share one of those with you. They’re always brief and always focused. Enjoy!
Q: Sometimes, I just can’t remember how to accomplish a task. Often, I know it’s simple. Maybe I’ve done it before–or even learned it before–and it’s lost in my brain. What do I do?
A: One of the best gifts I have for students and colleagues alike is how to solve this sort of problem. Before you call your IT guy, or the tech teacher, or dig through those emails where someone sent you the directions, here’s what you do:
Google it.
Share this:
- Click to share on Facebook (Opens in new window) Facebook
- Click to share on X (Opens in new window) X
- Click to share on LinkedIn (Opens in new window) LinkedIn
- Click to share on Pinterest (Opens in new window) Pinterest
- Click to share on Telegram (Opens in new window) Telegram
- Click to email a link to a friend (Opens in new window) Email
- More


