Author: Jacqui
169 Tech Tip #119–What to do when Computers are Down?
 In these 169 tech-centric situations, you get an overview of pedagogy—the tech topics most important to your teaching—as well as practical strategies to address most classroom tech situations, how to scaffold these to learning, and where they provide the subtext to daily tech-infused education.
Today’s tip: #119–What to do when Computers are Down?
Category: CLASSROOM MANAGEMENT
Sub-category: Problem-solving, teaching
Here are six suggestions:
- discuss digital citizenship
- build a digital citizen
- review computer hardware
- assess student knowledge with a blank keyboard quiz
- play Tech Challenge
- play a tech-themed Jeopardy
Share this:
- Click to share on Facebook (Opens in new window) Facebook
- Click to share on X (Opens in new window) X
- Click to share on LinkedIn (Opens in new window) LinkedIn
- Click to share on Pinterest (Opens in new window) Pinterest
- Click to share on Telegram (Opens in new window) Telegram
- Click to email a link to a friend (Opens in new window) Email
- More
13 Ways to Use Canva in Your Classroom
No one disagrees with the importance of the visual in communicating. The problem usually is creating it. Most teachers aren’t adept at matching colors, picking fonts and font sizes, and then laying everything out artistically. It’s much easier to use text with a few pictures tossed in and leave the artistry for the art teacher. When Microsoft Publisher came out over twenty-five years ago, it was the first major desktop publishing effort to blend layout, colors, and multimedia that was accessible to everyone. Unfortunately, it was (and continues to be) an expensive piece of software not traditionally included in Microsoft’s Office Suite (though that changed with Office 365). That meant MS Publisher skills learned at school were rarely transferrable to a home environment.
Canva changes that. It’s web-based (including apps available for iPads and Chromebooks) with a drag-and-drop functionality that makes the design process simple and intuitive. You can create professional presentations, posters, multi-page documents, marketing materials, social media graphics, and more (see the list below for education) using Canva’s more than 1 million photos, icons, and layouts, each with colors and fonts coordinated into attractive schema easily accessed by both beginners and reluctant designers. There’s no cost when using the thousands of free illustrations and images in the Canva library or uploading your own. For a small fee (usually $1.00), more than one million professional stock images and graphics can be used on a pay-per-use basis.
Educators: Visit Canva for Education to get how-tos, lesson plans, and teacher-oriented advice. One of my favorite features: Student designs can be shared, allowing teachers to view and add comments.
Once a template is selected, many projects can be completed in five minutes:
- edit text
- add relevant pictures
- save/publish
Here’s how it works:
- Sign in with your Google account or create a separate Canva account (must be 13 or over unless directly supervised by an adult).
- Select one of the over fifty-six categories such as presentations, posters, greeting cards, infographics, and cover pages.
- Select a category template that fits the project.
- Replace text and images.Optionally change colors, size, layering, and more.
- Save/publish/share.
- Extras include:
- themed elements
- more text
- more images
- your own uploaded images
If you have never designed graphically before, start with the free Design School with how-to instructions on many projects and skillsets. There’s even a pithy collection of lesson plans. Follow the directions for the project as you create your own.
Share this:
- Click to share on Facebook (Opens in new window) Facebook
- Click to share on X (Opens in new window) X
- Click to share on LinkedIn (Opens in new window) LinkedIn
- Click to share on Pinterest (Opens in new window) Pinterest
- Click to share on Telegram (Opens in new window) Telegram
- Click to email a link to a friend (Opens in new window) Email
- More
3 Augmented Reality Apps to Take Your Lessons to the Next Level
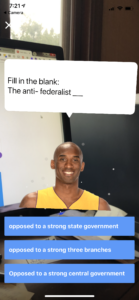 Ask a Tech Teacher guest blogger, Steven Wesley, has some great suggestions for using augmented reality:
Day by day, technology is becoming more and more present in our lives. As the time goes by, we tend to rely on technology more and more. A good example would be the kids nowadays. They are becoming tech-savvy from a very young age. Twenty years ago, kids were outside playing games from football to hide-and-seek, today’s kids are becoming too attached to their gadgets. They spend their time playing video games rather than hanging out with their friends.
Technology can be either a curse or a blessing, depending on how we use it. In good hands, it can be directed to the achievement of great purposes. Even so, if we use it in an unfavorable way, it can have a lot of malicious side effects.
Augmented reality is a technology that is gaining more and more popularity. Just remember what a huge hit Pokemon Go was this summer. Even though it’s a new technology, it doesn’t mean that it has to be very expensive. You don’t have to buy expensive glasses, you can just use your smartphone or a tablet for educational purposes.
Let’s take a look at three helpful reality apps. They can make your lessons exciting and beneficial for your students.
Elements 4D
This is a helpful app because it can combine two elements and create a new one. For example, you can take two triangles and transform them into a rhombus. This way, math teachers can help their students find out more about how different shapes are created.
Another advantage of the app is that it can help students learn mathematical formulas easily. People find it easier to understand a definition or a formula if they visualize it. In this case, the learning process can be drastically increased if an app like this is used during math classes.
Share this:
- Click to share on Facebook (Opens in new window) Facebook
- Click to share on X (Opens in new window) X
- Click to share on LinkedIn (Opens in new window) LinkedIn
- Click to share on Pinterest (Opens in new window) Pinterest
- Click to share on Telegram (Opens in new window) Telegram
- Click to email a link to a friend (Opens in new window) Email
- More
Touch Typing Basics from KidzType
Here’s a comprehensive infographic put together by KidzType. It covers lots of basics from touch typing rules to which-finger-which-key to one that is often forgotten when teaching keyboarding skills: pacing.
Share this:
- Click to share on Facebook (Opens in new window) Facebook
- Click to share on X (Opens in new window) X
- Click to share on LinkedIn (Opens in new window) LinkedIn
- Click to share on Pinterest (Opens in new window) Pinterest
- Click to share on Telegram (Opens in new window) Telegram
- Click to email a link to a friend (Opens in new window) Email
- More
Must-have Resources for Blended Learning
 Guest blogger, Emily Cleary, has some great ideas on some of her favorite must-have resources for today’s blended learning. She makes some great points about first, why blended learning is becoming so popular, and second, how to make that happen in your life:
Blended learning is becoming increasingly popular as institutions transition from classroom style learning to mixed media and online learning. Both schools and workplaces alike are accepting the shifting times, moving from traditional to technological resources and approaches. The best things about eLearning are likely the flexibility and accessibility that come with online instruction: People can learn about things they are interested in or need help with, at their own pace, on their own time, and from nearly anywhere in the world!
The Internet is a big place – so there are tons of options available when it comes to eLearning resources, and looking up explainer videos and DIY tutorials on YouTube is pretty much a given. The abundance of tools could understandably come off as a bit overwhelming, though. Luckily, some of the most effective elearning resources are listed by category below.
Share this:
- Click to share on Facebook (Opens in new window) Facebook
- Click to share on X (Opens in new window) X
- Click to share on LinkedIn (Opens in new window) LinkedIn
- Click to share on Pinterest (Opens in new window) Pinterest
- Click to share on Telegram (Opens in new window) Telegram
- Click to email a link to a friend (Opens in new window) Email
- More
How Tech is Part of my Education, Through the Eyes of a Student
 I had the pleasure of meeting Tyler, a fascinating and outgoing sophomore in Mitchell School District in Mitchell, South Dakota. He contacted me for help promoting his blog and I persuaded him to tell his story about the part technology has played in his education. I encourage all of you to read this, add your thoughts under comments, and then drop in on Tyler’s brand new blog to get him started.
Enjoy!
Hello, everyone. My name is Tyler Wright, and I am a sophomore in high school. My website is thewrightread.com, where I write book reviews over inspiring, nonfiction books. After you read this, feel free to take a look there. Just stopping by and reading one review helps me more than you would think.
Throughout all of my education, I have been exposed technology.
I was first “officially introduced” to computers shortly after learning how to read. In order to judge our reading comprehension, my classmates and I would take “AR tests” over the books we read. These tests were taken on the computer, and I never found them to be very challenging. The program itself was set up in a simple way that allowed elementary students to use them easily. Another way I used computers was through a program called “CCC,” I don’t remember what CCC stood for. Every week I would go into the computer room with my class, where we would learn at our own pace, on our own computers. Sitting in a dark room and staring at a computer for an hour wasn’t the easiest thing for a child that young, as I am sure you can imagine. There was one time, while I was in CCC, that I really had to go pee and my teacher didn’t believe me. That was the only time I wet myself in school.
Share this:
- Click to share on Facebook (Opens in new window) Facebook
- Click to share on X (Opens in new window) X
- Click to share on LinkedIn (Opens in new window) LinkedIn
- Click to share on Pinterest (Opens in new window) Pinterest
- Click to share on Telegram (Opens in new window) Telegram
- Click to email a link to a friend (Opens in new window) Email
- More
169 Tech Tip #117–How to Use an Internet Start Page
 In these 169 tech-centric situations, you get an overview of pedagogy—the tech topics most important to your teaching—as well as practical strategies to address most classroom tech situations, how to scaffold these to learning, and where they provide the subtext to daily tech-infused education.
Today’s tip: #117–How to Use an Internet Start Page
Category: CLASSROOM MANAGEMENT
Sub-category: Internet, Search/Research
Q: My students get distracted when they go on the internet by all the ads, bling, and websites that are not age-appropriate. What do I do?
When students open the internet, it should kick start their browsing experience, not leave them searching for a bookmark. As a teacher, you make this happen with what’s called an internet start page. It’s also your first line of defense in protecting students from the inherent dangers of using the internet because it focuses them on safe, age-appropriate sites that you have personally approved.
Share this:
- Click to share on Facebook (Opens in new window) Facebook
- Click to share on X (Opens in new window) X
- Click to share on LinkedIn (Opens in new window) LinkedIn
- Click to share on Pinterest (Opens in new window) Pinterest
- Click to share on Telegram (Opens in new window) Telegram
- Click to email a link to a friend (Opens in new window) Email
- More
What’s a Digipuzzle?
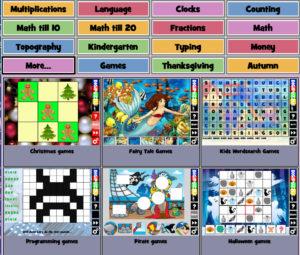 Netherlands-based Digipuzzle is an online educational resource that offers hundreds of G-rated learning games for younger audiences, many in both Spanish and English. Topics include math, animals, typing, geography, spelling, letter recognition, holidays, seasons, dinosaurs, USA, other games, and more. Many of these are divided into subcategories — for example: Math includes games and counting, fractions, addition, subtraction, and multiplication. Digipuzzle even offers holiday games. The site is easy to navigate, fun to use, and completely free. It is the labor of love from Marcel van de Wouw. It includes not only lots of themed puzzles, but Sudoku, line puzzles, search puzzles, dot-to-dot, tangrams, mosaics, and more.
You can use Digipuzzle on the web or as a mobile app.
Pros
Each game includes a sidebar with easy-to-understand icons that answer questions, access settings, and click you through available games.
Each game can be played at the level a student is comfortable — easy, normal, or hard — and can include audio or silent.
Share this:
- Click to share on Facebook (Opens in new window) Facebook
- Click to share on X (Opens in new window) X
- Click to share on LinkedIn (Opens in new window) LinkedIn
- Click to share on Pinterest (Opens in new window) Pinterest
- Click to share on Telegram (Opens in new window) Telegram
- Click to email a link to a friend (Opens in new window) Email
- More
169 Tech Tip #116–How to Take Screenshots
In these 169 tech-centric situations, you get an overview of pedagogy—the tech topics most important to your teaching—as well as practical strategies to address most classroom tech situations, how to scaffold these to learning, and where they provide the subtext to daily tech-infused education.
Today’s tip: #116–How to Take Screenshots
Category: CLASSROOM MANAGEMENT
Sub-category: Keyboarding, PC, Mac, iPad, Chromebook
Here are the screenshot shortkeys for five platforms:
- Windows: a tool included in Windows called the Snipping Tool
- Chromebooks: Ctrl+Window Switcher key
- Mac: Command Shift 3 for a full screenshot; Command Shift 4 for a partial screenshot
- Surface tablet: hold down volume and Windowsbutton
- iPad: hold Home button and power button simultaneously
There are also screenshot programs you can download like Jing and Printkey (the latter uses your keyboard’s Print Scr key) or use from your browser (like Nimbus or Snagit). Each has a different selection of annotation tools. You may find this works better for your needs.
Share this:
- Click to share on Facebook (Opens in new window) Facebook
- Click to share on X (Opens in new window) X
- Click to share on LinkedIn (Opens in new window) LinkedIn
- Click to share on Pinterest (Opens in new window) Pinterest
- Click to share on Telegram (Opens in new window) Telegram
- Click to email a link to a friend (Opens in new window) Email
- More
Edit and Share Videos Like a Rock Star
 The engine of learning is not always fueled by reading. In fact, knowledge is often acquired via audio, video, role-playing, and other approaches that address the varied learning styles of today’s students.
One communication method that has seriously grown up from even a generation ago is video. Where movies used to be considered babysitting — the activity of last resort for tired or unprepared teachers — that’s no longer true. Today, done well, they become real teaching tools that use optics to communicate ideas, unpack granular concepts, and connect students to information.
For many teachers, though, there’s the rub: How do they use this tool to agilely and effectively deliver content? Let’s start with five clever video edit/format tools:
EdPuzzle
Edit, quizzify, and add your voice to any video. Pick a video, personalize it for your group, add your voice, and then track student understanding. You can even include quizzes.
Share this:
- Click to share on Facebook (Opens in new window) Facebook
- Click to share on X (Opens in new window) X
- Click to share on LinkedIn (Opens in new window) LinkedIn
- Click to share on Pinterest (Opens in new window) Pinterest
- Click to share on Telegram (Opens in new window) Telegram
- Click to email a link to a friend (Opens in new window) Email
- More


