Weekend Website #105: Voki
Every Friday, I’ll send you a wonderful website (or more) that my classes and my parents love. I think you’ll find they’ll be a favorite of your students as they are of mine.
[caption id="attachment_9354" align="aligncenter" width="614"] Create talking avatars to assist teaching[/caption]
Share this:
- Click to share on Facebook (Opens in new window) Facebook
- Click to share on X (Opens in new window) X
- Click to share on LinkedIn (Opens in new window) LinkedIn
- Click to share on Pinterest (Opens in new window) Pinterest
- Click to share on Telegram (Opens in new window) Telegram
- Click to email a link to a friend (Opens in new window) Email
- More
Back to School–Tech Makes it Easy to Stay On Top of Everything
 If you’re sending your child back to school, technology can be intimidating. Should your elementary-age child have a computer? If so, what should you buy? And how do you keep it safe?
Here’s what I tell my K-5 parents about how to handle the stress of equipping the 21st century tech kid:
By third grade, children need a computer. Here’s why:
- There’s a good chance your child’s class has a website. All of my school’s classes from kindergarten up do. On those webpages, teachers list what happened during class, homework, resources, extensions, expectations and more. You’ll want to access those to stay up to date.
- It’s hard for you as a parent to keep in touch with all the ancillary teachers your child sees during the day AS WELL AS the classroom teacher. I’m talking about the art teacher, the PE teacher, language B teacher, technology teacher. A good way is to access their school webpages. My profile at school links to my class technology page. All of our Specials (the teachers who cover subjects outside of the classroom) have their own webpages. This is likely true in your school, too.
- A lot of teachers choose to communicate with parents via blogs or twitter. Here’s my professional blog. It’s a great way to casually keep parents and students up to date on class activities. I have one at school, too, but non-students are locked out of it.
- Much classwork integrates information from the internet. If your child is excited about something shown in class, s/he’ll want to revisit at home. That’s as simple as an internet connection and the website (probably posted on the class webpage). In tech class, students have a class internet start page that track everything done in class for follow-up at home. All are accessible from one location on my class webpage to make it easier on parents and students. (more…)
Share this:
- Click to share on Facebook (Opens in new window) Facebook
- Click to share on X (Opens in new window) X
- Click to share on LinkedIn (Opens in new window) LinkedIn
- Click to share on Pinterest (Opens in new window) Pinterest
- Click to share on Telegram (Opens in new window) Telegram
- Click to email a link to a friend (Opens in new window) Email
- More
Tech Tip #102: Doc Saved Over? No Problem
As a working technology teacher, I get hundreds of questions from parents about their home computers, how to do stuff, how to solve problems. Each Tuesday, I’ll share one of those with you. They’re always brief and always focused. Enjoy!
Q: My youngers constantly save a blank document over their MS Word file. How? Instead of ‘file>open’, they use the menu command ‘file>save-as’ and then they lose all their work. Is there any way to retrieve the file?
A: Absolutely. I just found out about this recently. Bring the student’s file folder in Windows Explorer (I’m using Win 7). Right click on the file name for the lost Word file and select ‘Restore previous version’. Select the latest version that’s not today.
Every time I do this, I’m a hero for ten minutes.
Share this:
- Click to share on Facebook (Opens in new window) Facebook
- Click to share on X (Opens in new window) X
- Click to share on LinkedIn (Opens in new window) LinkedIn
- Click to share on Pinterest (Opens in new window) Pinterest
- Click to share on Telegram (Opens in new window) Telegram
- Click to email a link to a friend (Opens in new window) Email
- More
Dear Otto: My computers are old. What do I do?
 Dear Otto is an occasional column where I answer questions I get from readers about teaching tech. If you have a question, please complete the form below and I’ll answer it here. For your privacy, I use only first names.
Here’s a great question I got from Laurie:
There are a lot of teachers trying to keep up with tech ed changes despite older labs and computer set-ups. Some are lucky with 1:1 set-ups and classroom iPads, but lots of teachers make do with what they have.
Like you, I don’t have a smartscreen. Our IT guys attached my computer to a screen (probably like your Epson) so I can display samples and rubrics, and I have Splashtop on my iPad so I can get back to my screen from anywhere in the classroom (albeit, it’s a bit clunky) so that-all helps. I have students come up to the screen and point or share–a way to involve them more in the lessons. At times, I let them use my computer–when I flip the class and have them teaching a skill. This is quite popular.
Share this:
- Click to share on Facebook (Opens in new window) Facebook
- Click to share on X (Opens in new window) X
- Click to share on LinkedIn (Opens in new window) LinkedIn
- Click to share on Pinterest (Opens in new window) Pinterest
- Click to share on Telegram (Opens in new window) Telegram
- Click to email a link to a friend (Opens in new window) Email
- More
Tech Tip #28: 5 Ways to Fix a No-Sound Problem–For Free
 for K-8[/caption]
As a working technology teacher, I get hundreds of questions from parents about their home computers, how to do stuff, how to solve problems. Each Tuesday, I’ll share one of those with you. They’re always brief and always focused. Enjoy!
Q: I can’t get any sound out of my computer. Do I need a new sound card?
A: Before you invest that kind of money, try these easy fixes:
- Are headphones plugged in?
- Is the volume turned up?
- Are speakers plugged in? This is my personal favorite. About once a year, this happens to me. The solution is exacerbated because I can’t reach the back of my CPU (the tower) to check the plugs. Can’t being a relative word, because I do finally do so and my problem is fixed!
- Is the sound muted? Check the icon on the systray, or the collection of icons in the lower right corner of your monitor.
- Are the speakers broken? Plug in a set of speakers that you know work. Does that fix it?
Share this:
- Click to share on Facebook (Opens in new window) Facebook
- Click to share on X (Opens in new window) X
- Click to share on LinkedIn (Opens in new window) LinkedIn
- Click to share on Pinterest (Opens in new window) Pinterest
- Click to share on Telegram (Opens in new window) Telegram
- Click to email a link to a friend (Opens in new window) Email
- More
Weekend Website #104: Animoto
Every Friday, I share a website (or app) that I’ve heard about, checked into, gotten excited to use. I hope you enjoy it as much as I do.
[caption id="attachment_8326" align="aligncenter" width="614"]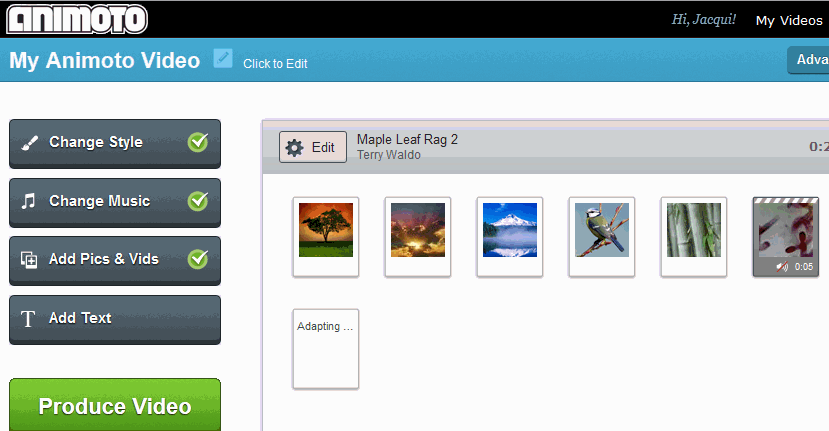 Animoto–create a video in a minute (if you’re in a hurry) or take your time to make it perfect. Either way, it’s easy.[/caption]
Share this:
- Click to share on Facebook (Opens in new window) Facebook
- Click to share on X (Opens in new window) X
- Click to share on LinkedIn (Opens in new window) LinkedIn
- Click to share on Pinterest (Opens in new window) Pinterest
- Click to share on Telegram (Opens in new window) Telegram
- Click to email a link to a friend (Opens in new window) Email
- More
Subscribe to my Blog–Get Special Gifts Every Month
 Free or discounted–both are great[/caption]
If you subscribe to my blog, you are eligible for specials on tech ed books and ebooks every month. Here are some of the specials subscribers have received:
- 5 for $25 on tech themed bundles
- Discount of 98 Tech Tips
- Free 19 Posters
Click for this month’s special.
Jacqui Murray has been teaching K-18 technology for 30 years. She is the editor/author of over a hundred tech ed resources including a K-12 technology curriculum, K-8 keyboard curriculum, K-8 Digital Citizenship curriculum. She is an adjunct professor in tech ed, Master Teacher, webmaster for four blogs, an Amazon Vine Voice, CSTA presentation reviewer, freelance journalist on tech ed topics, contributor to NEA Today, and author of the tech thrillers, To Hunt a Sub and Twenty-four Days. You can find her resources at Structured Learning.
Share this:
- Click to share on Facebook (Opens in new window) Facebook
- Click to share on X (Opens in new window) X
- Click to share on LinkedIn (Opens in new window) LinkedIn
- Click to share on Pinterest (Opens in new window) Pinterest
- Click to share on Telegram (Opens in new window) Telegram
- Click to email a link to a friend (Opens in new window) Email
- More
Book Review: 19 Posters to Decorate Your Technology Lab
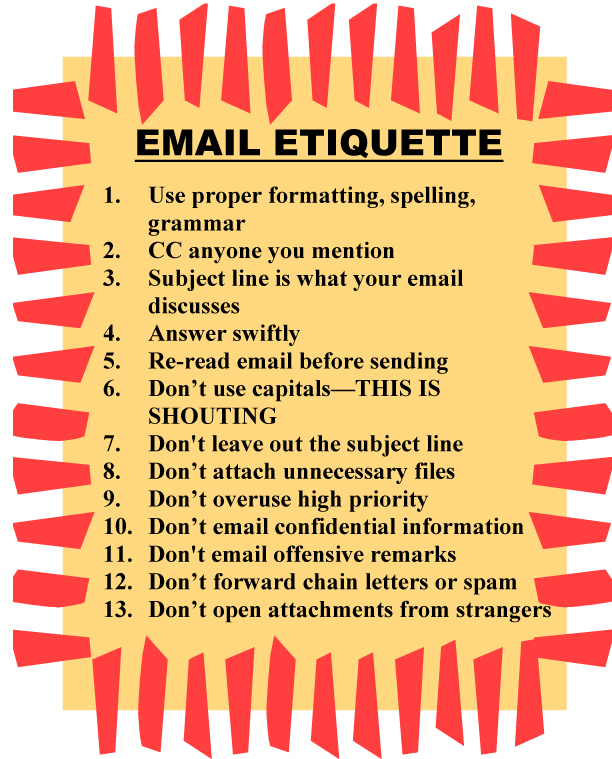
19 posters to Decorate Your Technology Lab is for new and experienced tech teachers to remind students of the basics of computer use. It includes keyboard tips, website usage, mouse control, how to solve common problems, parts of the computer, email netiquette, how to search, volunteer guidelines and more. As a Bonus: There’s a sample structure for a 45-minute tech class.
This is a must-have for new teachers, a time-saver for everyone.
Share this:
- Click to share on Facebook (Opens in new window) Facebook
- Click to share on X (Opens in new window) X
- Click to share on LinkedIn (Opens in new window) LinkedIn
- Click to share on Pinterest (Opens in new window) Pinterest
- Click to share on Telegram (Opens in new window) Telegram
- Click to email a link to a friend (Opens in new window) Email
- More
Tech Tip #27: My Taskbar Disappeared
As a working technology teacher, I get hundreds of questions from parents about their home computers, how to do stuff, how to solve problems. Each Tuesday, I’ll share one of those with you. They’re always brief and always focused. Enjoy!
Q: My taskbar disappeared. What do I do?
A: Push the flying windows key (it’s located between Ctrl and Alt on the bottom left of your keyboard). That brings up the start button
It might have disappeared because its properties got reset to Autohide. Here’s what you do to fix that:
- Hover over the area where the toolbar normally lives.
- If it appears, right click on it and select Properties
- Go to the tab that says Taskbar
- Make sure the box that says Autohide toolbar isn’t checked.
What if the toolbar doesn’t appear when you hover over it? That means it got minimized to the bottom edge of your screen. Here’s what you do:
Share this:
- Click to share on Facebook (Opens in new window) Facebook
- Click to share on X (Opens in new window) X
- Click to share on LinkedIn (Opens in new window) LinkedIn
- Click to share on Pinterest (Opens in new window) Pinterest
- Click to share on Telegram (Opens in new window) Telegram
- Click to email a link to a friend (Opens in new window) Email
- More
Dear Otto: What About Carmen San Diego?
Dear Otto is an occasional column where I answer questions I get from readers about teaching tech. If you have a question, please complete the form below and I’ll answer it here. For your privacy, I use only first names.
Here’s a great question I got from Dawn:
We have upgraded our Computer Lab computers to Windows 7, some programs are now obsolete since they were DOS and will not run with 7. Carmen San Diego is one we used for Geography. Some teachers are sad we can’t use that anymore – the students did enjoy it. Do you know of anything our that can take its place? Thanks for your time!
I know what you mean. We tried to run it at my school–spent too much time tweaking everything–and never succeeded. I’ve had to toss it.
There are a few geography games you can look into:
- Geography games–National Geographic
- Geography—geonet game (from Houghton Mifflin)
- Geography Games II
They’re OK, but not as good as CSD. I’ll post your comment–see if anyone has any other ideas.
Share this:
- Click to share on Facebook (Opens in new window) Facebook
- Click to share on X (Opens in new window) X
- Click to share on LinkedIn (Opens in new window) LinkedIn
- Click to share on Pinterest (Opens in new window) Pinterest
- Click to share on Telegram (Opens in new window) Telegram
- Click to email a link to a friend (Opens in new window) Email
- More

