 When I teach professional development classes, by far the topic that surprises teachers the most is the legal use of online images. And they’re not alone. On my blog, in educator forums, and in the virtual meetings I moderate, there’s lots of confusion about what can be grabbed for free from online sites and what must be cited with a linkback, credit, author’s name, public domain reference, or even as little as an email from the creator giving you permission. When I receive guest posts that include pictures, many contributors tell me the photo can be used because they include the linkback.
Not always true. In fact, the answer to the question…
“What online images can I use?”
typically starts with…
It depends…
Luckily, teaching it to K-8 students is simpler because most of them haven’t yet established the bad habits or misinformation we as adults operate under. But, to try to teach this topic in a thirty-minute set-aside dug out of the daily class inquiry is a prescription for failure. The only way to communicate the proper use of online images is exactly the way you teach kids not to take items from a store shelves just because they think they can get away with it: Say it often, in different ways, with the buy-in of stakeholders, and with logical consequence. Discuss online images with students every time it comes up in their online activities.
There are five topics to be reviewed when exploring the use of online images:
- digital privacy
- copyrights
- digital law and plagiarism
- hoaxes
- writing with graphics
Here are suggestions on how to teach these to your students.
Plagiarism
Discuss plagiarism. What are the repercussions of ‘plagiarism’? When must you credit material found online? In general terms, you must cite sources for:
- facts not commonly known or accepted
- exact words and/or unique phrase
- reprints of diagrams, illustrations, charts, pictures, or other visual materials
- opinions that support research
Watch and discuss the online life of a photo posted by an unknowing student.
Digital privacy
Have a discussion about privacy on the Internet—how rare it is in a world where people post everything they do onto Facebook, Twitter, and blogs. Watch and discuss 6 Degrees of Information. This video reinforces how easy is it to find out about anyone by following the crumbs left during their online surfing. Next, watch Eduardo post pictures he considers innocent in Two Kinds of Stupid. Expand your discussion by watching and then discussing this video on Online Reputations.
With this background, discuss the use of avatars to protect online privacy. If students have online accounts (through blogs, Twitter, or a class website), have them create an avatar for their profile. Here’s a list of great avatar-creation sites.
Wrap up with a discussion on the impact of hacking on privacy. Talk with students about how kids ‘hack’ game codes. Should they do it? Is it a victimless crime? What issues should they consider? What is the difference between ‘hacking’ and ‘cracking’?
Copyrights
If you chatted about copyright legalities in prior years, ask students what they remember from those conversations. Discuss ‘Copyright Explained’. Copyrights range from public domain—creative work that can be used without permission or notification—to intensely private— available only to view, on the host website. Share an anonymous research project (maybe one completed by students in a different class) that innocently broke the law. What are the consequences of infringing on copyrights?
Some images are licensed under Creative Commons, but many have more restrictive licenses. What does that mean? What is the legal way to use an online image?
Review copyright law with this rephrasing (for older students, discuss the original law through this link):
The law states that works of art created in the U.S. after January 1, 1978, are automatically protected by copyright once they are fixed in a tangible medium (like the Internet) BUT a single copy may be used for scholarly research (even if that’s a 2nd grade life cycle report) or in teaching or preparation to teach a class.
Discuss the meaning of ‘Fair Use’. It provides rights to use images for education purposes without obtaining permission from the creator. How does ‘fair use’ apply to your academic research? Or students? Watch and discuss A Fair(y) Use Tale. Watch and discuss Wanna Work Together about Creative Commons licensing that encourages the sharing of creative work.
Make sure you introduce these domain-specific terms:
- Attribution
- Non-derivative works
- Share alike
- Non-commercial
Show students how to adjust the Google search engine to provide only images in the public domain. The screenshot below shows how to find this option:
Take time to access the following image sites that provide mostly public domain images:
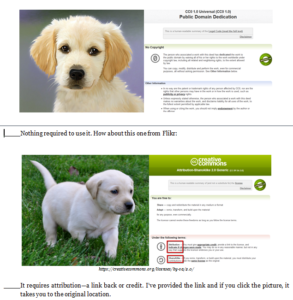
Next, show students how to track an image back to its source and find the copyright protections invariably listed on the pages. This is often time-intensive, but necessary: Never assume an image is available freely to use. If students can’t find the copyright notice, pick a different image. Here are two examples:
The bottom one requires attribution—a linkback or credit. I’ve provided the linkback here: https://www.flickr.com/photos/crazymandi/.
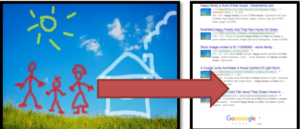
If you have a student in the school who has their own photography or art website, grab one of their personal creative works (with permission) and drop it into either Images.google.com or Tineye.com to see where it has been used online. The figure below on the left was drawn by a student and posted to her/his public website to share with family and friends. Without her/his knowledge, it was used forty-seven times, not always in places s/he or her/his parents would approve.
Ask students how they would feel if someone stole their artwork and posted it online? What if they made ugly comments about it? What if they made money off of it? Suggest that the student adds a copyright notice to her/his website, announcing that all media contained on the website is protected by copyright laws and cannot be used without permission.
Here’s a general collection of websites addressing copyrights and digital law:
- Copyright and Fair Use
- Copyright Law Explained
- Copyright law curriculum
- Creative Commons
- Take the mystery out of copyrights–by the Library of Congress
- Videos on licensing, copyrights, more
Hoaxes
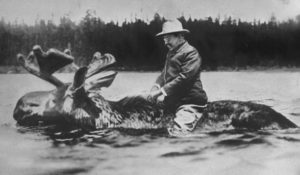
Students want to believe that anything they find online is legitimate — like the adage: It must be true because “I read it in the newspaper”. Discuss how easy it is to fake a picture with programs like Photoshop. Look at this picture of President Roosevelt crossing a river on a moose. How many students think it’s true?
It’s no surprise photos are not accepted as proof in court.
Listen to ‘War of the Worlds’. Discuss how this story confused fiction with reality if listeners missed the first ten minutes.
Make-your-own Graphics
A great solution to worrying about the legality of online images is to create your own. Students can use software such as KidPix, Paint, Photoshop, and GIMP, or an image creation tool like:
- BigHugeLabs
- Graffiti Creator
- Mondrimat
- Mutapic
- Photoshop app (on iPads)
- Psychopaint
- Scribbler
- Tessellate!
If these don’t work for you, use a tool from this list of websites or apps.
A note: Links die. If you click one of the links above, it’s probably because it is no longer supported. Try a different one.
***
Spread these topics throughout the year and circle back on them every time they come up during regular classwork. Before the year is out, students will understand the do’s and don’ts of image copyrights and accept them as the normal actions of a good digital citizen.
–published first on TeachHUB
More on digital citizenship:
Lesson plan for Image Copyright Do’s and Don’ts
K-8 Digital Citizenship Curriculum
120+ Digital Citizenship Links on 22 Topics
Jacqui Murray has been teaching K-18 technology for 30 years. She is the editor/author of over a hundred tech ed resources including a K-12 technology curriculum, K-8 keyboard curriculum, K-8 Digital Citizenship curriculum. She is an adjunct professor in tech ed, Master Teacher, webmaster for four blogs, an Amazon Vine Voice, CSTA presentation reviewer, freelance journalist on tech ed topics, contributor to NEA Today, and author of the tech thrillers, To Hunt a Sub and Twenty-four Days. You can find her resources at Structured Learning.











This and excellent and informative article! Very helpful. Thanks for the post!
Thanks so much!
Thanks, Jacqui! I credit my photos, but I’m never sure I’ve credited correctly. I would hate to be accused of plagiarism. I’ve been plagiarized and I resented it.
I gave up and now purchase most of the photos I use on my blogs. I do find public domain images occasionally, but sometimes they’re mislabeled. It’s all so complicated.
Great info and such an important topic for the students to grasp, thanks for sharing, but…. how do you do this step: “Next, show students how to track an image back to its source and find the copyright protections invariably listed on the pages.” It seems to me that google image search and tineye tell you where an image has been used, but how do you find the original copyright info? Thanks!
Hi Amy
You’re right about Google Images and Tineye–they only help you find where an image has been used, not it’s copyright protections. Finding usage rights for images on websites isn’t always easy, but must be done. It’s nice when sites like Flikr have an obvious link that spells out the rights (which in their case, almost always requires a linkback and credit). Creative Commons also has a nice visual badge that helps students understand the rights and restrictions of material on a website.
To test the difficulty of finding image guidelines, I went to National Geographic to see if their image guidelines would be front-and-center on the site (after all, they are known for their amazing photography). It took me five minutes of browsing to find this:
“The Service is owned by National Geographic. All of the content featured or displayed on the Service, including, but not limited to, still images, text, pictorial works, video images, still images of video, graphic designs, audio recordings, multimedia combinations, and computer programs, including web-based programs (“Content”) is owned or licensed by National Geographic. ”
I found it under ‘Terms of Service’, but it clearly states that all images are copyrighted. This blog article has two other ways these copyrights are shared.
Site copyright guidelines can vary broadly between free-to-use to always-contact-us (and we’ll probably charge you). Share keywords students might look for on the site (copyrights, image usage, licensing, ‘all rights reserved’, ‘privacy policy’, ‘terms and conditions’, ‘intellectual property’, and ‘terms of service’). Decode the legalize so students know what they’re looking for.
If students can find the image use guidelines, they shouldn’t use the image.
Students can–of course–use any online image under the authority of ‘fair use’–a one-time license for educational purposes. But don’t rely on that with students. Remind them they can’t take these image-use skills home to make birthday cards for family and friends using online images. That is no longer an ‘educational use’ and is illegal.
Here’s a 12-minute video I created on how to verify licensing.
Let me know if you have any questions. This is an important issue, worthy of sufficient time with students to discuss.
Great information. If students want to use a purchased stock image how would they need to credit that back to the photo site? For example, they want to use an image from Adobe Stock. The FAQ is fairly vague and basically says to add the copyright, but it doesn’t give a specific example. After digging around, I found in a forum the basic way they want it is © [Photographer’s name] / Adobe Stock, but is that supposed to go in an image credit embedded in the image, or does it need to be under the image?
Adobe Stock images are purchased with a standard license (usually) which gives you the right to use the images non-commercially (with limitations) without attribution. So, if students had an Adobe Stock account, they wouldn’t have to provide attribution. If you want to teach students about attribution (great idea), then the approach you’ve mentioned is fine. Or, go through a site like EasyBib and use their suggestions for images. An important lesson students will learn with Adobe Stock images is that the watermarked copyright means someone owns it and isn’t willing to give it away for free.
Thank you so much!