Category: Art

Creative Fabrica–the Perfect Solution for Teachers, Creators, and Anyone In a Hurry

I–like many teachers–do a lot of prep for my teaching, often requiring digital desktop publishing platforms. Between newsletters for parents, announcements on social media, communications for students and parents, and more, it became a challenge to demonstrate the excitement and engagement of learning through what could be boring tools.
Then I got an email from the folks at Creative Fabrica. My norm with these sorts of solicitations (I get about a dozen a week) is give the website ten seconds to grab me or lose me. With Creative Fabrica–I was sold faster. How had I never seen this amazing website? It seemed to hold the answer to so many of my daily tasks, offering quick professional, clean communication that save time. 
 What is it
Creative Fabrica is a digital marketplace out of Amsterdam that offers a wide range of creative resources for designers, crafters, creators, and to my specific area of interest–teachers. They offer over 9 million products from 50,000 designers besides what users design themselves. Users can access fonts, graphics, SVG files, 3D, tools, bundles, embroidery designs, mockups, teacher resources, and more for various creative projects.
[gallery type="square" ids="68685,68686,68687"]
You can pay ala carte for individual items or sign up for a monthly/yearly subscription and download unlimited items. Additionally, the platform features tutorials and community forums to support and inspire creators.

#9: How to Look Like a Photoshop Pro–in Fifth Grade

Before trying this lesson, start with Photoshop for Fifth Graders: The First Step is Word, Autofixes, cloning, and cropping. Don’t worry. It’s not hard–just the basics.
Ready? Let’s start with what Adobe Photoshop is–a grown-up KidPix, and the default photo-editing program for anyone serious about graphics. This series of projects (available in 55 Technology Projects for the Digital Classroom Volume I) introduces students to a traditionally-challenging program in an easy to understand way, each scaffolding to the next, thus avoiding the frustration and confusion inherent in most Photoshop training.
Adobe Photoshop has an impressive collection of tools to add pizazz to pics. You might have students open their school picture for this project. They love working with their own image.
- #1: Artistic Renderings—artistic overlays that add flair to pictures. Go to Filter—artistic and it brings up dozens of choices. Try some (it gives a preview of the result) and select a favorite.
[gallery columns="2" ids="68588,68589"]
- #2: blur and smudge tools on left tool bar to soften the background, and sharpen a focal point.
- #3: Use Filter-render-clouds to create a cloudy background (the colors of your foreground and background tool)
Troubleshooting Tips
- I can’t get the right colors for the clouds (check your foreground and background tools. That’s where Photoshop takes the colors)
- I’m trying to drag the picture but I get an error message (Check your layers. Do the have the correct layer highlighted?)
- I don’t have Photoshop. (Try GIMP–it’s free)
Do you have questions? Please add a comment and I’ll answer. Thanks.

Here’s the sign-up link if the image above doesn’t work:
https://forms.aweber.com/form/07/1910174607.htm
Copyright ©2024 worddreams.wordpress.com – All rights reserved.
“The content presented in this blog is the result of my creative imagination and not intended for use, reproduction, or incorporation into any artificial intelligence training or machine learning systems without prior written consent from the author.”
Jacqui Murray has been teaching K-18 technology for 30 years. She is the editor/author of over a hundred tech ed resources including a K-12 technology curriculum, K-8 keyboard curriculum, K-8 Digital Citizenship curriculum. She is an adjunct professor in tech ed, Master Teacher, webmaster for four blogs, CSTA presentation reviewer, freelance journalist on tech ed topics, contributor to NEA Today, and author of the tech thrillers, To Hunt a Sub and Twenty-four Days. You can find her resources at Structured Learning.

#12: Create Simple Shapes in Excel

What’s the first thing you think of when I say, Excel? Numbers, right–turning data into information. That is Excel’s ‘killer app’, but the ingenious human brain has come up with another striking use for Excel: Drawing. I spent a long time trying to find a lesson that taught drawing in Excel, finally gave up and created my own” (more…)

#16: A Holiday Memory in Word or KidPix

Use this not only to create a gift for parents, but to practice writing skills, grammar, MS Word’s spell check. I have student compose the memory one week and we format it the next. For beginning writers, use KidPix and its text tools. 
 –from 55 Technology Projects for the Digital Classroom (more…)

ASCII Art–Computer Art for Everyone
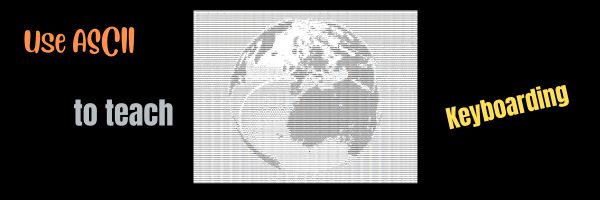
ASCII art is text-based visual art that uses ASCII characters to create images. It is a fun and effective way to teach keyboarding because it requires students use a variety of different keys, including the symbols.
Here’s a pumpkin I did for Halloween in about fifteen minutes:


8 Online Resources for Animation

Here are eight online resources for quick animations. For updates on this list, click here:
- Animate with Krita–free Photoshop-like program for animation (see video below)
- Animation and 3D Templates from MS
- Brush Ninja–free and no registration required
- ChatterPix–make anything talk
- Draw and Tell–for K-2
- PowerPoint–a video showing how to create animations in PowerPoint
- Puppet Pals HD (free app)–Create your own unique shows with animation and audio in real time
- Wick Editor–free, open source, to create games, animations, and more
If you’re not familiar with creating animations, here’s a longish video on using one popular program:

12 Online Resources About 3D Printing

Here are popular online resources to teach about 3D Printing (click here for updates on links):
- 3D Bear
- Cricut Machine–to cut materials
Create 3D Printing Designs
- 3D Doodler Pen
- MakerBot PrintShop
- Onshape
- SculptGL
- Sketchup
- Tinkercad–create your own 3D print designs
Download 3D Printing designs
- GrabCad
- Smithsonian X3D–download 3D print designs of Smithosonian artifacts
- Thingiverse–download lots of 3D designs, like an iPhone case
- Youmagine–find 3D print designs
–image credit Deposit Photos
Here’s the sign-up link if the image above doesn’t work:
Jacqui Murray has been teaching K-18 technology for 30 years. She is the editor/author of over a hundred tech ed resources including a K-12 technology curriculum, K-8 keyboard curriculum, K-8 Digital Citizenship curriculum. She is an adjunct professor in tech ed, Master Teacher, webmaster for four blogs, an Amazon Vine Voice, CSTA presentation reviewer, freelance journalist on tech ed topics, contributor to NEA Today, and author of the tech thrillers, To Hunt a Sub and Twenty-four Days. You can find her resources at Structured Learning.

#6: Photoshop for Fifth Graders–Auto-fixes
Before starting on Photoshop lessons for fifth grade and up, teach preparatory basics covered in this lesson plan here (reprinted in part below). If you have a newer version of Photoshop, adapt these instructions to yours:

Open Photoshop. Notice the tool bars at the top. These will change depending upon the tool you choose from the left side. These are the crux of Photoshop. We cover about ten of them in fifth grade. The right-hand tools are used independent of the left-hand tools. They are more project oriented.
-
- Click the File Browser tool (top right-ish). It shows you the folders on your computer. From here, you can select the picture you’d like to edit (or use File-open)
- Select a picture and notice how it displays all data—file name, size, date created, author, copyright and more
- Click on several tools on the left side and see how the top menu bar changes, offering different choices. Go to Help. Have students view several of the ‘How To’ wizards available. Make sure they try ‘How to paint and draw’, ‘How to print photos’, ‘How to save for other applications’. Then have them select the ‘Help’ files. This takes them to the Adobe CS website and exposes a vast database of questions and answers. Encourage them to explore, engage their critical thinking and active learning skills. Remind them this is where they can find answers independent of teacher assistance.
- Open a picture of the student’s choice. Show class how to zoom in and out (right-side toolbar). Explain pixels.
Show students how they can take the paint brush and color just one pixel if they are close enough. This is
how experts remove ‘red eye’ in photos. - Introduce the History toolbar (right side) as an undo feature (like Ctrl+Z in Word). Have students open a new blank canvas and draw on it. Now use the history tool to toggle between the canvas before and after drawing on it by clicking between the original picture and the last action taken (at the bottom of the History list).
- Have students click through several tools on the left tool bar and show them how the top toolbar changes,
depending upon the tool selected. - Watch the layers tools. You can only paint on the highlighted layer. Notice that the top layer covers all others
- Show students how to save. The default is as a Photoshop file with a .psd extension. This won’t open in other programs, so show students how to change the file type format to a .jpg, .bmp, .tif or other for use in Word, Publisher, emails or a website.

Once students are comfortable with the Photoshop format, try these easy-to-do auto-fixes.
Auto-fixes is one of the easiest Photoshop skills. Depending upon your version of Photoshop, this may be found in different spots on the menu lists. If you’re familiar with your program, you’ll find it right away:

#32: How to Use Art to Teach Grammar

Here’s a great lesson that uses every child’s innate love of color to learn grammar. All you need is MS Word or Google Docs), a quick introduction to the toolbars and tools, and about 25 minutes to complete. If you’re the tech lab teacher, this gives you a chance to reinforce the grammar lesson the classroom is teaching and teach tech skills students need (click to enlarge):
[caption id="attachment_1026" align="aligncenter" width="450"] From Structured Learning’s Tech Lab Toolkit Volume I[/caption]


Photoshop Basics
Before teaching Lesson Plans using Photoshop, be sure to cover the basics with students:
Open Photoshop. Notice the tool bars at the top. These will change depending upon the tool you choose from the left side. These are the crux of Photoshop. We’ll cover about ten of them in fifth grade. The rest will have to wait. The right-hand tools are used independent of the left-hand tools. They are more project oriented.
- Click the File Browser tool (top right-ish). It shows you the folders on your computer. From here, you can select the picture you’d like to edit (or use File-open) (more…)