Category: 5th Grade

Easy Photo Editing in MS Word

Before teaching students Photoshop (or GIMP), acclimate them to photo editing with a program they are likely comfortable with: MS Word. For basic image editing, Word’s pallet of tools do a pretty good job (Note: Depending upon your version of Word, some of these tools may not be available; adapt to your version):
- Open a blank document in MS Word. Insert a picture with multiple focal points (see samples). (more…)

#6: Photoshop for Fifth Graders–Auto-fixes
Before starting on Photoshop lessons for fifth grade and up, teach preparatory basics covered in this lesson plan here (reprinted in part below). If you have a newer version of Photoshop, adapt these instructions to yours:

Open Photoshop. Notice the tool bars at the top. These will change depending upon the tool you choose from the left side. These are the crux of Photoshop. We cover about ten of them in fifth grade. The right-hand tools are used independent of the left-hand tools. They are more project oriented.
-
- Click the File Browser tool (top right-ish). It shows you the folders on your computer. From here, you can select the picture you’d like to edit (or use File-open)
- Select a picture and notice how it displays all data—file name, size, date created, author, copyright and more
- Click on several tools on the left side and see how the top menu bar changes, offering different choices. Go to Help. Have students view several of the ‘How To’ wizards available. Make sure they try ‘How to paint and draw’, ‘How to print photos’, ‘How to save for other applications’. Then have them select the ‘Help’ files. This takes them to the Adobe CS website and exposes a vast database of questions and answers. Encourage them to explore, engage their critical thinking and active learning skills. Remind them this is where they can find answers independent of teacher assistance.
- Open a picture of the student’s choice. Show class how to zoom in and out (right-side toolbar). Explain pixels.
Show students how they can take the paint brush and color just one pixel if they are close enough. This is
how experts remove ‘red eye’ in photos. - Introduce the History toolbar (right side) as an undo feature (like Ctrl+Z in Word). Have students open a new blank canvas and draw on it. Now use the history tool to toggle between the canvas before and after drawing on it by clicking between the original picture and the last action taken (at the bottom of the History list).
- Have students click through several tools on the left tool bar and show them how the top toolbar changes,
depending upon the tool selected. - Watch the layers tools. You can only paint on the highlighted layer. Notice that the top layer covers all others
- Show students how to save. The default is as a Photoshop file with a .psd extension. This won’t open in other programs, so show students how to change the file type format to a .jpg, .bmp, .tif or other for use in Word, Publisher, emails or a website.

Once students are comfortable with the Photoshop format, try these easy-to-do auto-fixes.
Auto-fixes is one of the easiest Photoshop skills. Depending upon your version of Photoshop, this may be found in different spots on the menu lists. If you’re familiar with your program, you’ll find it right away:

Lesson Plan #32: Color my Grammar
In this lesson plan, students type several sentences in a word processing program like MS Word. Use the font color palette to label parts of speech, i.e., blue for subject, red for verb. Use sentences from a book they’re reading in class, spelling words they’re working on, or a teacher hand-out. This makes grammar fun.


#75: Tessellations in Excel
Tessellations are repetitive patterns of shapes that cover a surface without overlapping. With Excel (or another spreadsheet program), you can create tessellations by arranging shapes in a grid and using formulas and formatting options to make the patterns visually appealing. Here’s a step-by-step lesson plan to use Excel or another spreadsheet program to teach tessellations:
(more…)

#3: Make Your Own Wallpaper

Kids love personalizing their computer stations. Show them how to create their own wallpaper using internet pictures, pictures on the computer, or their own photos or drawings (more…)

Are you as Tech-Smart as a Fifth Grader?

I taught technology to kindergarten through eighth graders for almost fifteen years (now I teach grad school classes). Parents and colleagues were constantly amazed that I could get the littlest learners to pay attention, remember, and have fun with the tech skills required to grow into competent, enthusiastic examples of the digital generation.
I have a confession to make: It’s not as hard as it looks. Sure, those first few kindergarten months, when they don’t know what the words enter and backspace mean, and don’t understand why they can’t grab their neighbor’s headphones or bang on their keyboard, I do rethink my chosen field. But that passes. By January, every parent tour that passes through my classroom thinks I’m a magician.
What’s my secret? I teach every child to be a problem solver. If their computer doesn’t work, I have them fix it (what’s wrong with it? What did you do last time? Have you tried…?) If they can’t remember how to do something, I prod them (Think back to the instructions. What did you do last week? See that tool—does that look like it would help?) I insist they learn those geek words that are tech terminology (There’s no such thing as earphones. Do you mean headphones? I don’t understand when you point. Do you mean the cursor?) No matter how many hands are waving in my face, I do not take a student’s mouse in my hand and do for them, nor will I allow parent helpers to do this (that is a bigger challenge than the students. Parents are used to doing-for. They think I’m mean when I won’t—until they’ve spent a class period walking my floorboards.). I guide students to an answer. I am patient even when I don’t feel it inside. My goal is process, not product. (more…)

When is Typing Faster Than Handwriting?

Most elementary-age students struggle with typing. This doesn’t surprise me. They’ve been handwriting since kindergarten. They’re proud of their new cursive skills. It’s easy to grab a pencil. Typing requires setting up their posture, hand position, trying to remember where all those pesky keys are (why aren’t they just alphabetized? Discuss that with students).
In third grade, we chat about why they learn to keyboard when they can already handwrite–faster. The discussion eventually ends up with a comparison of handwriting and keyboarding: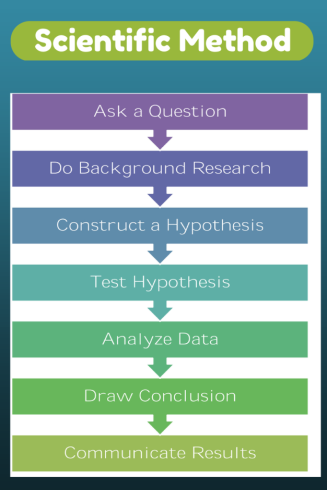
- Discuss whether students handwrite faster/slower than they type. You are likely to get opinions on both sides of this discussion. If not, prod students with logic for both.
- When it’s clear the class is divided on this subject (or not–that’s fine too), run an experiment to see which is faster—handwriting or typing.
- Circle back to science class and engage in a discussion on the Scientific Method. Develop a hypothesis for this class research, something like: Third grade students in Mr. X’s class can handwrite faster than they type (this is the most common opinion in my classes).
- Have students hand-copy the typing quiz they took earlier in the trimester for 3 minutes.
- Analyze the results: Compare their handwriting speed to their typing speed. I encourage an individual comparison as well as a class average comparison to help with understanding the conclusion.
- Discuss results: Why do students think some students typed faster and others typed slower? (In my classes, third graders typed approx. 10 wpm and handwrote approx. 15 wpm. Discussion was heated and enthusiastic on reasons. Especially valuable were the thoughts of those rare students who typed faster).
- Students will offer lots of reasons for slower typing (they’re new to typing, don’t do it much in class, their hands got off on the keyboard). In truth, the logistics of typing make it the hands-down winner once key placement is secured. Fingers on a keyboard are significantly faster than the moving pencil.
- One reason students suggest is that they don’t usually type from copy. Key in on this reason (quite valid, I think—don’t you?) and revise the experiment to have students type and handwrite from a prompt.
- What is the final conclusion?
- If possible, share results from 4-8th. What grade level do students consistently type faster than they handwrite? Why? Are students surprised by the answer?
- Post a list on the wall of students who type faster than they handwrite. This surprises everyone.
Tech Tip #34: My Program Froze

As a working technology teacher, I get hundreds of questions from parents about their home computers, how to do stuff, how to solve problems. Each Tuesday, I’ll share one of those with you. They’re always brief and always focused. Enjoy!
Q: I’m writing a very (very) important paper and all of a sudden, the screen froze. I can’t save it, or anything else. What do I do?
A: Programs do freeze for no reason sometimes, but not often (I’m assuming you take care of your computer–don’t download with abandon, update it occasionally). Before you declare a dog-ate-my-homework sort of catastrophe, try this: (more…)

Human Body Websites for 2nd-5th Grade

In my school, 2nd grade and 5th grade have units on the human body. To satisfy their different maturities, I’ve developed two lists of websites to complement this inquiry. I put them on the class internet start page so when students have free time, they can visit (check here for updates):
2nd-3rd Grade
[caption id="attachment_5364" align="alignright" width="212"] Place organs where they belong[/caption]
- Blood Flow
- Body Systems
- Build a Skeleton
- Can you place these parts in the correct place?
- Choose the systems you want to see.
- Find My Body Parts
- How the Body Works
- Human Body Games
- Human Body websites
- Human Body—by a 2nd grade class—video
- Human Body—videos on how body parts work
- Inside the Human Body: Grades 1-3
- Kids’ Health-My Body
- Matching Senses
- Muscles Game
- Nutrition Music and Games from Dole (more…)

#72: Check Your Math in Excel
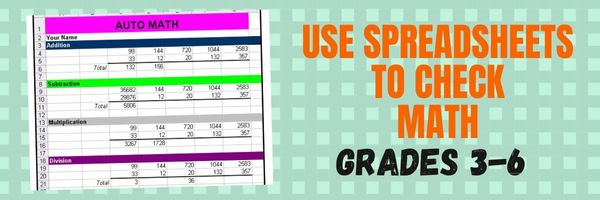
This is one of the most popular lessons I teach to Excel beginners. It is relevant, instantly usable and makes sense from the beginning. Click the images below to enlarge them for viewing.
[gallery columns="2" ids="45219,45218"]–from 55 Technology Projects for the Digital Classroom
Copyright ©2023 usna.wordpress.com – All rights reserved.
Jacqui Murray has been teaching K-18 technology for 30 years. She is the editor/author of over a hundred tech ed resources including a K-12 technology curriculum, K-8 keyboard curriculum, K-8 Digital Citizenship curriculum. She is an adjunct professor in tech ed, Master Teacher, webmaster for four blogs, an Amazon Vine Voice, CSTA presentation reviewer, freelance journalist on tech ed topics, and author of the tech thrillers, To Hunt a Sub and Twenty-four Days. You can find her resources at Structured Learning.